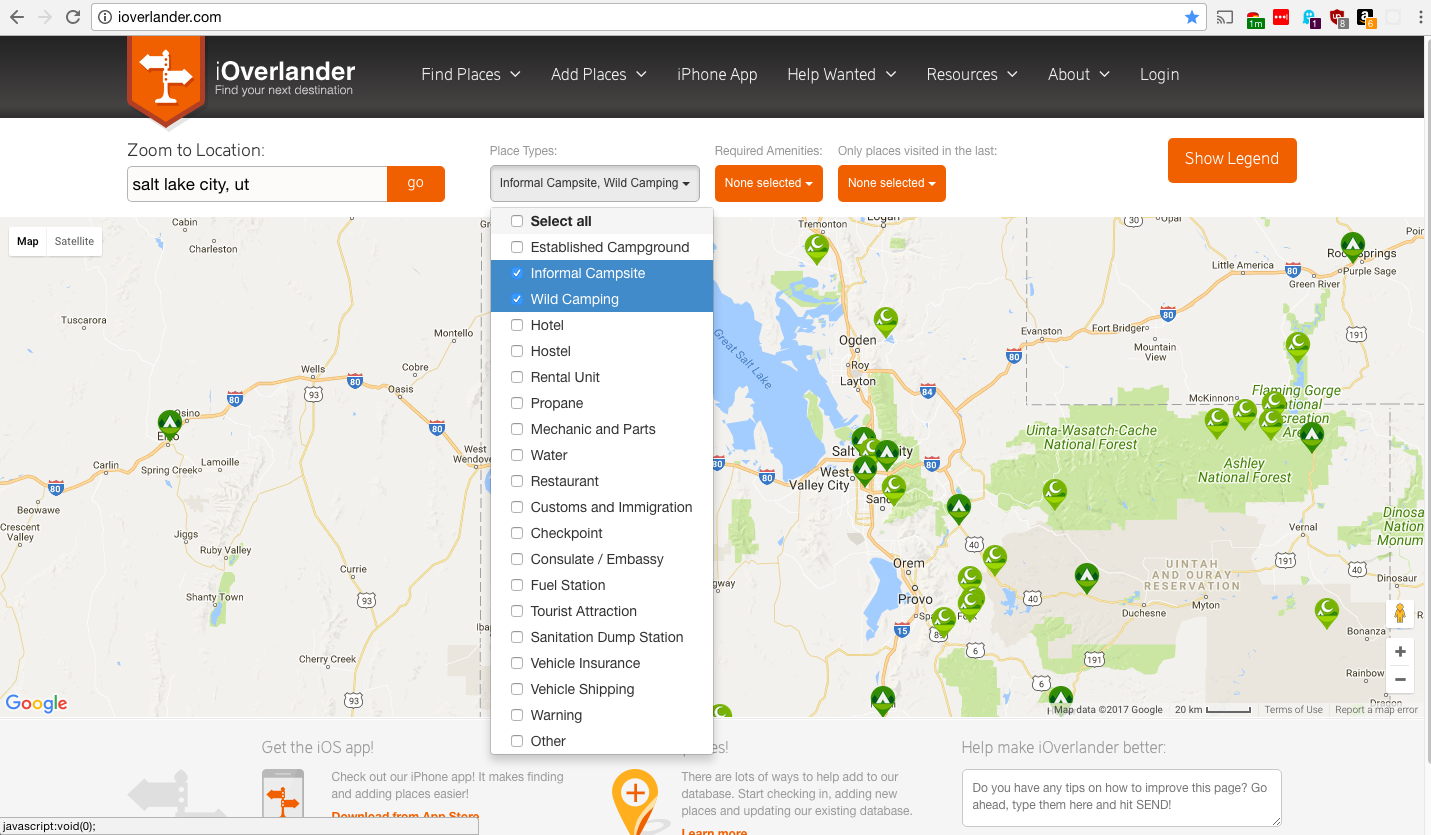
I’m always on the lookout for tools to help me find free campsites. Websites I currently consult before going on a trip include FreeCampsites.net, Campendium, and Hipcamp. I recently found a new one to add to the rotation, and it’s called iOverlander. (There are Android and iOS apps too.)
I live in Utah and have extensive camping experience in the state, so whenever I come across one of these new websites or apps, I immediately go to Utah and see if there are any camping areas I don’t already know about. It turns out that iOverlander had several. I then looked down into Arizona and southern California (other areas I’m pretty familiar with) and found still more campsites I wasn’t aware of. In my opinion, iOverlander is the second best of the above mentioned campsite websites after FreeCampsites.net. (I’ve found that the other two websites, Campendium and Hipcamp, have campsites that are usually covered on FreeCampsites.net.)
You can filter the camps by type of camping (I usually turn all of them off except for “wild camping” and “informal campsites”) and by amenities you’re looking for (being able to find a paid campground with a shower, for example, could mean that you won’t need to pay for a shower at a recreation center or truck stop).
Head on over to iOverlander and take a look at the camping areas near you or that you’re familiar with. Did you find any campsites you didn’t already know about?
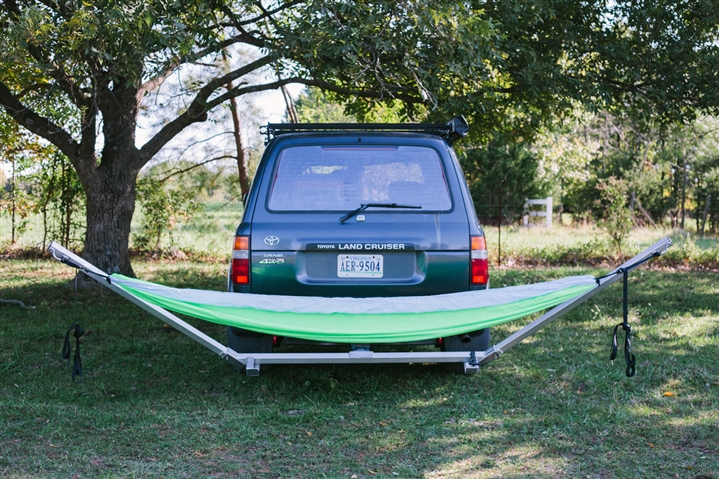
I know that not everyone is into hammocking when they’re out traveling and camping in their SUVs, but I highly recommend it. I think it provides an unparalleled relaxation experience. One thing I’ve been fascinated with lately is the idea of being able to hang a hammock without trees, and one way to do that is to get a hitch-mounted hammock stand for the back of your SUV, truck, car, etc.
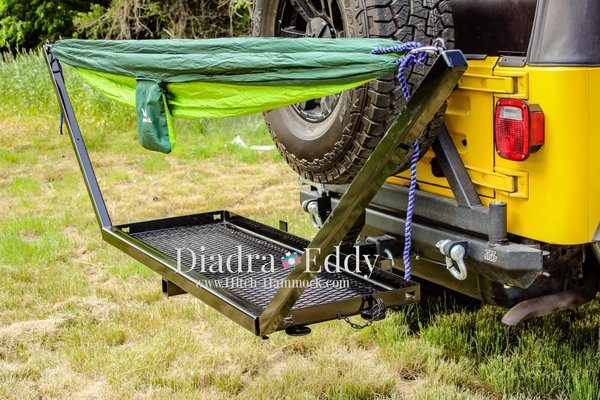
I’ve linked to the Blue Ridge Overland Gear Hitchhiker ($290 plus $33 shipping) hammock stand before, but I’ve recently come across a few more hitch-mounted hammock stands and wanted to share them in case anyone else is as weirdly interested in these things as I am:
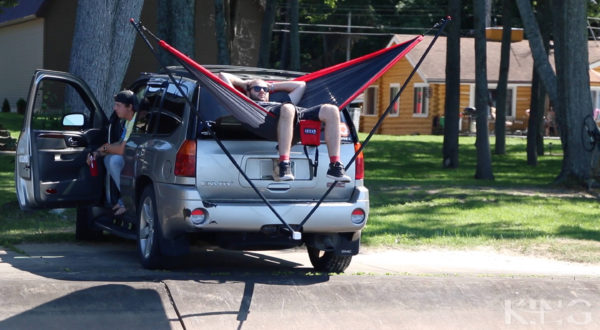
If I had $400 burning a hole in a my pocket, this is the hitch-mounted hammock stand I’d get. With the arms collapsed and folded down, the thing is just 26 inches wide. Very cool design.
This one is brand new on the market. As you can see, it’s a much different design from the others. The good news is that it’s cheaper than all the rest. The bad news is that you’re really high off the ground when you’re in the hammock. Not good if you’re injury-prone. As for the $70 shipping price, that’s how much I was quoted for shipping to Utah from Michigan, where the Hammock-King is made. It may be more or less depending on where you are. Here’s a video showing the Hammock-King in action.
What is the best shower option for SUV RVers and car campers? A video viewer asked me that question in an email a couple of weeks ago, and I’ve turned my reply into this blog post.
It’s something I don’t have a very good answer for, and that’s for a few reasons. First, I haven’t tried every camp shower out there, so I can’t really give a definitive answer in that regard. And second, the best one for you really depends on what you value most in your shower. And third, I myself haven’t made up my mind as to which I prefer. That said, here are some brief thoughts on different kinds of camp showers.
Do you want simplicity? Then a spray bottle and bag of wet wipes is a great solution. This is what I used on most of my early trips. It won’t get you as clean as a traditional shower, but it’s more compact and less of a hassle, in my opinion, than the other options below. It doesn’t get much simpler than this.
Do you want more of a traditional shower experience but don’t want it to take up too much space when it’s not being used? A solar camp shower (the kind that is essentially a bag that you fill with water and then leave out in the sun; this is the one I have) may be right for you. I used one of these showers on a couple of my early trips but never really liked it for two reasons:
1. I was never at a campsite long enough or during the hotter/sunnier parts of the day, so the water was never as hot as I would like.
2. I often camp in the desert or some other area that doesn’t have trees nearby. With no trees to hang the shower from, I had to resort to plopping the shower down on the roof of my car, but my car isn’t very tall. This meant that I’d have to hunch over to get the water flowing. Not ideal.
I’m currently giving the solar camp shower a second chance. I’ve gone a long way toward solving the first problem by doing this. And I’ve also solved the second problem, which will be covered in a video in the next week or two. The downside of this kind of shower is that, depending on environmental circumstances (cloud cover, temperature, elevation, etc.), the water still may not be as hot as you’d like.
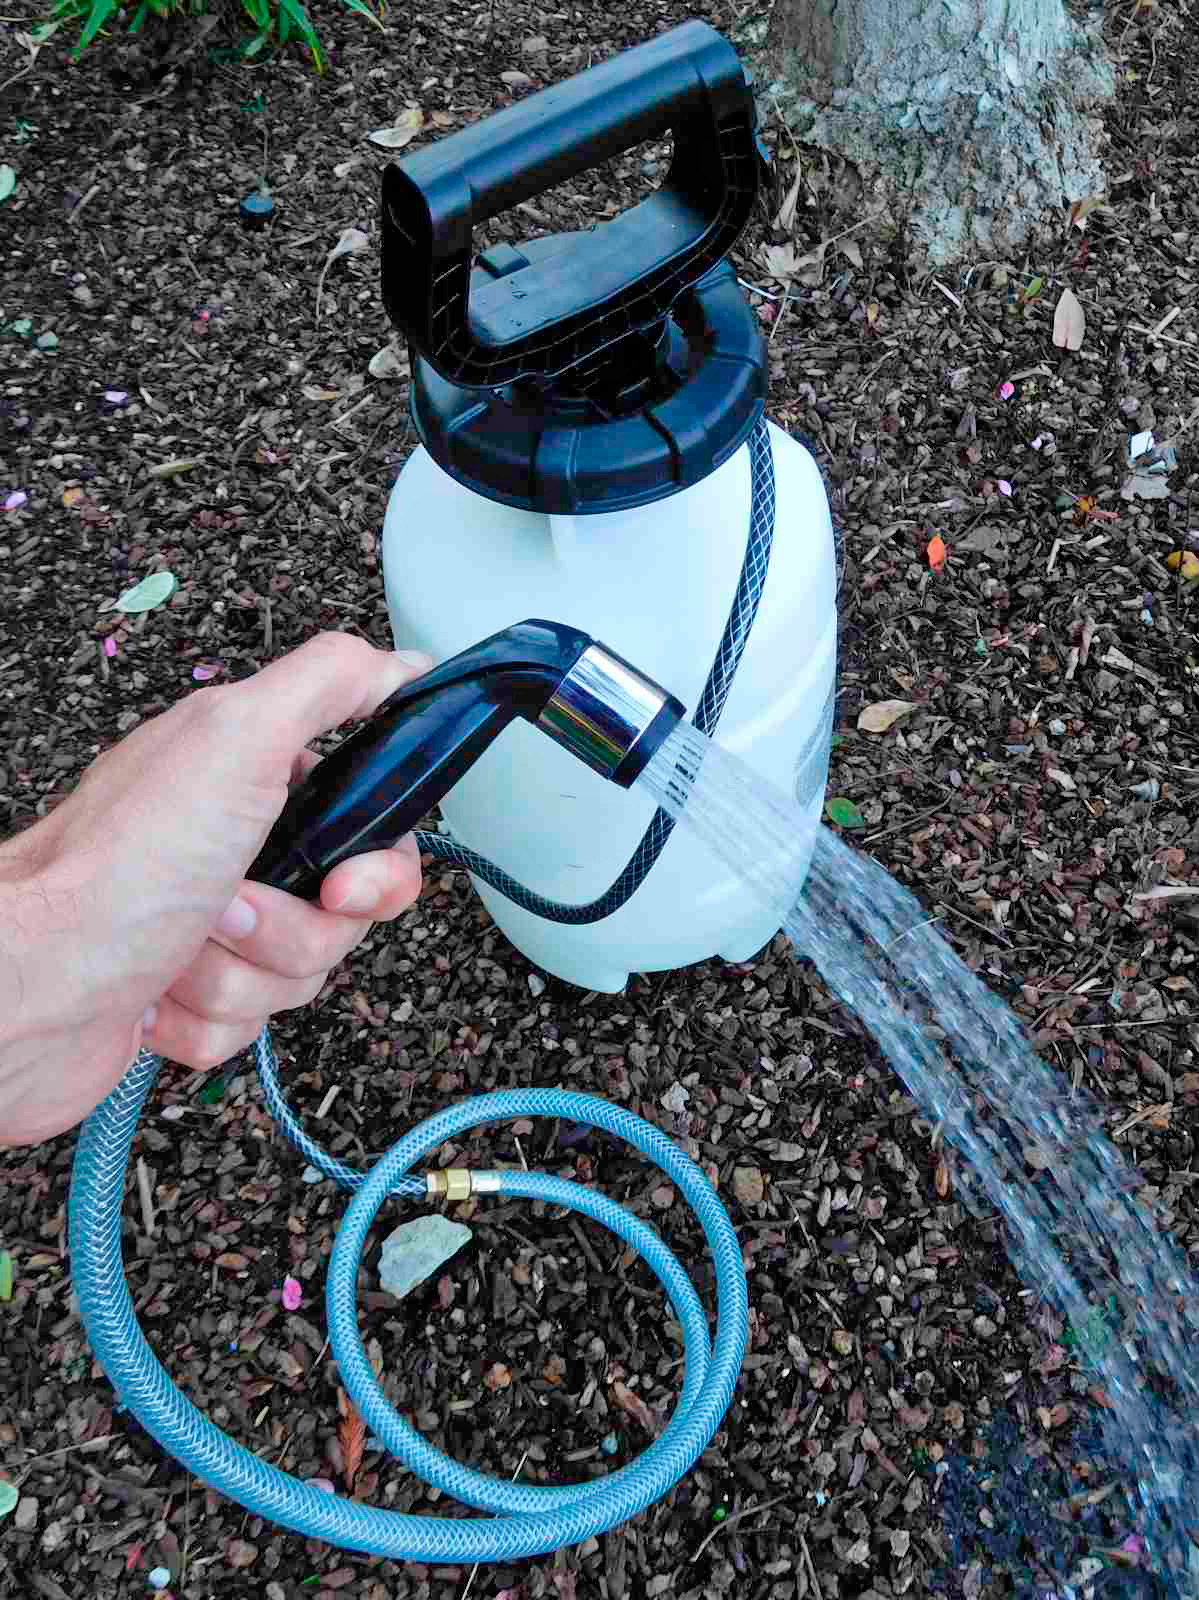
My DIY sprayer shower
A sprayer-style shower (like this) is great if you have a bit more room and don’t want to have to mess with finding a place to hang up the camping-style shower. I made a shower similar to the one in that video and liked it whenever I was using it, but found that it took up more space than I wanted when I wasn’t using it. Because my SUV (a RAV4) is so small and space is at a premium, I gave it up in favor of the more compact solar camp shower.
If you want ultimate comfort (i.e., a pressurized, heated shower) and are willing to give up some space for it, the Zodi heated camp showers are supposed to be great. Ted from this article has the Extreme SC and speaks highly of it.
(Note: This article contains Amazon affiliate links.)
This is a collection of SUV camping- and vandwelling-related gear and articles that I’ve come across recently that I wanted to share.
Hammock Hanging Options
I’ve really gotten into hammocking lately. If you’ve never taken a hammock on an SUV RVing adventure, get one! (Here’s one on Amazon that’s inexpensive, gets good reviews, and comes with the tree straps.) It’s a cheap and oh-so-relaxing camp activity. While exploring deeper into the world of hammocking, I’ve come across a couple of items that are of specific interest to SUV campers:
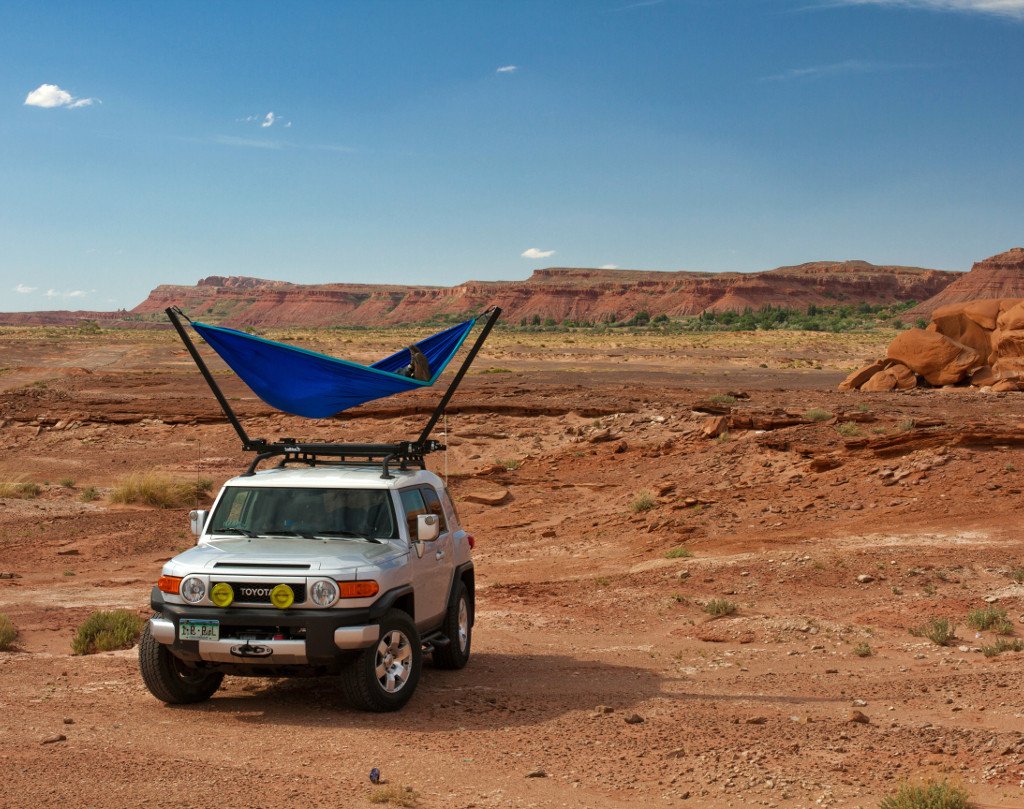
The TrailNest Roof-Top Hammock Stand ($349) – You’ve seen roof-top tents, right? Well how would you like to have a roof-top hammock? That’s what the TrailNest stand allows.
Above: The TrailNest roof-top hammock stand. Photo by TrailNest.
I know it’s a bit silly, but I really, really want this thing. As shown in the image above, you can hammock even when there are no trees or other objects to attach your hammock to. You can sleep in the hammock overnight (thus freeing up the inside of your vehicle for storage) or just whip it out whenever you’re feeling like you’ve earned a bit of a rest.
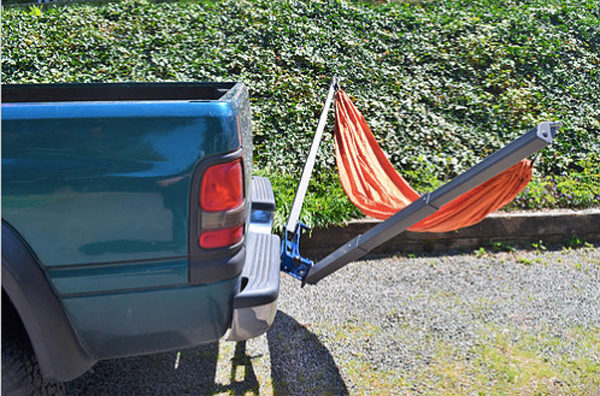
The Hitchhiker hitch-mounted hammock stand ($290) – Perhaps slightly more practical than the roof-top hammock stand is this hitch-mounted hammock stand from Blue Ridge Overland Gear.
Above: The Hitchhiker hitch-mounted hammock stand. Photo by Blue Ridge Overland Gear.
It’s made out of lightweight aluminum, attaches to a vehicle’s hitch receiver, and folds down to a relatively compact bundle when not being used. The only issue I have with this is that the setup angles down slightly. This is done so that the hammock stand arms extend out and away from the vehicle. But it’s not uncommon for me to bump the hitch receiver on my RAV4 when I go into and out of dips, dry washes, or even steep driveways—I just don’t have enough clearance back there. I’d have to strap the hammock stand to the top of my car when not using it and then move it down to the hitch when I get to camp. That’s not terrible, but it’s not quite as convenient as the roof-top hammock stand. On the other hand, you also don’t need to (get to?) climb up on top of your vehicle to access this hitch-mounted hammock stand.
2-in-1 Hitch Rack and Roof-Top Cargo Carrier
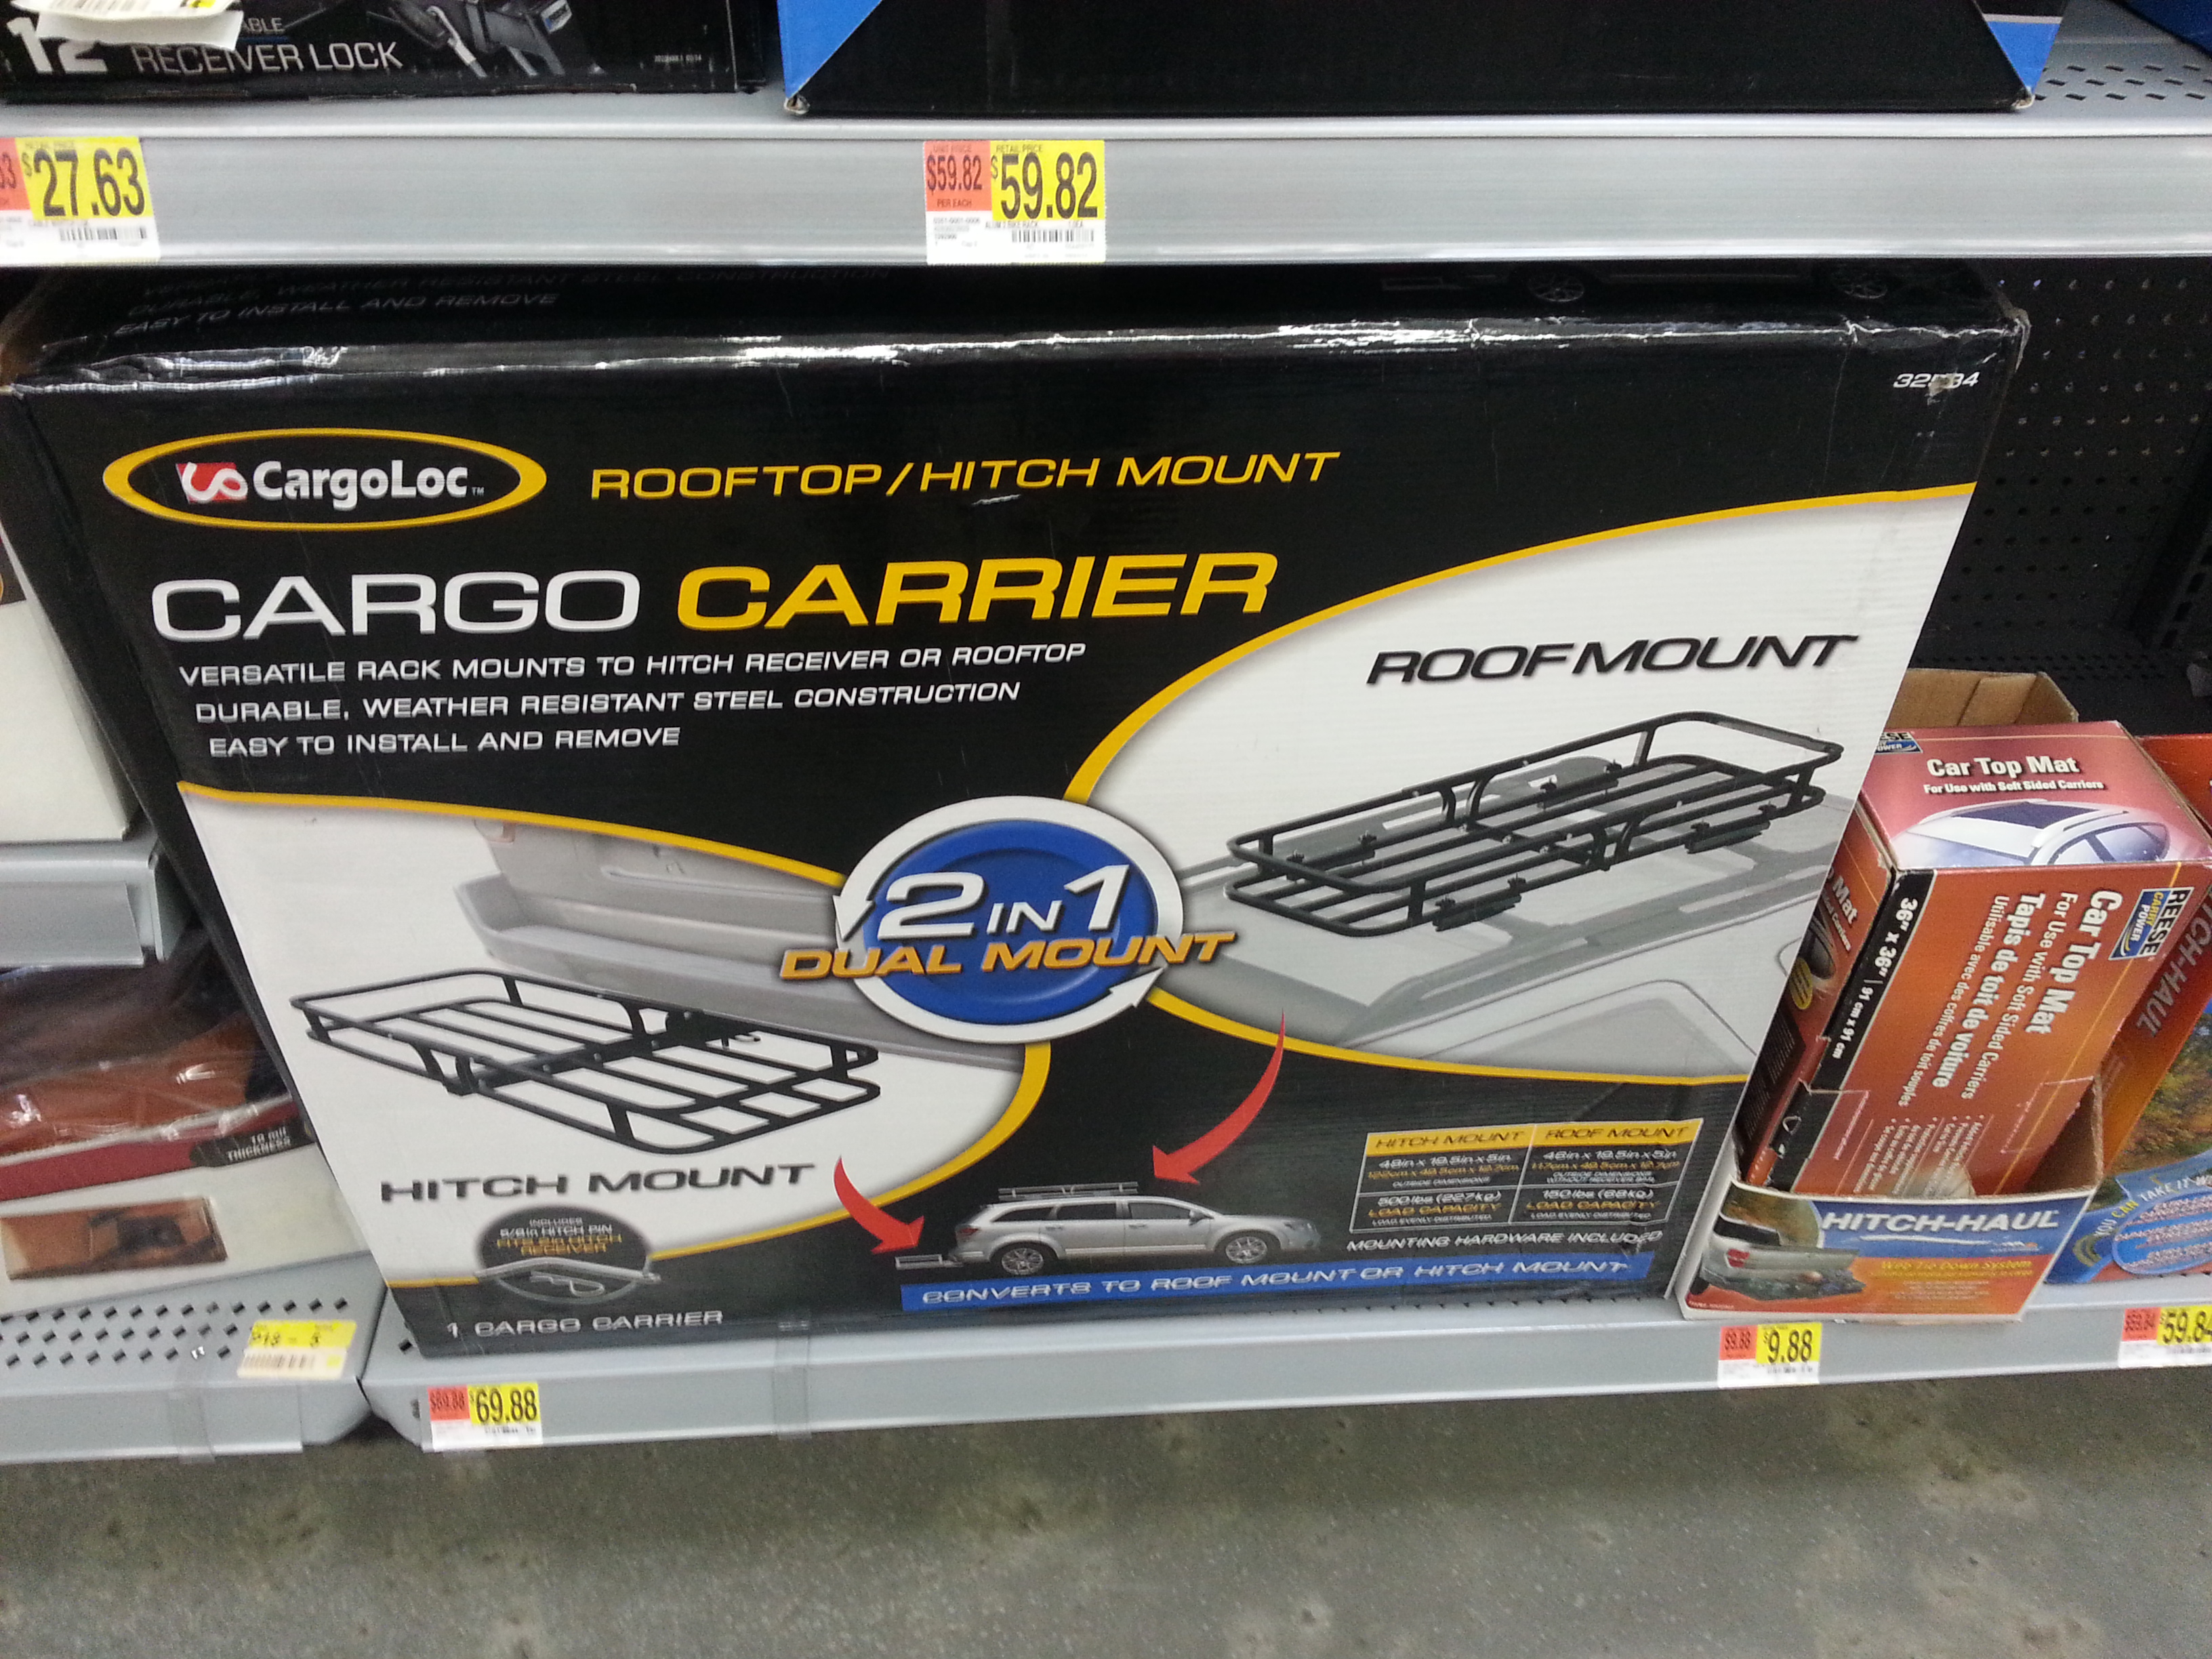
Speaking of hitch receivers and strapping things to the top of my SUV, I saw this bad boy at Walmart the other day:
Above: The CargoLoc 2-in-1 Cargo Carrier
It’s a hitch-mounted cargo rack/basket that also doubles as a roof-mounted cargo rack/basket. Neat, huh? While it retails for $69.88 at Walmart, I found it for on sale for $45 on the Pep Boys website. (And in case you were wondering, it’s on Amazon for nearly $100.) The thing I like about it as a roof basket is that it’s narrow; it doesn’t take up the full width of the top of the vehicle. That means that you could also mount a bike, kayak, or skinny cargo box up there. I’ve been eyeing roof baskets lately because it would be a great way to store firewood, among other things, and this particular rack is currently at the top of my list. There aren’t a ton of reviews of it out there, however, so who knows if it generates wind noise, if it will rust with exposure to the elements, or if it will last.
The Best SUV Video Ever?
A guy wants to sell his 1996 Suzuki Vitara. He made a video of it, and it’s awesome. (Click here if you can’t see the video below.)
The Ultimate Awning… Thing
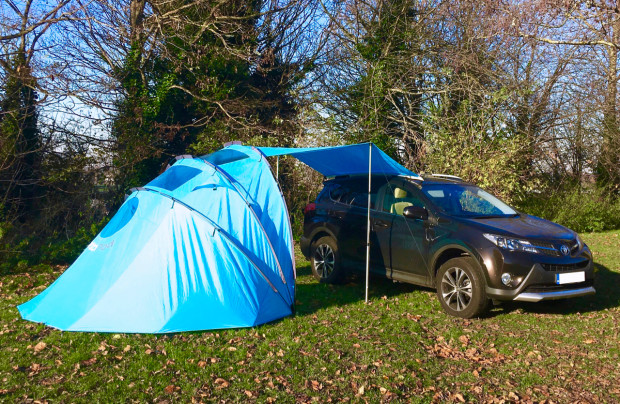
Check out the sheltaPod ($345 or £265). It bills itself as “The coolest, most versatile campervan awning EVER!” I don’t think I can argue with that.
The sheltaPod awning/tent.
Pretty neat, huh? You can read a lot more about it on the sheltaPod’s website and see about a trillion videos and images of it on the IndieGoGo page.
Everything Else
Here are a few more items of interest:
Deadman: the world’s most versatile off-road recovery anchor – This is currently on Kickstarter. The idea is that if your vehicle gets stuck while you’re out in the middle of nowhere, you dig a hole, bury the Deadman, and use that as an anchor to help you winch (or strap) your way out of trouble. I’m familiar with using a deadman as an anchor when mountaineering, but this is the first time I’ve seen one used for getting a vehicle unstuck.
Want to try out a roof-top tent but don’t want to buy one? Consider renting one. I know that for me here in northern Utah, the closest rental options are from Off the Grid Rentals in St. George (southern Utah) or Teton Backcountry Rentals in Jackson, Wyoming. Maybe there’s a rental place near you?
While we’re on the subject of roof-top tents, here’s a review from Expedition Portal about the iKamper, which was a mega-popular Kickstarter campaign.
We’ve already mentioned here hitch-mounted hammock stands and cargo baskets, but what about a hitch-mounted table? Could be useful for camping, right?
***
Do any of these things appeal to you? Got something SUV-related that you want to share? Leave a comment or shoot me an email. Thanks for reading!
Note: This blog post contains Amazon affiliate links.
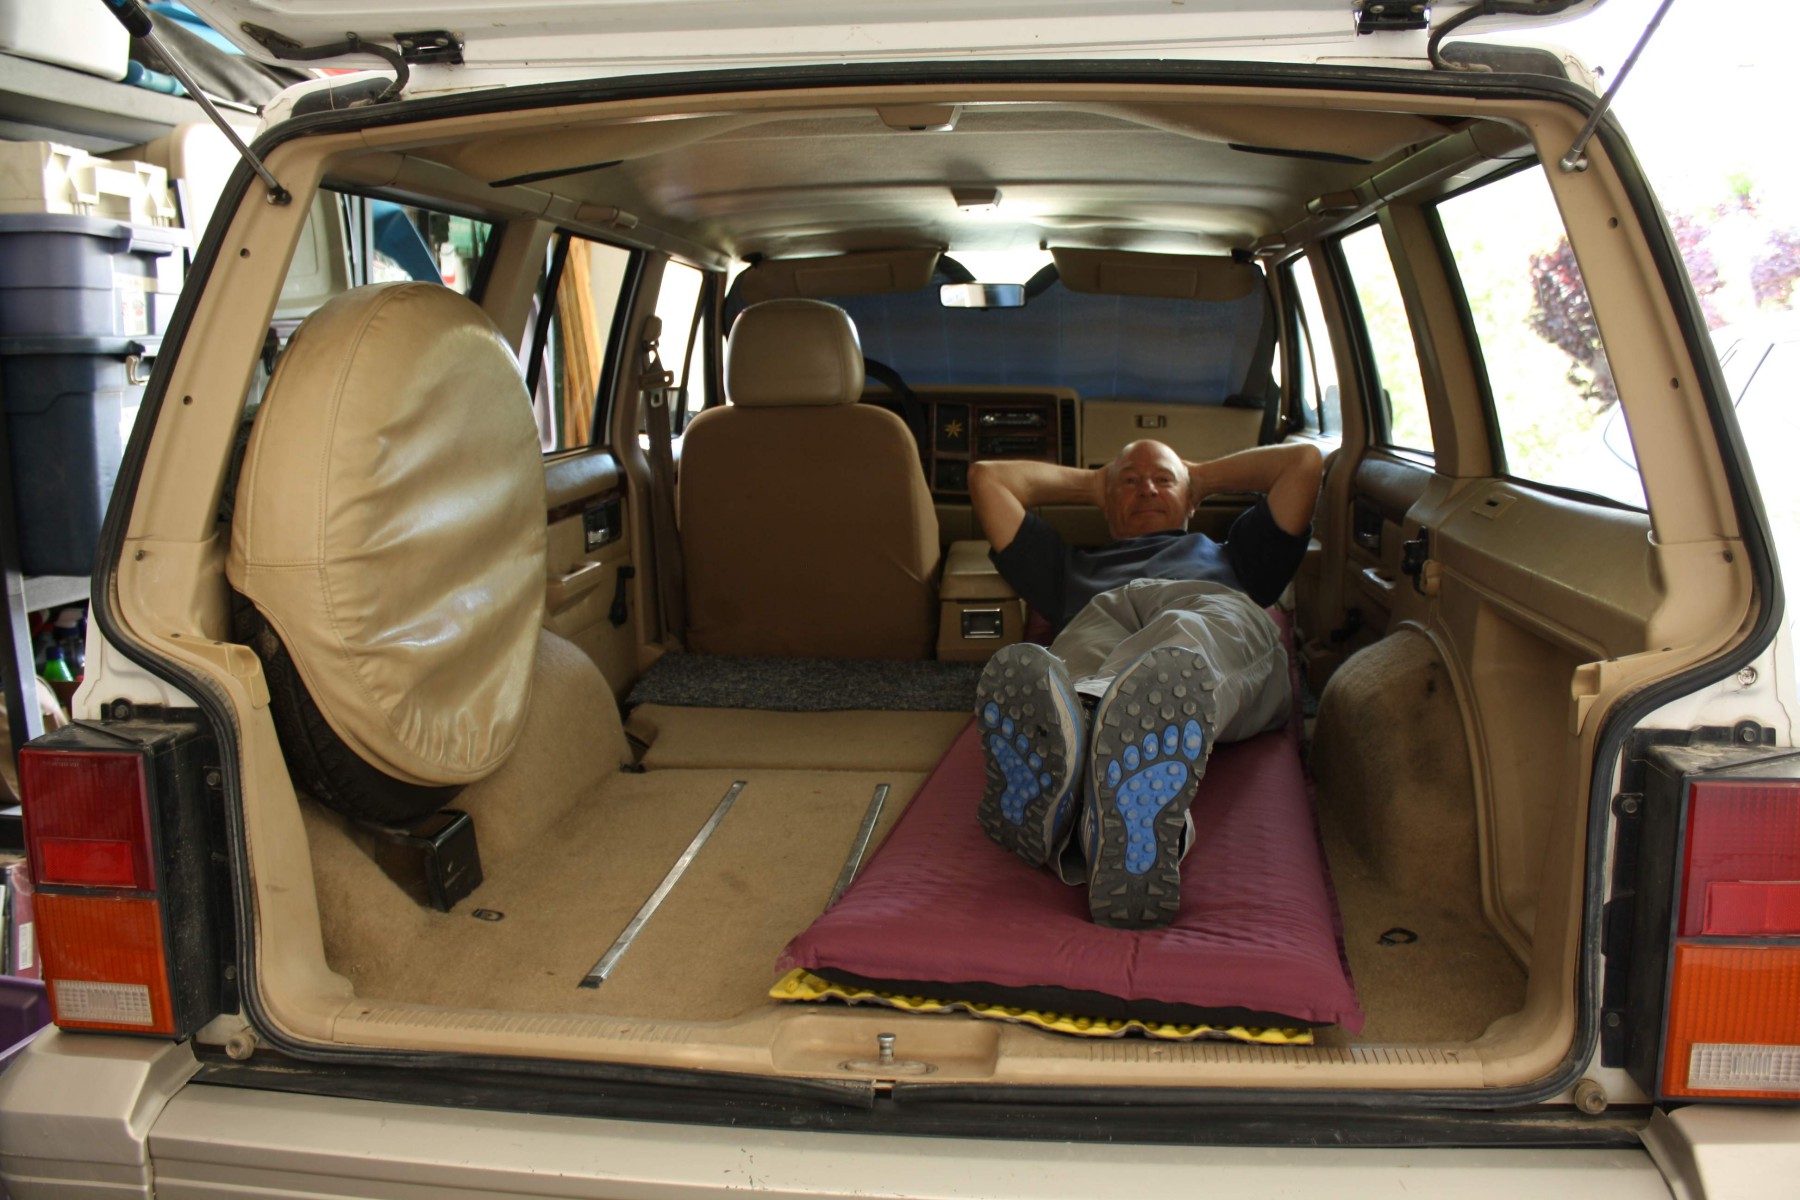
[Tristan’s Note: I had the pleasure of meeting up with SUV RVing reader and viewer Robert DeNike when I was in California in January. We had a great time chatting about adventures past and future, and we’ve kept in touch since then. He recently sent me a ton of fantastic photos and info about his sleeping/camping setup in his 1995 Jeep Cherokee Country. All of the photos and words below are his, but I will occasionally add my own thoughts, which will be in brackets. Thanks for sharing your adventure rig, Robert!]
****
It came off the assembly line in 1995, before some of you were born. But 22 years later it still runs like a Swiss watch, taking me over rutted, boulder-strewn roads far from the maddening crowd.
I’m a backpacker, so the Jeep’s purpose in life is to get me to trailheads at the edges of North America’s great wilderness areas. After 10 days out there, I am thinking fondly of the Jeep and the little luxuries within. It’s always with great joy and relief that I catch sight of it as I emerge from the wilds, waiting there patiently like a loyal dog.
One-Man Show
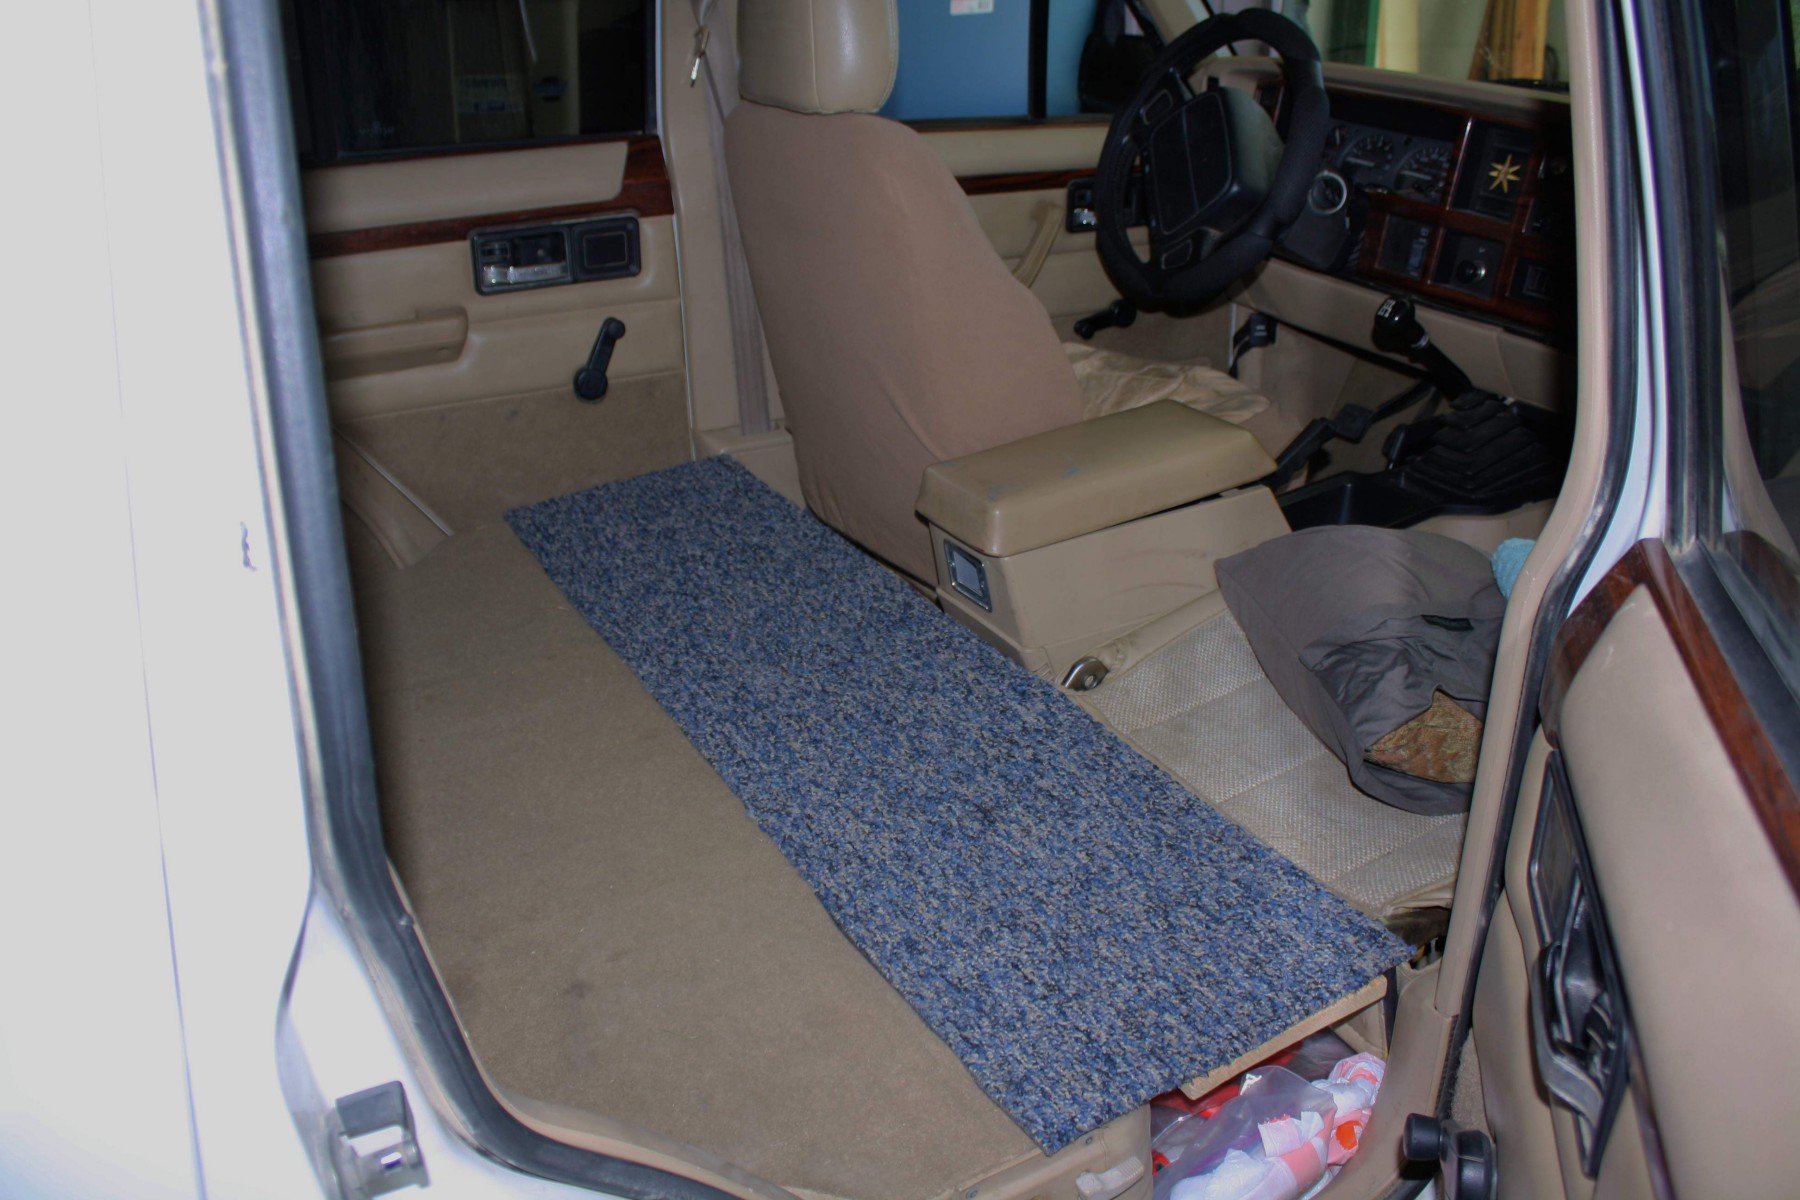
The first modification I made was to remove the rear seat bench. Permanently. The seat back now folds down flat, creating a sizable cargo space. This left the seat belts hanging uselessly in the way, so I unscrewed and cut out all except mine. Finally, I detached the front passenger seat back so I can stretch out fully when lying down, which also opened up the cargo area even more.
The Jeep now accommodates exactly one rider: me. So if your wife or kids want to go camping with you, or even just shopping at the local Costco, forget it. But my wife would rather go to the dentist than go camping. That’s OK; I love her anyway. The point being: these modifications are for the committed solo SUVer only.
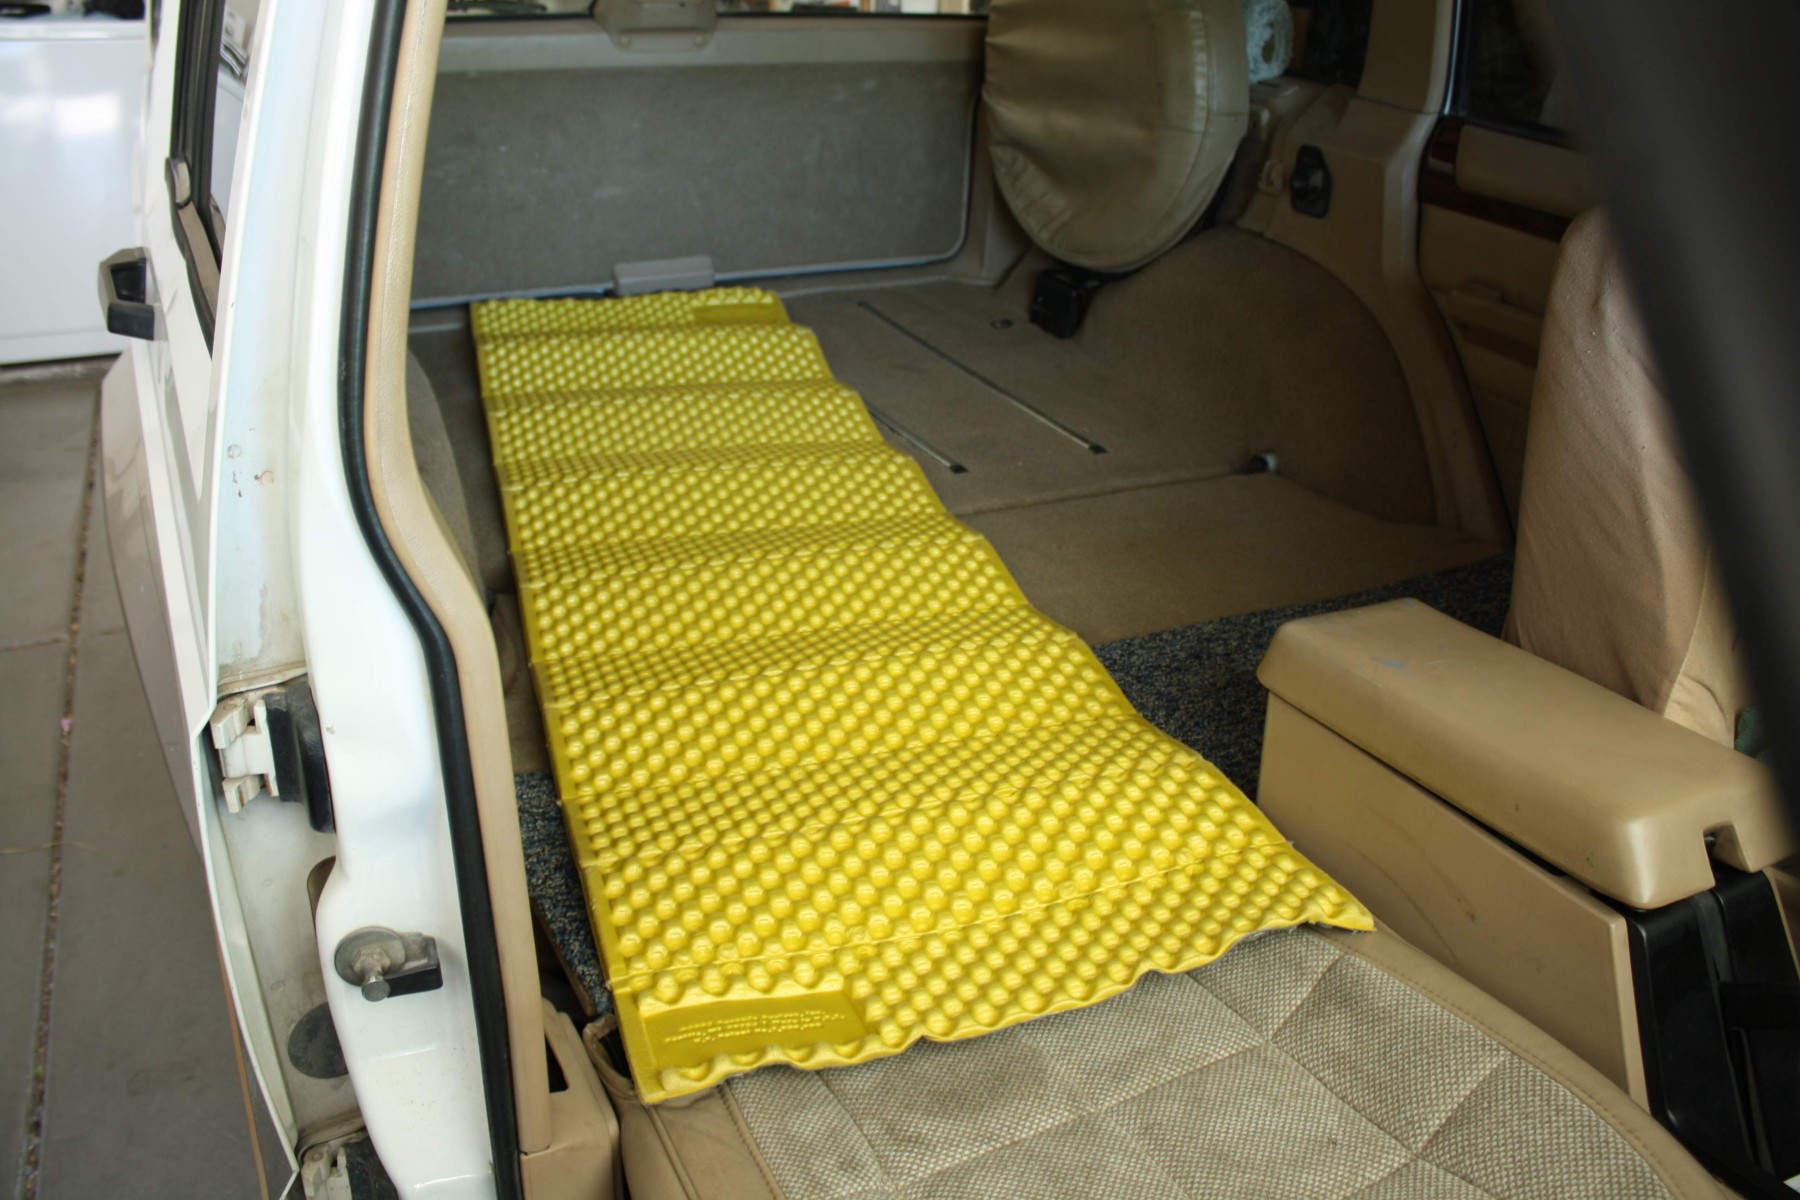
Photo Tour
Base layer: I start with a Thermarest Z-Lite as padding for the mattress.Plenty of leg-room on this flight: removing the front passenger seat allows me to stretch out with impunity. The Thermarest LuxuryMap Mattress goes on top of the foam pad.Bridging the gap: the space between the front and rear seats is covered with a simple plank and strip of carpet (a scavenged scrap from a local flooring outlet).
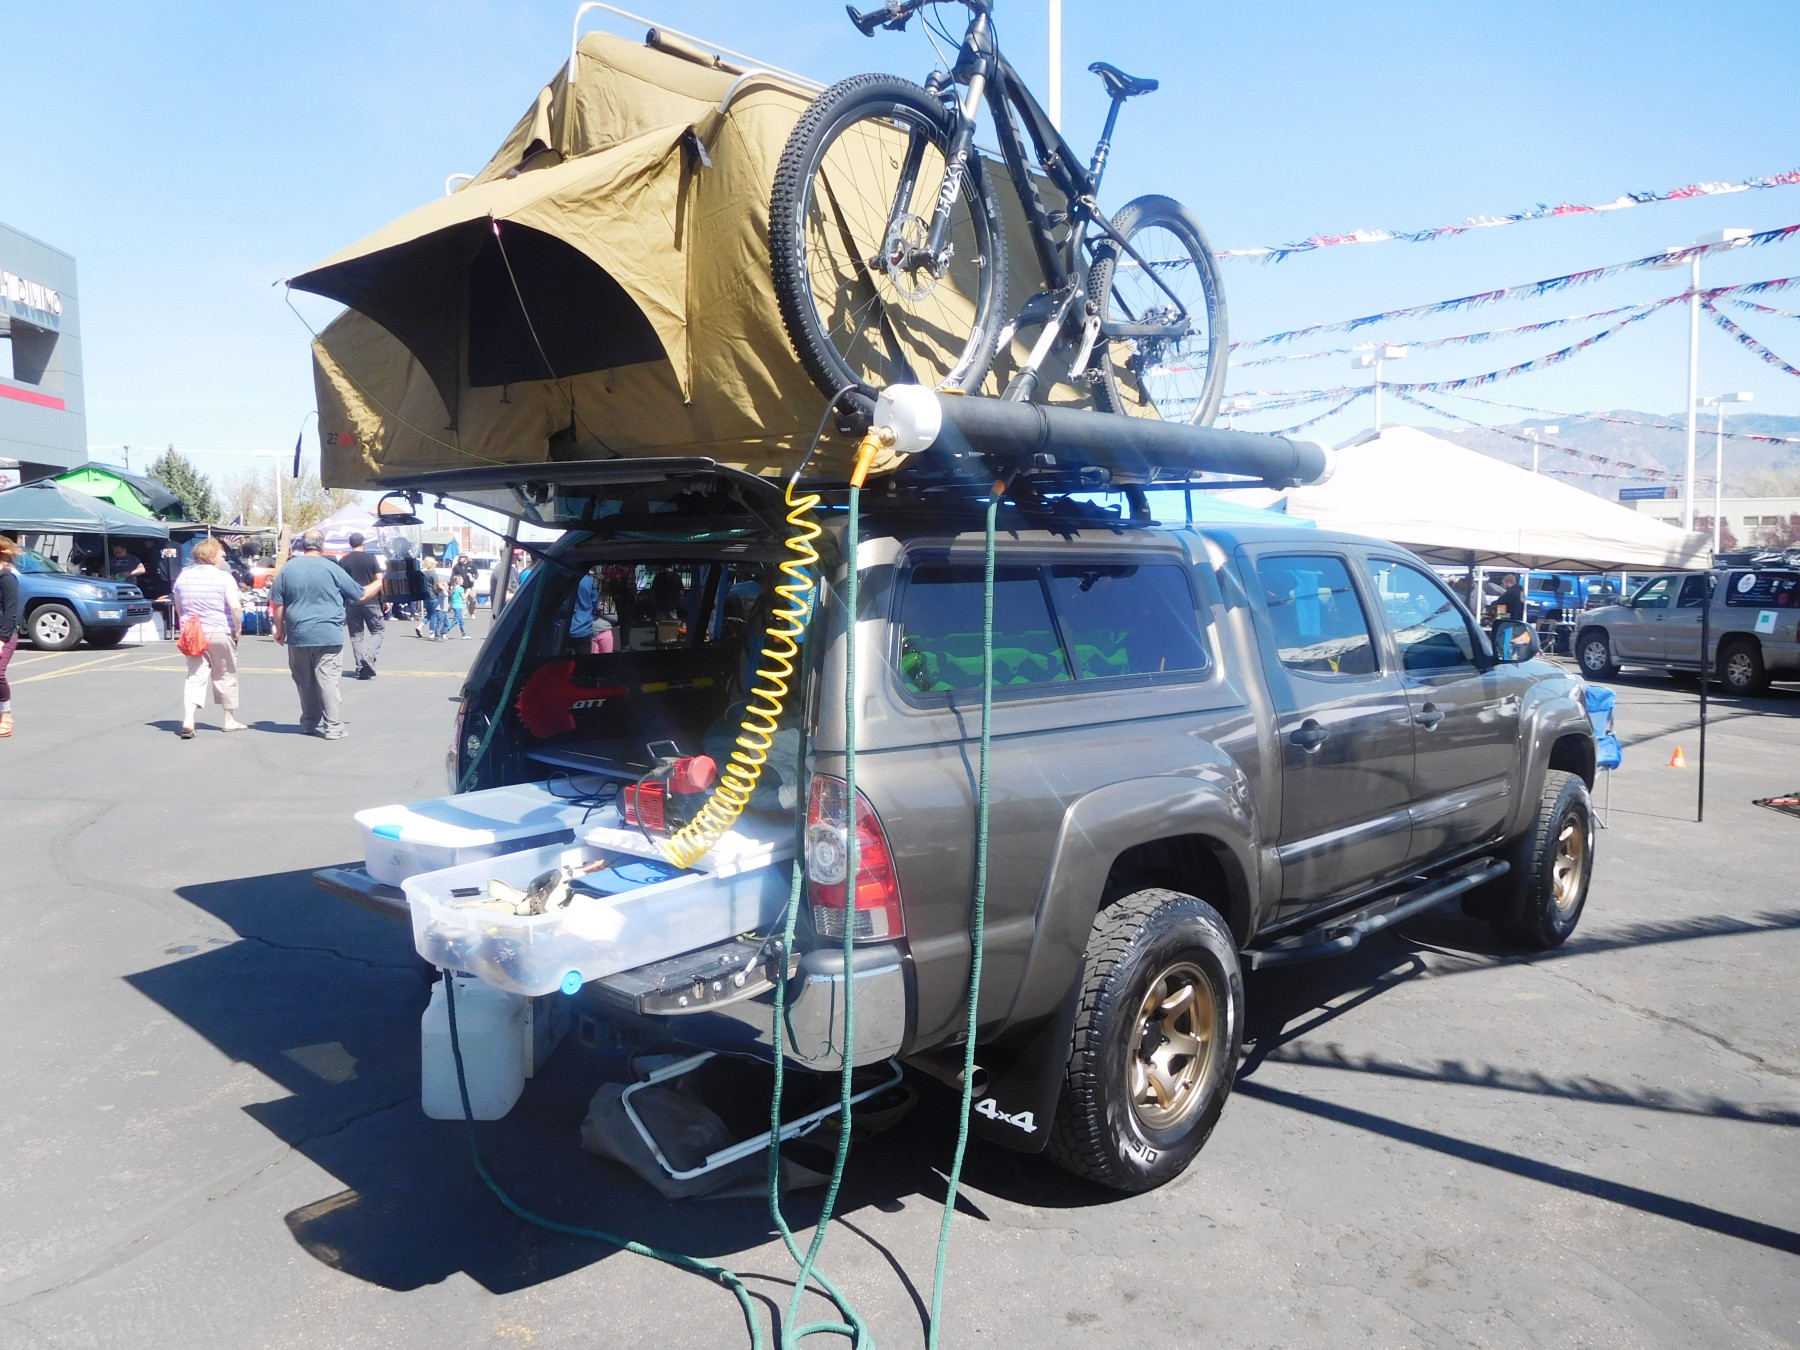
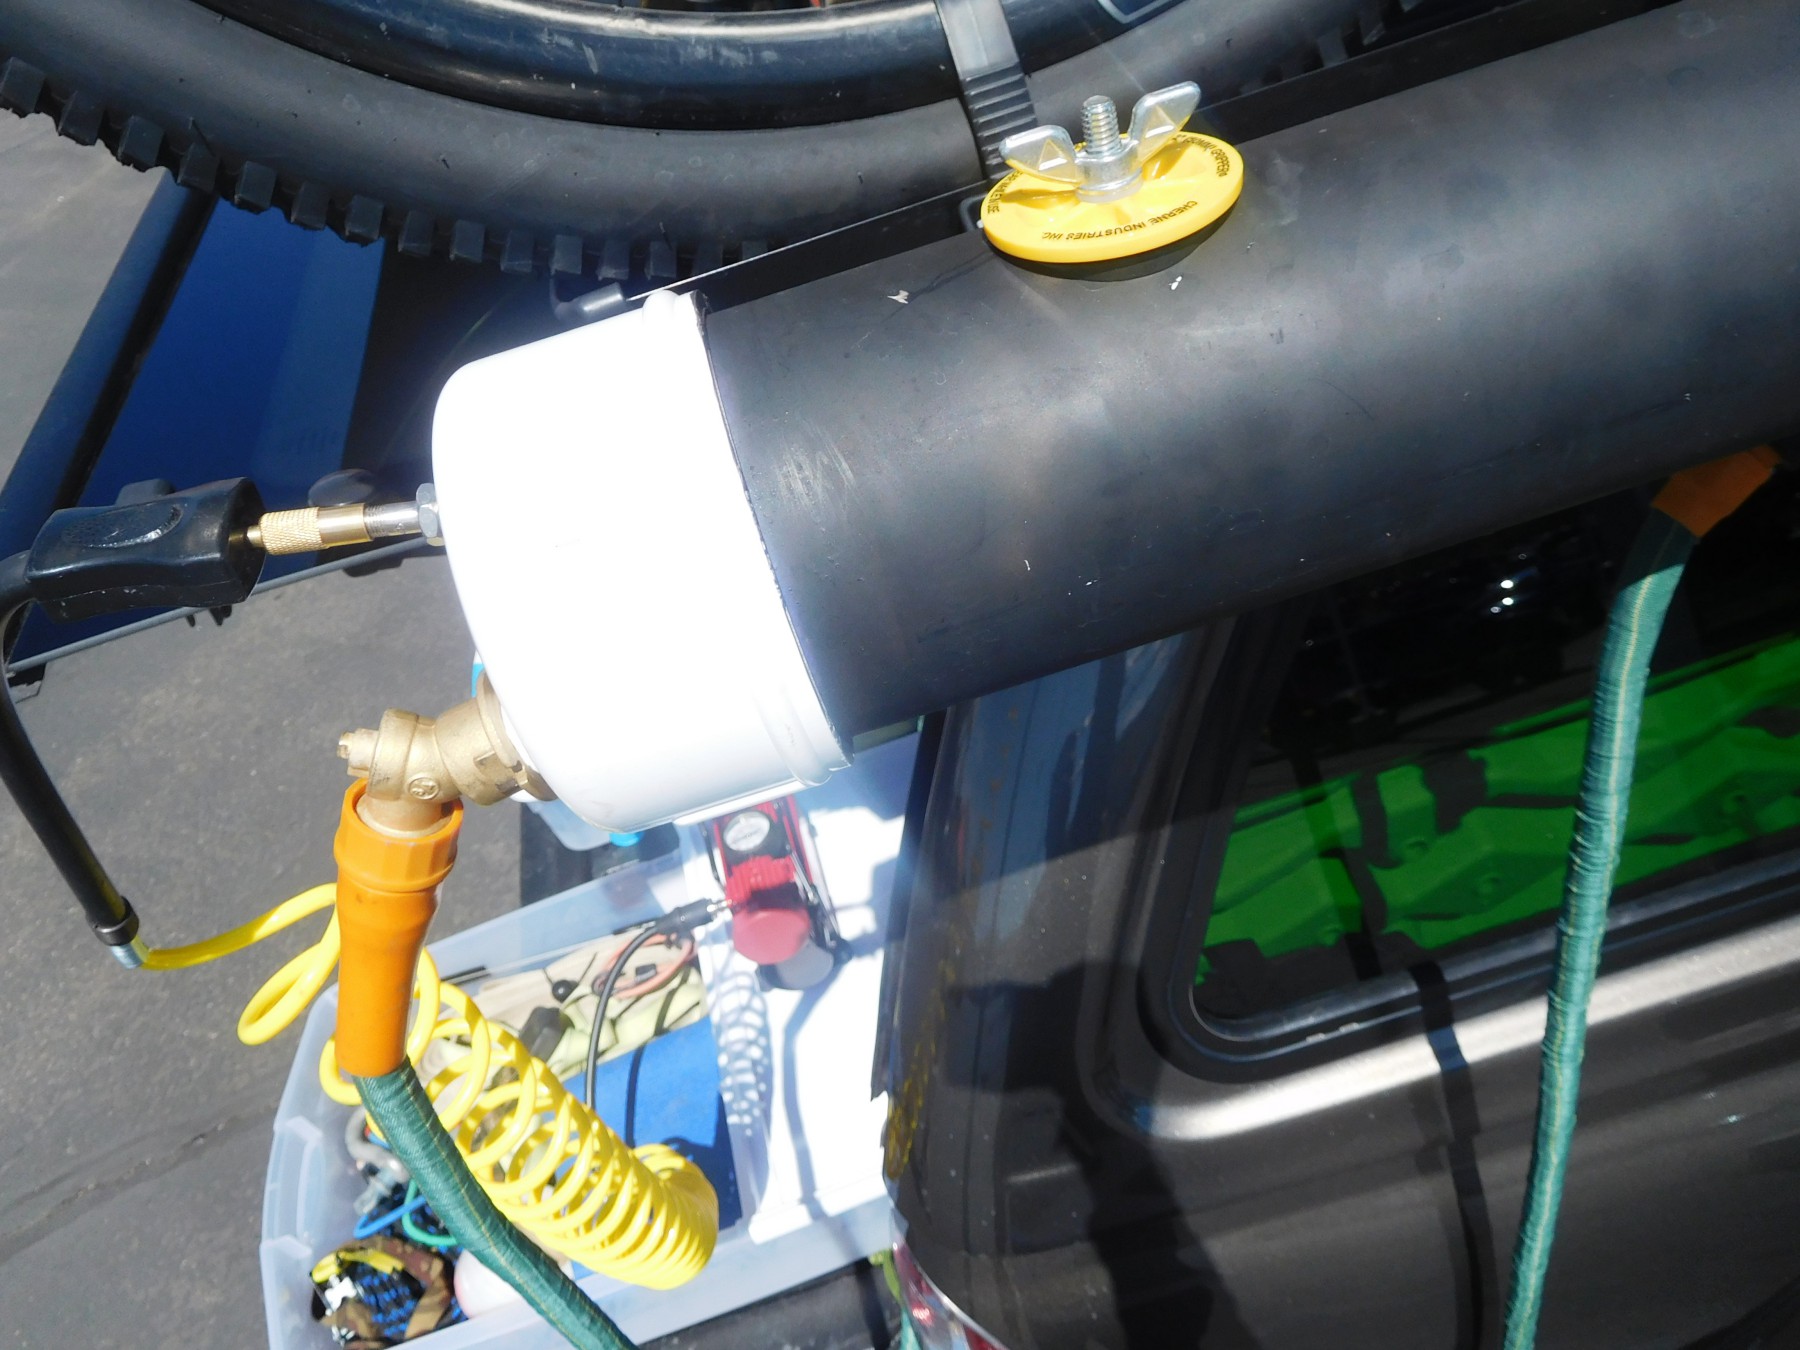
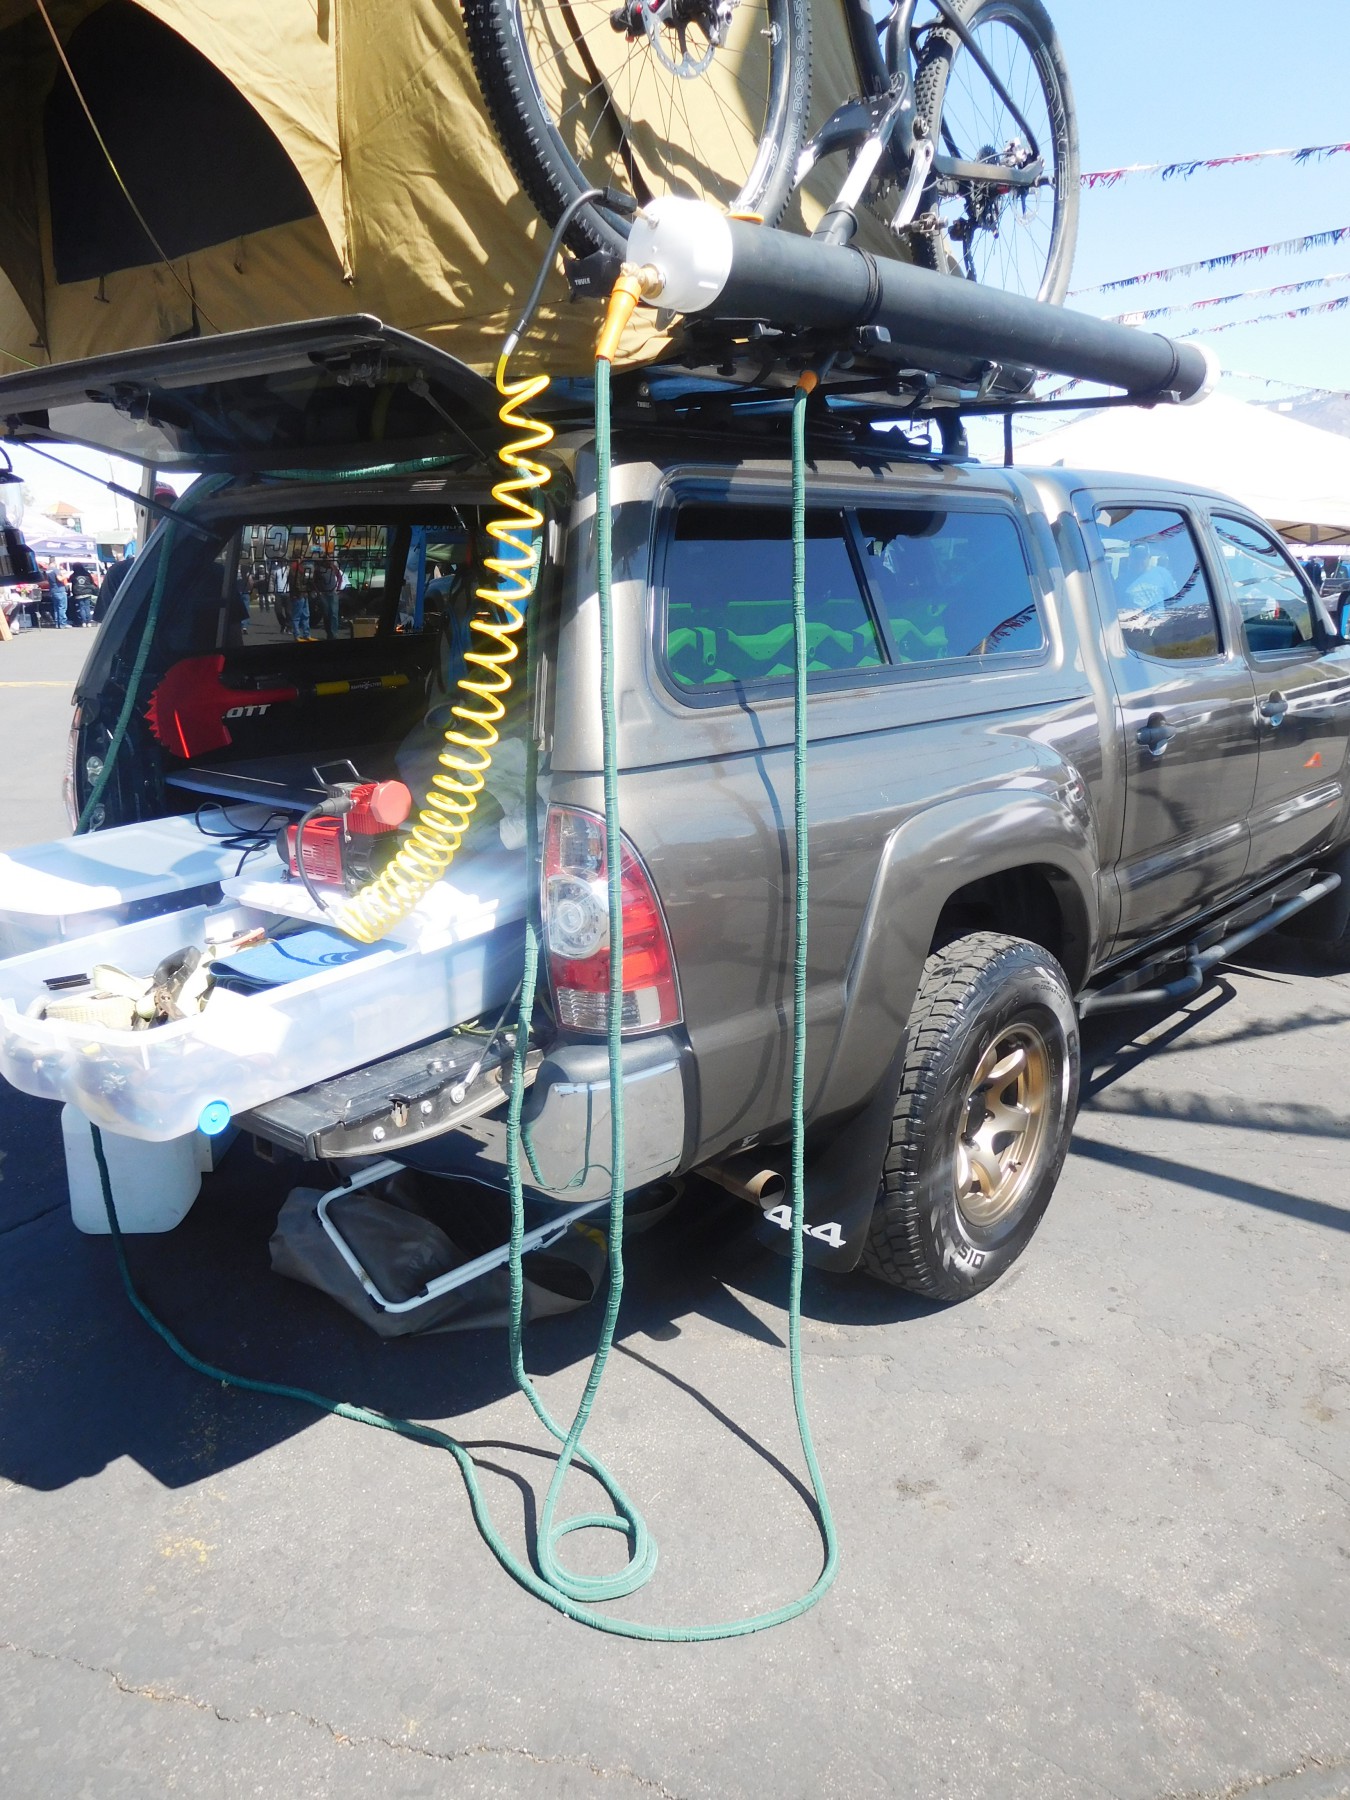
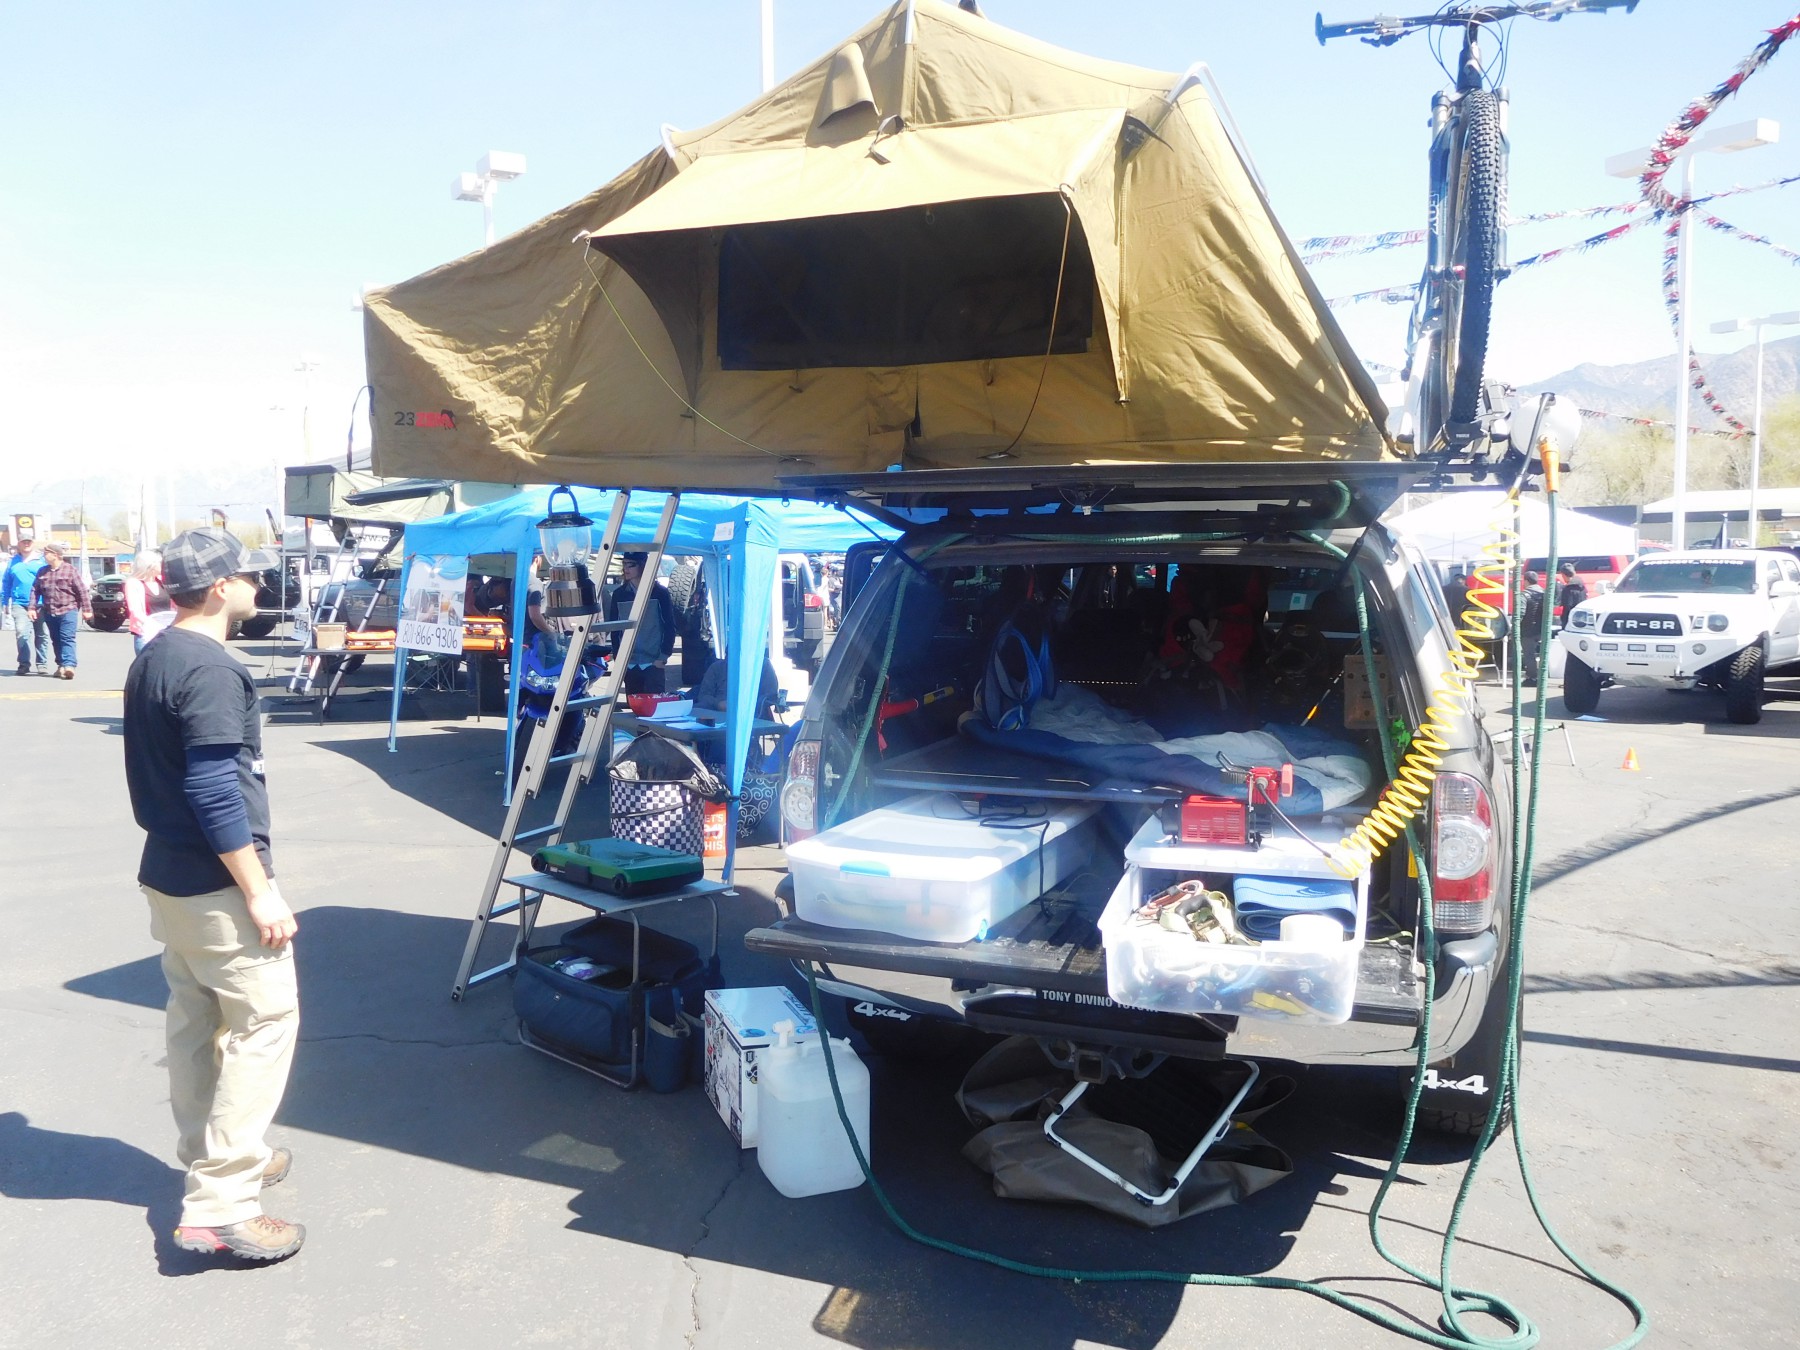
A month or so ago I went to the Utah Toyota Off-Road Expo. It was much smaller than the Salt Lake Off-Road Expo that I went to a week later (and both pale in comparison to Overland Expo West, which is going on right now). Still, there were some great rigs there, mostly 4Runners and Tacomas (no RAV4s, sadly). I noticed on one of the rigs (a Toyota Tacoma with camper shell, roof top tent, bike rack, and more) what looked like a DIY version of the Road Shower, so I went up to talk to the rig’s owner and ask about how he made the shower. Here are some pictures and info:
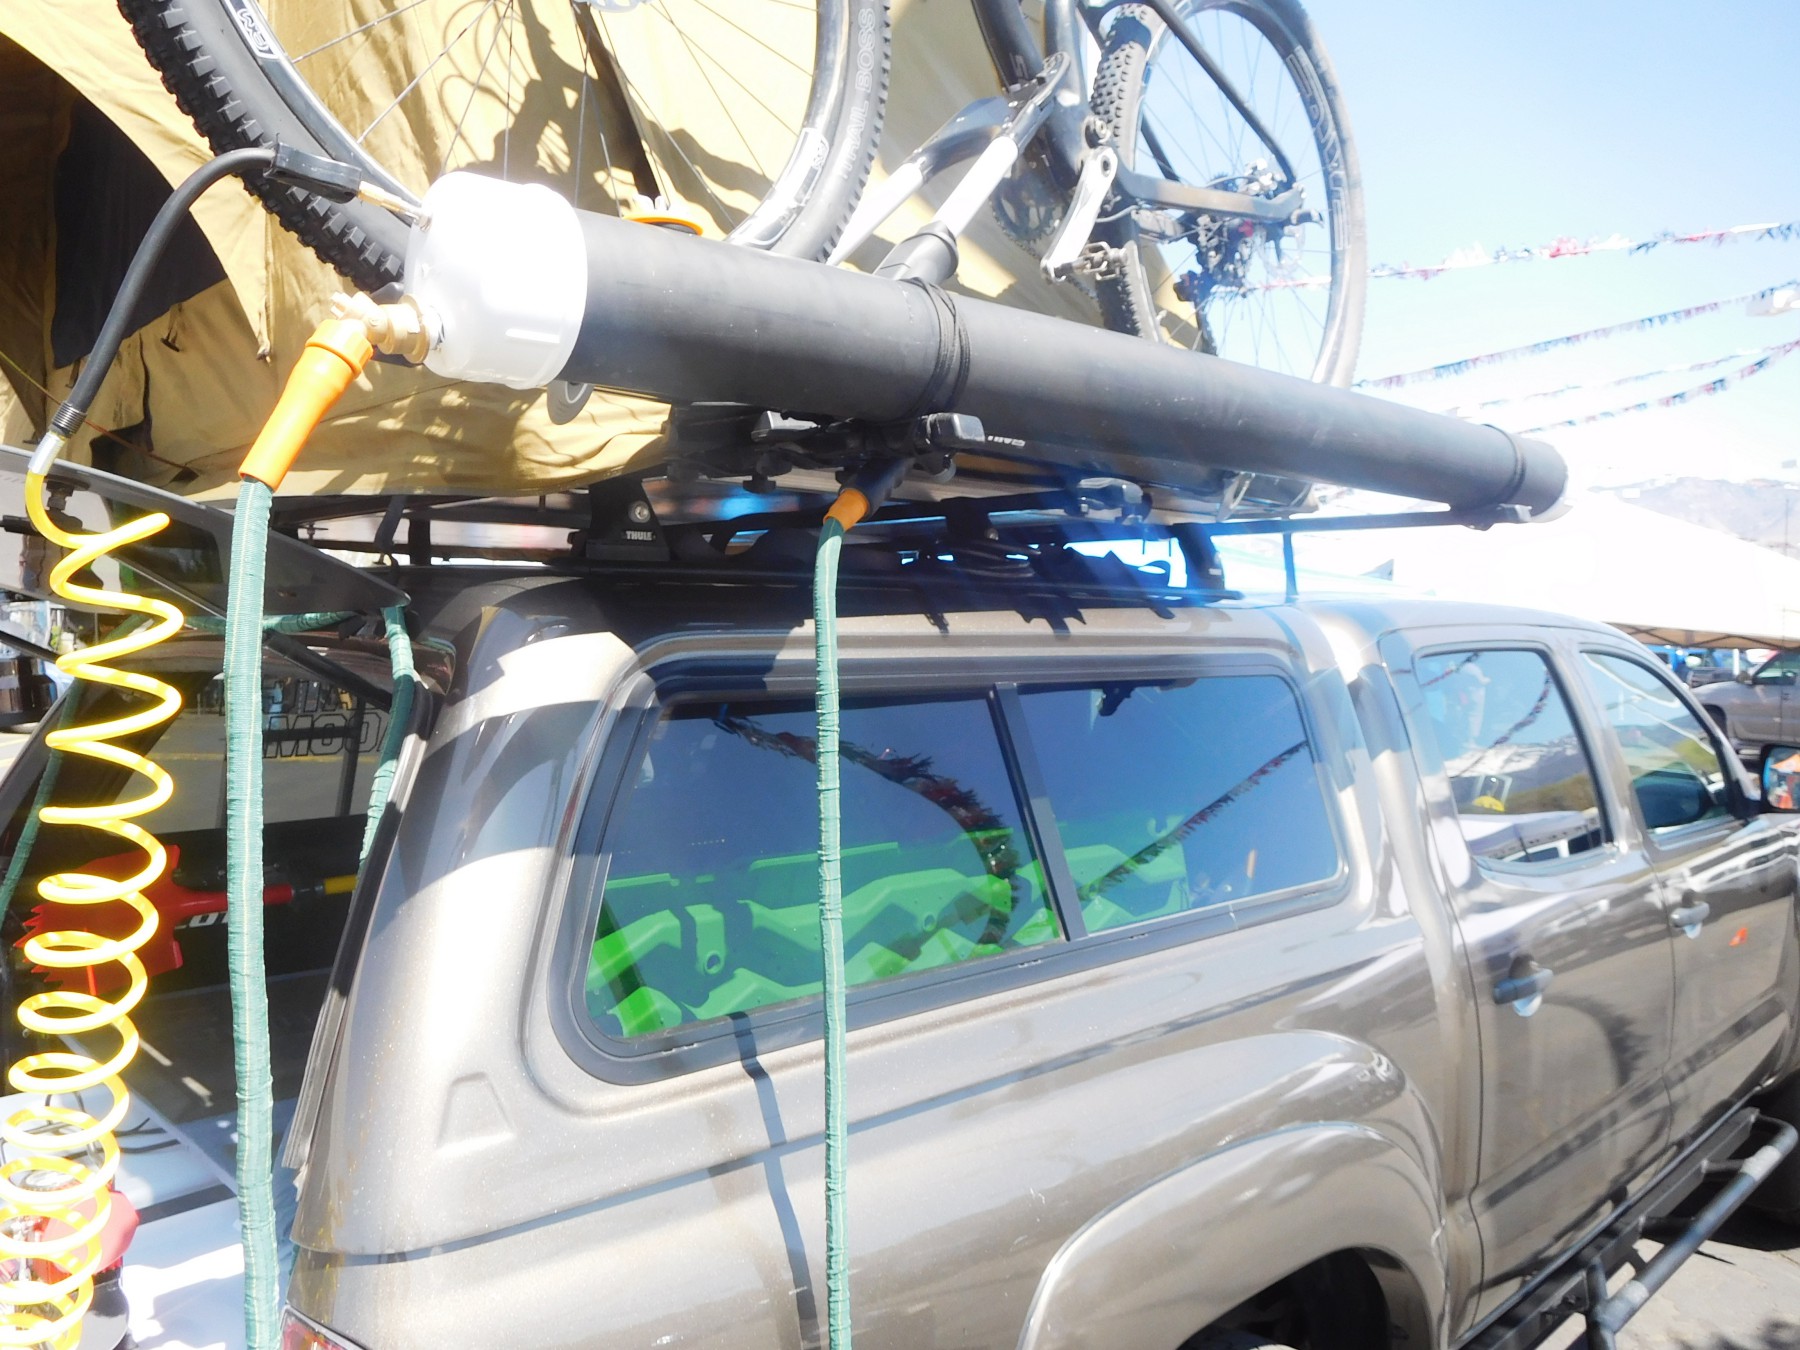
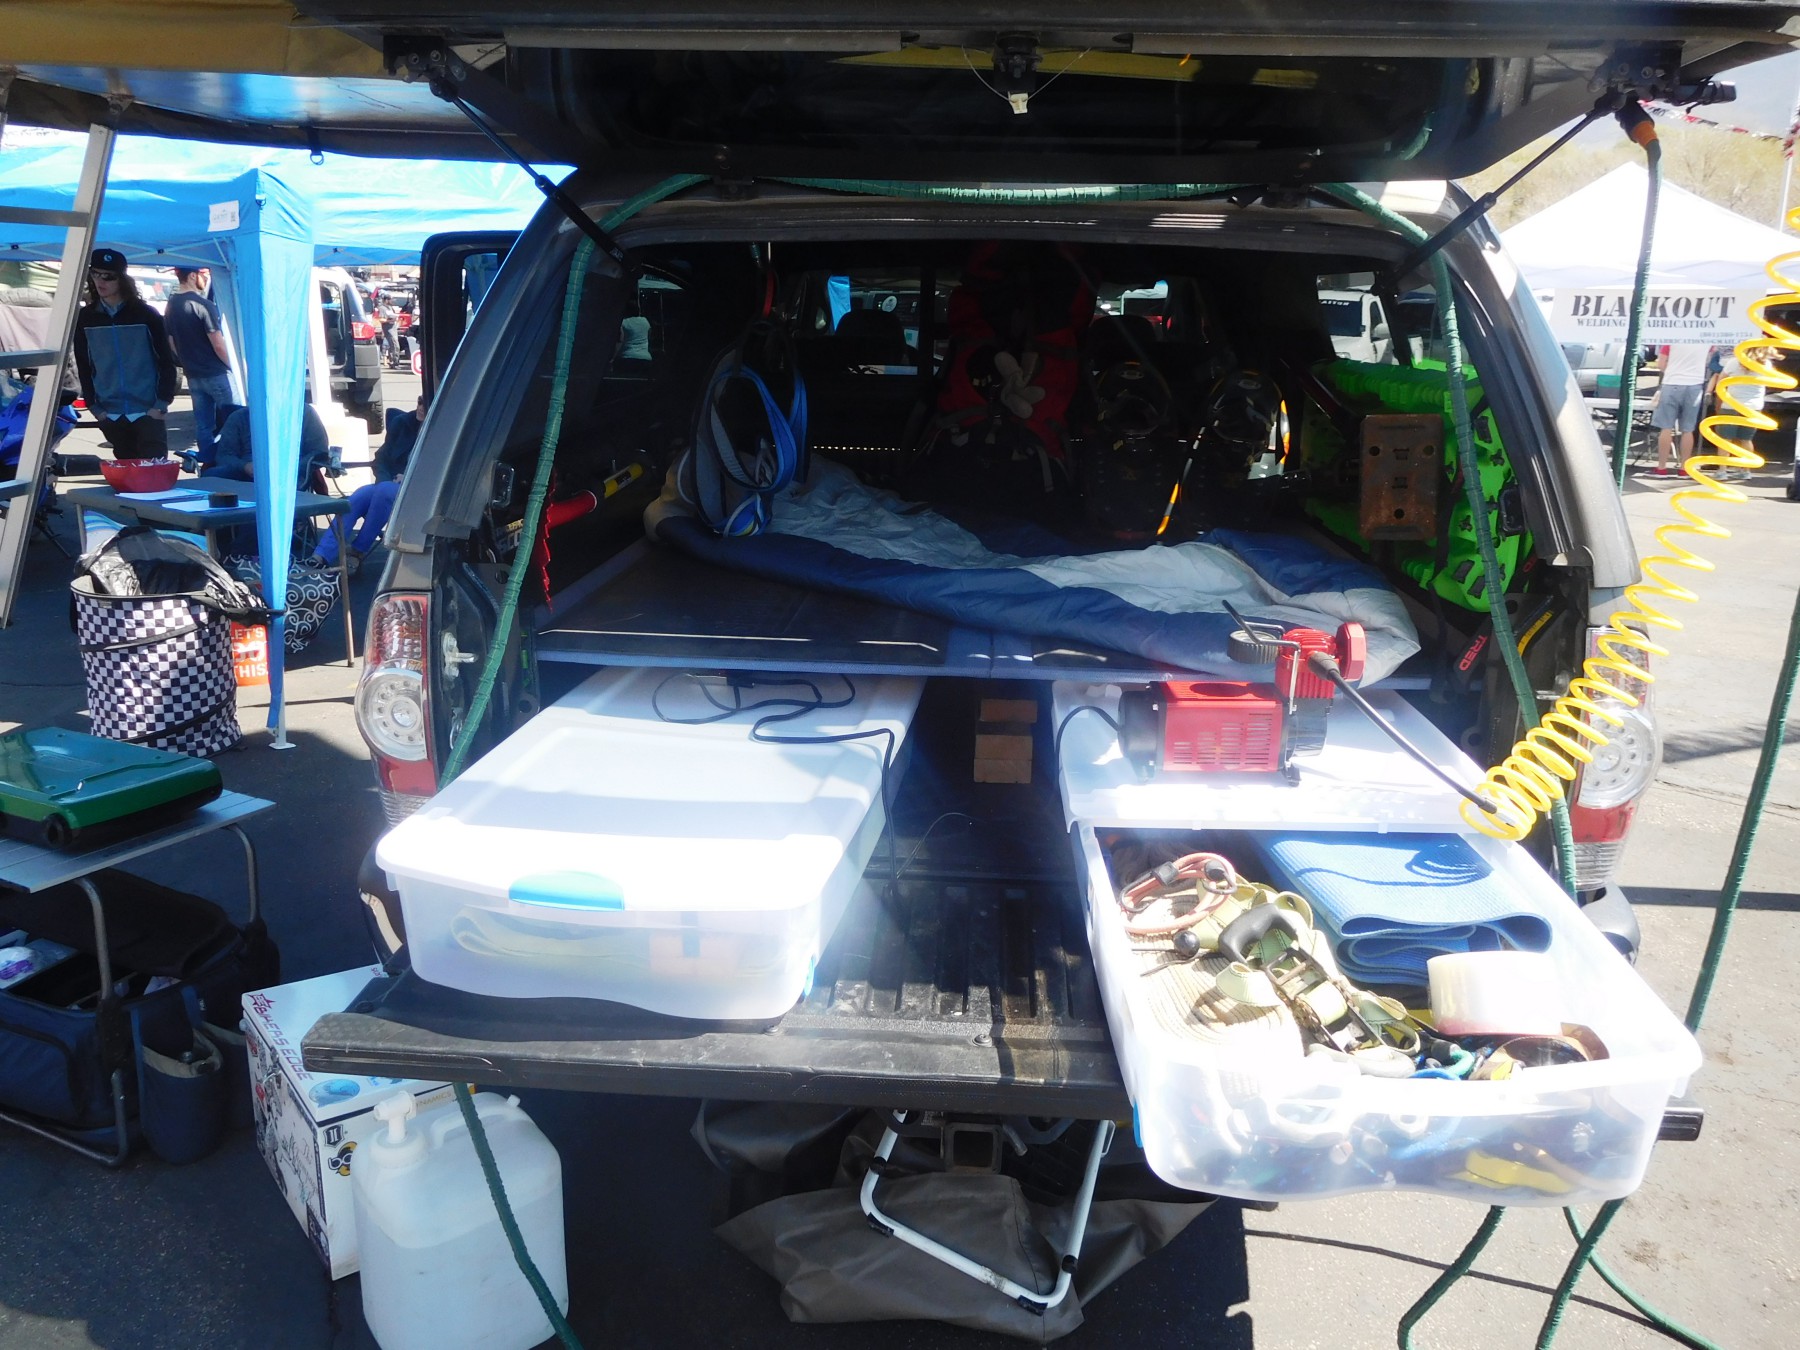
A look at the whole setup. Not an SUV, but undoubtedly a great adventure rig.The homemade PVC roof rack shower. It’s made out of 4-inch PVC that’s been painted black. If I recall correctly, it holds 4 or 5 gallons of water. It’s pressurized by an air compressor (you can see the compressor’s yellow coil hose on the left side of the photo).A garden hose is attached to a water faucet spigot thing that has been inserted into the PVC end cap. You can also see the red air compressor here.The yellow thing with the wingnut is the fill valve (i.e., where you put the water in). A stack of a few rubber washers is between the yellow plastic part and the top of the PVC pipe. The rubber washers create an airtight seal. When I was there, the guy had the shower pressurized to only about 20 PSI, and he was able to spray water about 10–15 feet. A metal tire valve (similar to this and visible coming out of the white PVC end cap) is used in conjunction with the air compressor to pressurize the shower. The end of the hose connects with a quick-connect adapter to the brass hose valve also coming out of the end cap.Another look at the setup. You can’t really see it, but a spray nozzle (something like this) is at the business end of the hose. The shower was simply lashed to the roof rack crossbar with paracord. I was a bit doubtful of how secure this was, but the guy assured me that it was rock solid. It is definitely not an attachment system that will stand up well to prolonged exposure to the elements.The back end of the Tacoma camping setup. The owner travels and camps with his wife and 14-year-old son. The guy and his wife sleep in the roof top tent, and the son sleeps diagonally in the bed of the truck.A closer look at the back of the Tacoma camping setup.
My Thoughts
Let’s face it, these DIY PVC showers are all kind of ugly. Definitely not as sleek as the Road Shower. But this setup only cost about $50 or $60 versus the Road Shower’s $300. There are lots of videos and other information out there about how to make a PVC shower like this (here are the results for “PVC car shower” on YouTube, and this is probably the best build video I’ve seen), but there are a few things I like about this particular shower. I like that the water fill valve is low-profile and not too much of an eyesore. I’m intrigued by—if still a bit skeptical of—the simple lashing attachment system. And I like the super long hose, though if I were to make a shower like this, it wouldn’t be quite this long.
What are your thoughts?
I don’t know if I’ll ever actually make something like this, but I was excited to see it and figure out the details of how it was made. It works great for him, and I wanted to share some details of the build with you guys.
Note: This blog post contains Amazon affiliate links.
SUV RVing reader/watcher Ted was kind of enough to send me pictures of his camping setup in a 2015 Ford Escape and give me permission to post them here. Thanks Ted!
In the captions of the images below, you’ll see some of Ted’s comments in quotes and my (Tristan’s) comments not in quotes.
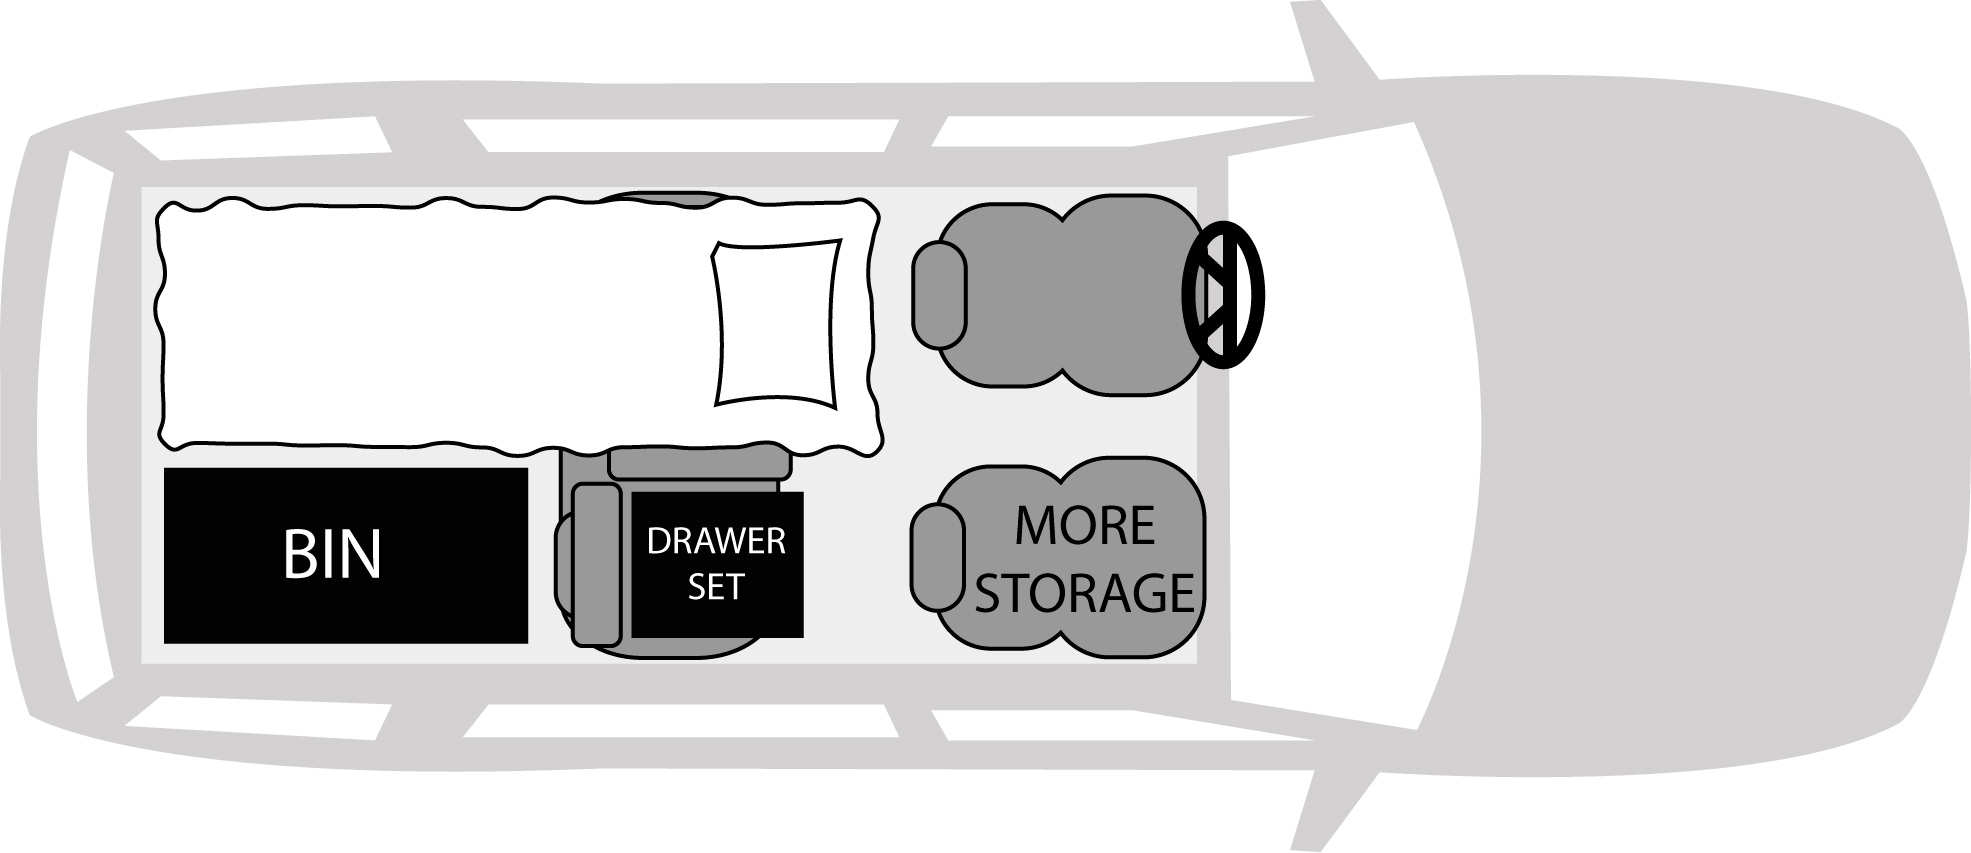
Here’s a rough overhead view of his layout:
A rough overview of Ted’s layout in his 2015 Ford Escape. He’s also made use of the floor space in front of the front passenger seat and in front of the rear seats.
Last week I published reader Mike’s fantastic set of tips for doing laundry while on the road. Soon after that, I got another great email from Mike that started off with this:
“I realized I did not provide a how-to on laundering items by hand. (Forgot that people might not have a clue as to how to do it.)”
He then proceeded to outline his method of washing clothes by hand. It’s much more systematized—and probably much more effective—than my “throw everything into a bucket of water and knead it for a bit” method. Without further ado, here are Mike’s tips.
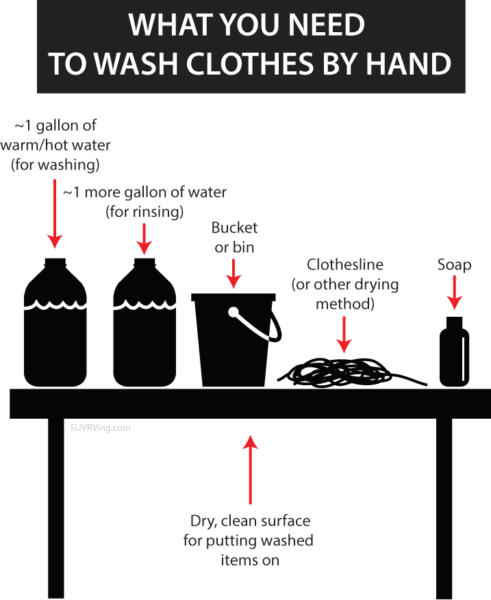
What You’ll Need
A gallon or so of warm to hot water (~98 degrees F, skin temperature) for washing the clothes. The exact amount of water you’ll need will depend on how much clothing you have and how dirty the clothing is.
An additional gallon or so of water for rinsing the clothes. (Warm water is nice but is not necessary.) Again, the exact amount will depend on volume of dirty clothes and how dirty the clothes are.
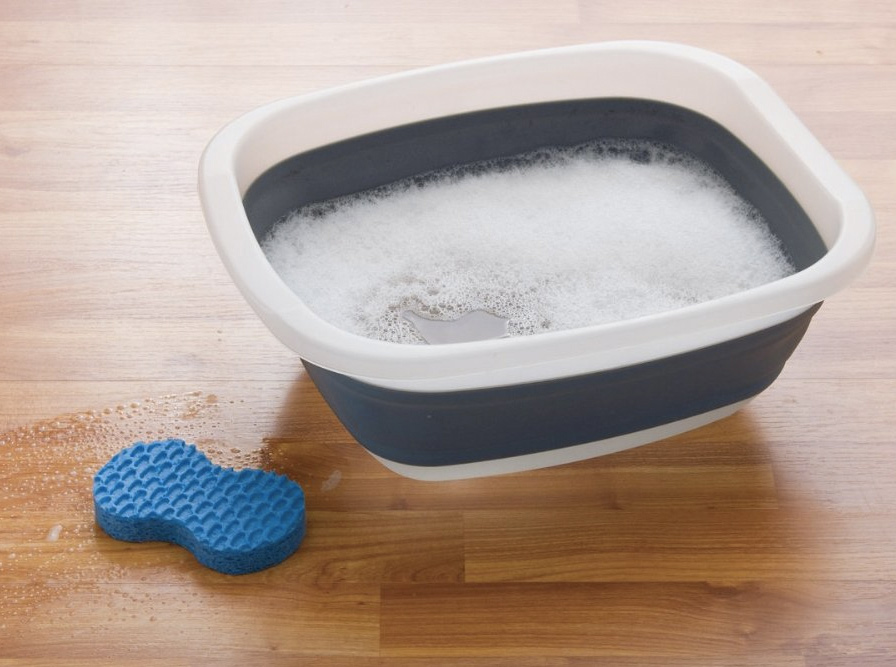
One bucket or tub. A collapsible tub like this is great for traveling. (Use the bathroom sink if you’re staying in a hotel room.)
Clothesline or suitable drying surfaces. A braided clothesline like this is effective and takes up little space.
Soap (For hand laundry it is best to use a true soap, not a modern detergent. Soap is a little easier on your hands and will leave fabric feeling softer than detergent as residue if any will lubricate fabric fibers rather than stiffen them. Also a gentle soap is easier on your skin if some residue remains in the fabric.)
Dry, clean surface that you can set your washed items on. [Tristan’s Note: This could be as simple as a clean trash bag on the ground.]
Preparation
Assuming you have only one bucket or tub, you will need to use it for both washing and for rinsing, so you will need to stage your washed items before rinsing. Sort items you wish to launder from cleanest to dirtiest and start washing the cleanest item first. Be prepared to set the washed items aside on a clean surface while still soapy.
Washing Instructions
In a bucket or tub, use about 1 gallon of warm to hot water, adding enough soap to ensure the water feels slippery. Suds are good, but you do not need many. Swish the water around to mix.
One item at a time, work fabric into the soapy mixture. Move it around, squeeze it and so on. Do you best to get the item clean. Usually about 20 seconds to one minute per item is all you need. Gently squeeze out the excess water and set the item aside on a clean dry surface and start washing your next item. If you see the wash water becoming too dirty, you’ll need to either dump it and add new wash water or add some fresh rinse water.
When all your laundry has been washed, it is time to begin rinsing. Dump your wash water and fill your bucket or tub with clean water. Warm water is nice but is not necessary.
Rinsing and Drying
Start rinsing the cleanest items first, the same order as when you were washing the items. This keeps the wash and rinse water the cleanest for the longest amount of time. Again, if you see the water becoming too dirty, add some clean water to the mix or dump it all out and fill the bucket up again with clean water.
Always rinse well. Rinse one item at at time. Squeeze out, but do not wring out, the water from the fabric. After the initial squeeze out, you can wrap the fabric inside a dry bath towel and squeeze or pat dry to absorb more moisture which will help speed drying.
Ease item back into shape and let dry flat, away from direct heat or bright light, or hang the item on your clothesline to dry.
I’ve recently gotten a couple of great emails from a reader named Mike about doing laundry while traveling on the road. My preference is to find a laundromat, but as Mike points out, that is not always possible, and he has tips that I think a lot of people will find useful. With his permission, I’m publishing his emails here (edited and rearranged slightly) for everyone to enjoy and get value from. I’ve also added a few of my own comments. Thanks for the great tips, Mike!
Doing and Drying Laundry
A few years ago I had to travel by car, 33 states in 20 days, staying in motels and hotels. In my case, I was traveling so much, there literally was no time to find and sit in a laundromat which was another reason I chose handwashing of garments in the evening once I was in my hotel room.
Mike recommends a collapsible tub like this for doing laundry.
I had 2 sets of clothes and washed items every day or so using a 2 gallon bucket that I carried my laundry equipment in. I think a collapsible tub like this might have been better as a space saver. [Tristan’s Note: A bin like this could, of course, also be used for washing dishes or even muddy shoes.]
Anyway, the best thing ever to help you do hand laundry effectively is a clothesline like this. Light, adaptable, strong, and you do not need clothespins! Can be attached probably a thousand different ways. [Tristan’s Note: Yes, these are great! I’ve used them in the past for my international travels.]
Rinsing is very important when washing any item by hand. Water management would be much harder SUV RVing than in a hotel room for instance, but if only a little bit of soap were used, rinsing would be less rigorous of course.
Natural Soaps
Natural areas often suggest/require something like the following with regard to washing things while on the land. From the National Park Service:
“All soap, including biodegradable soap, should be used and disposed of away from water sources. Carry water 100 feet from the source before washing. This includes washing clothes, dishes, and yourself.”
“To wash yourself or your dishes, carry water 200 feet away from streams or lakes and use small amounts of biodegradable soap. Scatter strained dishwater.”
I’ve had a small one-person business since 2003 where I import laundry soap from England. It is plain pure soap with no additives and no perfumes and is 100% biodegradable. While Soap Flakes or Liquid Soap Flakes (the products my company imports) can be used for anything including dishes, these soaps are best used as simply soap. As in “wash in soap and water”. Nothing magical, not a miracle cleaner, but very good soap that certainly works well.
I note that both the products above will not harm durable water repellent (DWR) fabrics as the soap is true soap and not detergent.
[Tristan’s Note: I’ve used Dr. Bronner’s for washing clothes and had good results. I like the citrus orange kind.]
Clothing Recommendations
Sounds strange, but silk is super strong and cleans really well with soap and water and dries quickly. Silk undergarments work well when repeated washings are necessary over a period of weeks or a month or so.
All sorts of other special fabrics are great for pants, shirts, socks and so on so as to wash easily and dry quickly while more or less maintaining a good freshly pressed look even when dried on a clothesline.
Here are a few travel clothing sources I have used and recommend:
Years ago I purchased one or two pieces of clothing from all three sources for easy washing and quick drying on the road while maintaining a neat look without ironing and so on.
Easy DIY Travel Shower
A useful cleaning/washing up tip is to take an ice pick—you could also use a deck screw in a pinch—and make 3 to 5 tiny holes in the cap of a throwaway water bottle; you know, those bottles with drinking water in them that you buy by the case. An ice pick makes a faster, easier, and nicer hole than slowly twisting a deck screw, but both will work. Careful use of a knife blade point will work as well. I’ve tried knife blade “slots” poked into a bottle cap, and they will work too, but I find ice pick holes to be the nicest and best for me.
Leave the cap on the bottle and gently press the ice pick through to make some holes in the top of cap.
You can do the same with 1L or 2L (used) plastic soft drink bottles filled with water, and use them for washing hands, even showering. It is so simple.
You can save the various caps you made for quicker future use and use a bottle’s original bottle cap to reseal any unused water remaining in the bottle.
By varying the number, placement and size of the holes you make in the cap, you can control the flow of the water leaving the bottle. Well, that and the amount of pressure you use when squeezing the bottle.
Sort of tip and squeeze and wash your hands or whatever, and with a 2L bottle or two or more 2L bottles, even take a decent shower.
In the past I have purchased those special caps (like this) that fit on plastic Coke bottles, with extra air holes in the cap, however the water comes out awfully fast, too fast for me. If the amount of water used is not an issue, using these special caps feels like you are taking regular shower at home. Great flow.
But just poking holes in a regular plastic bottle cap that comes standard on the bottle, works plenty well for me. Doesn’t use nearly as much water either.
I haven’t seen this bottle cap idea anywhere. Figured it out myself. As simple as it is though, I’m sure others have probably done something like this also. I just think it is really cool. Like you don’t even need pumps or battery powered showers or special anything. Plastic bottles in various sizes are everywhere. Cheap or free and reusable. True, it is not as fancy as those special sink or shower gadgets, but you do not use much water this way either. Plus you can make the kind of water flow the way you want.
[Tristan’s Note: I have done something similar, and it does work well. I used an awl when I did it, but I imagine a very small drill bit would also work. The Mud Dog Travel Shower, SpaTap, and Bottle Blasters are other options if you don’t want to make your own. I haven’t tried any of them, but the Bottle Blasters one looks particularly appealing because it doesn’t have a million holes in it, has two different sides to fit different sizes of bottles, and is cheap ($8.99 for a 3-pack).]
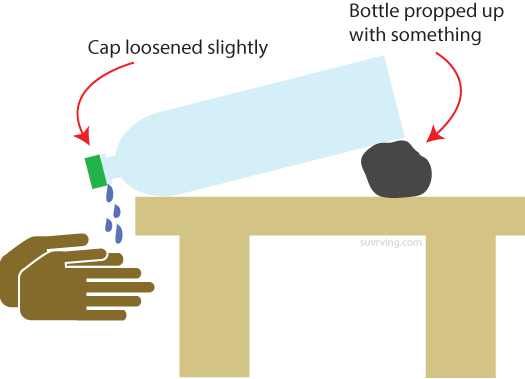
A Simple and Easy DIY Faucet
If you need a small steady flow of water to wash both hands at once, sort of like using a sink at home, you can rest a bottle of bottled water on a rag, stick, rock, table edge or whatever, pointing the bottle’s opening downhill a bit and then slightly loosening the regular cap (no holes in it) let the water dribble or trickle out.
Wash your hands under the dribbling water as if you were washing your hands in a sink. Turn the cap as if you are opening or closing a faucet tap.
Even a small but constant dribbling amount of water can wash your hands quite well and this method uses almost no water in the process.
***
See also Mike’s other tips about how to actually wash and rinse clothes by hand.
[Note: This blog post contains Amazon affiliate links.]
There are a few SUV RVing-related news items that I’ve come across recently that I wanted to give my thoughts on:
1. A new hardshell rooftop tent on the market
I’m a big fan of hardshell rooftop tents (RTTs). They seem to be faster and easier to set up than the soft-sided ones, plus they’re more aerodynamic and therefore less likely to negatively impact your gas mileage. As reported over at GearJunkie, South African rooftop tent company Eezi-Awn has come out with its first hard-shell RTT, the Stealth:
Eezi-Awn Stealth roof-top tent [Photo from Equipt]Pretty, isn’t it?
Equipt is the sole US retailer of the tent. Retailing for $3,900, it is definitely extremely pricey, as most hardshell tents are, but it sure looks awesome. One other hardshell RTT that has come across my radar recently is the Roofnest Sparrow, which checks in at a more reasonable (but still spendy) $2,095.
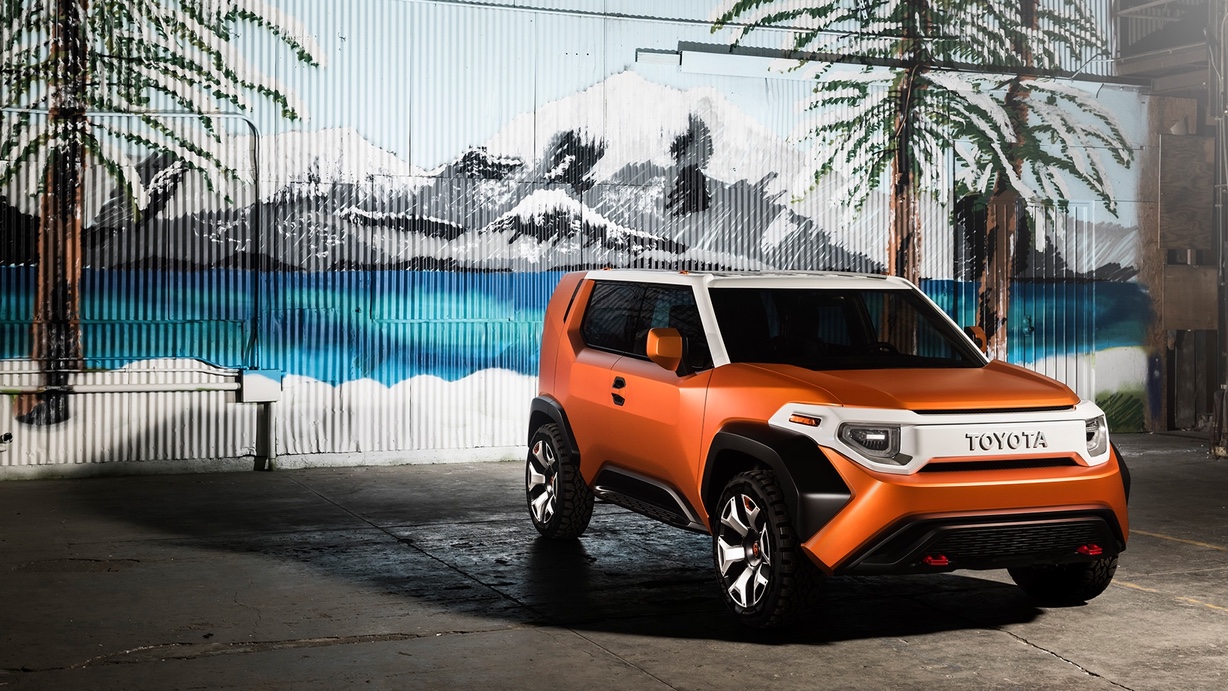
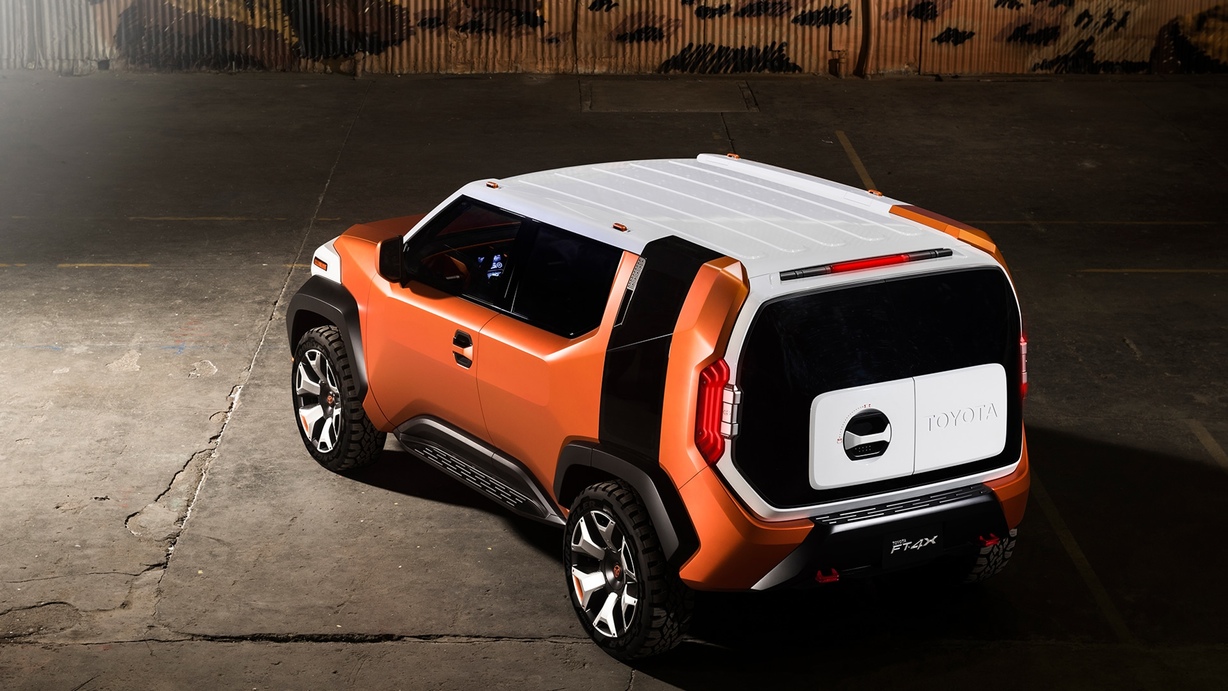
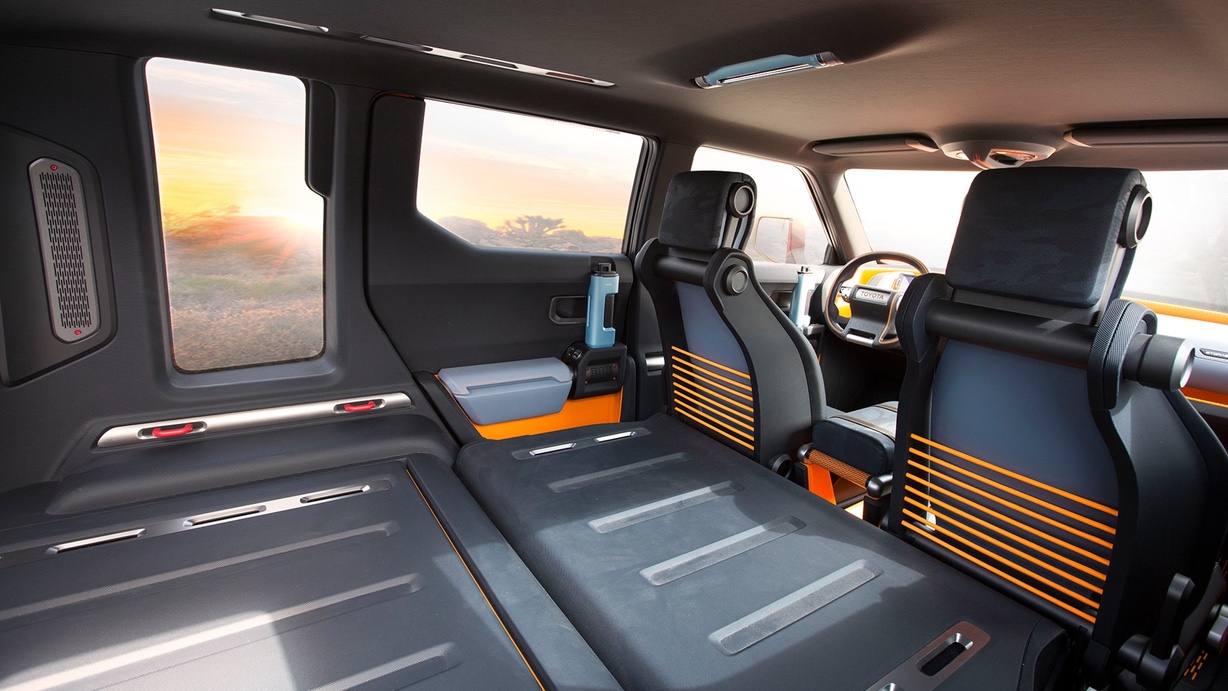
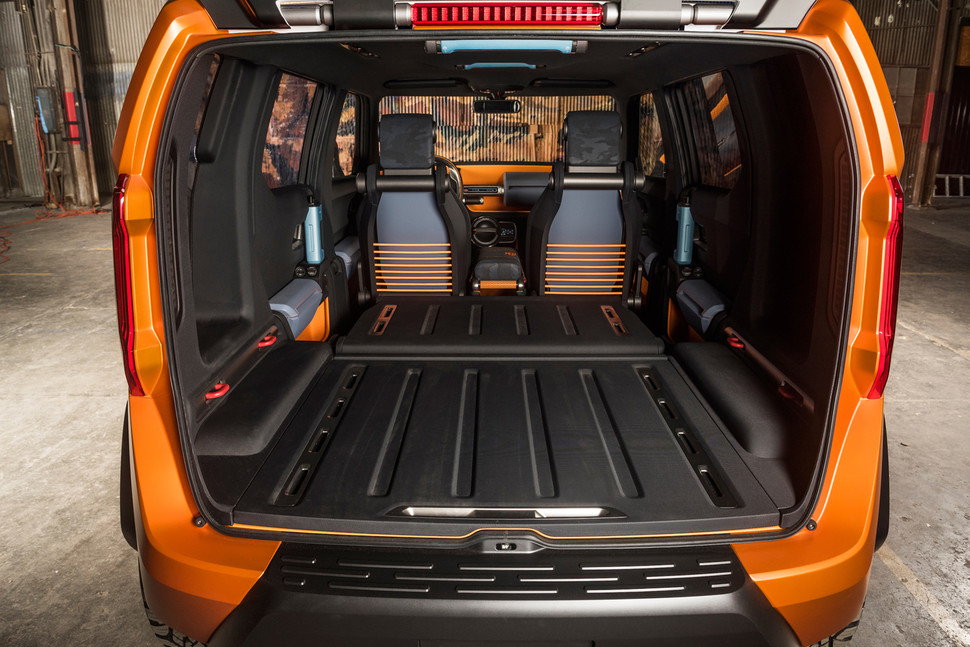
2. New Toyota concept car is the ultimate SUV RVing vehicle
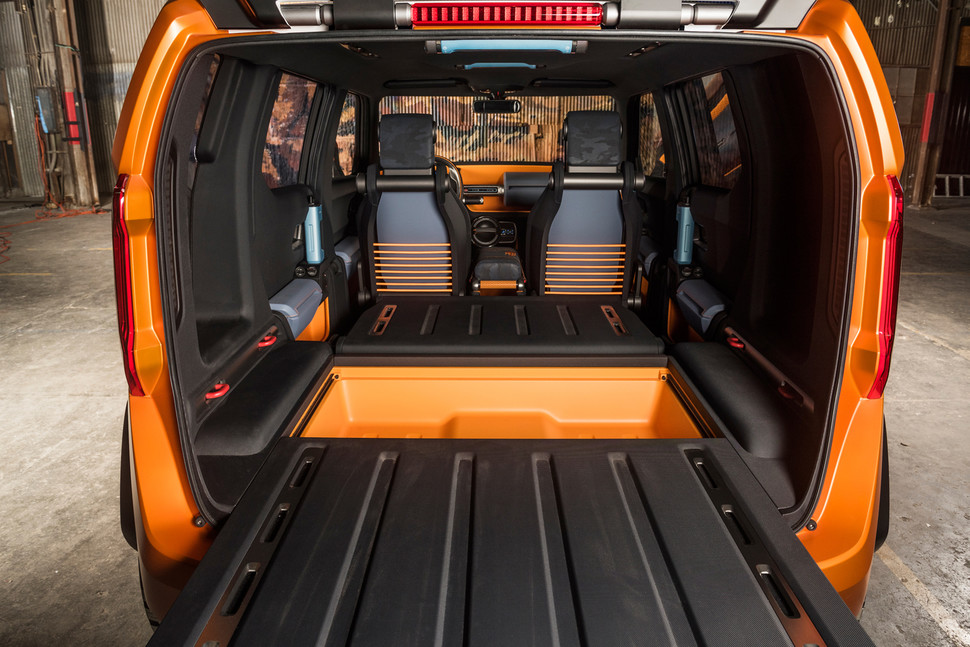
Toyota just released info on its latest concept car. It’s an SUV called the FT-4X, and Outside magazine called it “an REI store on wheels” and went on to explain:
“The door handles? They’re removable water bottles. The radio? It’s removable, too, and includes a battery so it can stream Spotify in camp. The center armrest is a North Face sleeping bag, the rearview-mirror-mounted camera is a removable GoPro Hero Session, and the dome light is a removable LED flashlight and lantern.”
The rear seats fold down perfectly flat, and the vehicle’s boxy interior looks very roomy and reminiscent of a Honda Element.
The SUV has a lot of other interesting little features, and you can read about them all over at Outside. Here’s a picture gallery (all photos from Toyota):
3. The Camperbox car bed
I’m not so sure about this one. It’s a current Kickstarter project and is basically a pre-made bed that you can insert into the back of your SUV, car, van, etc.:
The Camperbox
First off, it’s relatively expensive at $157. Second, the vehicle in the GIF above shows a rear cargo area that’s already flat. You could just roll out your sleeping pad or mattress on the floor itself. I guess the real benefit of something like this would be that it gives you space for your gear to go underneath, but you could easily make something like this out of plywood and 2×4 lumber for $20. Third, if your vehicle does not have a sleeping surface that is already flat enough for something like this to work, then you’d have to prop it up by sticking pieces of wood or something underneath the ends. I dunno, I suppose this could be useful for some people in some situations, but I don’t think it’s the best solution. You’re better off building something that is customizes for your specific vehicle.
What are your thoughts on these three little news tidbits?

![Eezi-Awn Stealth roof-top tent [Photo from Equipt]](https://suvrving.com/wp-content/uploads/2017/04/eezi-awn-stealth.png)