This video is my step-by-step guide to building a portable solar “generator” for camping, basic off-grid living, etc. It’s basically a self-contained ammo can-style setup (i.e., a lot of people build something like this using an ammo can/box), but my batteries are larger than what I could fit into an ammo can, so I had to upgrade to a larger box. I use it to power my laptop, charge camera batteries, run a fan, and charge my phone and tablet. (Click here if you can’t see the video below.)
The video is the main thing, but the information below the video here is supplemental to help you out.
BEFORE WE START
I am not an electrician. I basically have no idea what I’m doing, but I was able to successfully build a solar setup that works well so far. Follow these instructions at your own risk. You’re on your own here. Don’t blame me if you mess something up, break something, or hurt someone.
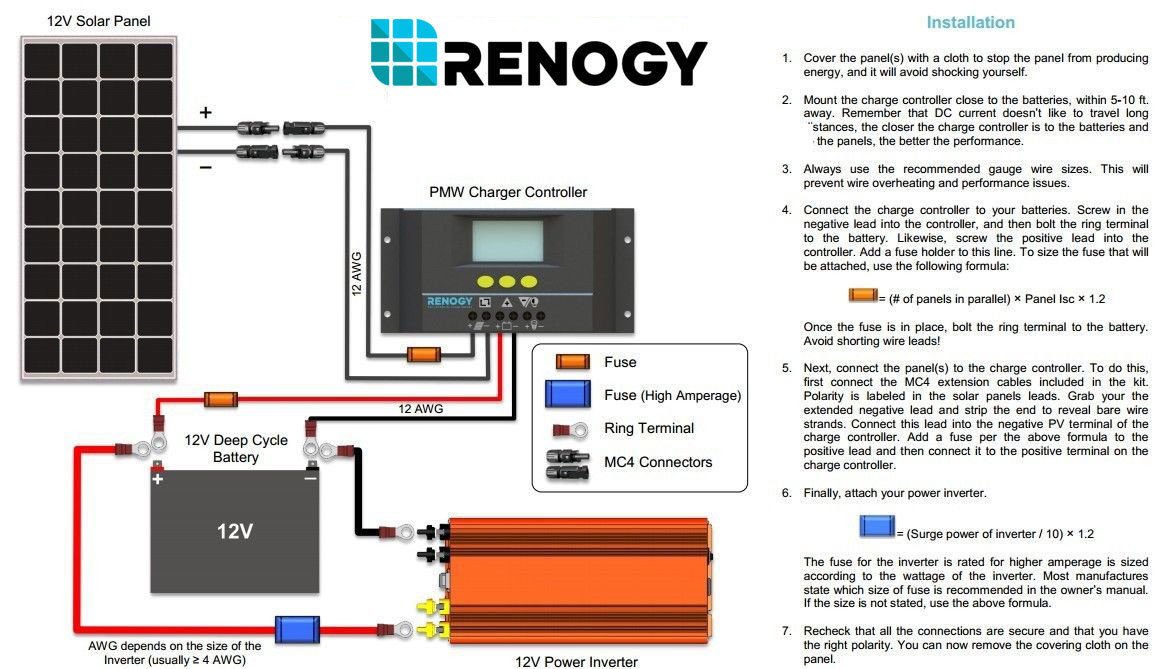
This is the diagram/schematic that I followed (click it for larger version). I recommend printing it out:
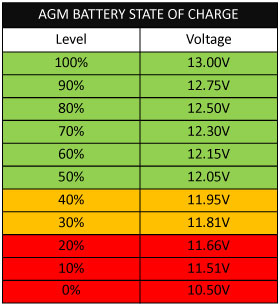
And then this is the battery charge percentage chart that I reference in the video.
COMPONENTS
These are the components I used, and I’ve included links to the products on Amazon or Walmart.com as appropriate. (Note that most of these are Amazon affiliate links, and I’ll get a small commission if you buy them or something else from Amazon through the links.)
- 100-watt solar panel
- 2 35Ah batteries
- Mighty Max Battery 12V 35Ah DC Deep Cycle SLA Battery ($64 each; $128 total)
- 400 watt inverter
- Solar charge controller
- Fuse holders
- E Support 12 Gauge ATC In-Line Fuse Holder ($8 for a 5-pack, but I used only 2 of them)
- Wired 12-volt socket
- Plastic box
- Hefty HI-RISE Heavy Duty Storage Bins, 18 Qt. ($6 @ Walmart)
- Solar cables
- Box of assorted cable connectors
- Hyper Tough Assorted Connects ($4 @ Walmart)
- 2 7.5-amp fuses
- Cables for wiring batteries in parallel
- Machine screws
- 8 of them; #6 – 32 x 3/4″ ($2 @ Home Depot)
****TOTAL: $390*****
TOOLS USED
- Drill
- Drill bits (I used the 7/64″ one to drill holes for the machine screws)
- Spade bits (I used only the 1/2″ one)
- Pliers
- Tape measure
- Screwdriver
- Small screwdiver
- Utility knife
- Wire stripper/crimper – I bought this one from Walmart, which is also currently on Amazon.
STEPS
I won’t go into a TON of detail here because I do that in the above video. But just as a reference point, here are the steps I went through to create my portable solar setup:
1. Gather materials.
2. Cover solar panel with towel.
3. Mount charge controller.
4. Cut a bit of the plastic off of the lip of the side of the box.
5. Mount the inverter.
6. Cut the 15′ solar cables down to size (10 ft).
7. Cut a ~13″ piece of the black cable from the 5-foot piece just cut off.
8. Strip the ends of the 13″ black piece and one of the red fuse holders.
9. Add a ring terminal to one end of the 13″ black piece and the red fuse holder.
10. Drill a wire passthrough hole just below the charge controller.
11. Plug one end of the 13″ black piece into its respective terminal/socket on the bottom side of the charge controller.
12. Attach the other end of the 13″ black piece (the end with the ring terminal) to the negative side of the battery.
13. Repeat steps 11 and 12 with the red fuse holder.
14. Cut off another ~13″ from the end of the red solar cable and strip the end of the remaining solar cable.
15. Strip both ends of another one of the red fuse holders and strip the end of the long black solar cable.
16. Use a butt connector to join the red solar cable and the red fuse holder.
17. Connect the stripped ends of the long solar cables to their respective terminals on the underside of the charge controller.
18. Plug the long solar cables into the solar panel.
19. Attach the 12-volt cigarette lighter plug socket thing to the battery terminals.
20. Attach the inverter cables to the inverter after drilling a hole for the cables to go through.
21. Connect the inverter to the battery by plugging the inverter’s cable into the 12-volt socket .
22. Uncover the solar panel.
23. Test everything to make sure it works.
I love your solar setup, but I would really like to know why you used two smaller batteries instead of one larger battery?
Hi David. Two reasons. First, I liked the idea of being able to add on extra capacity $64 (the price of one of those batteries) at a time instead of having to spend the larger chunk. Second, I’d ordered one of the batteries and had planned on just using that and seeing how it worked (I wanted to start with a low capacity and then add on from there), but then a second one arrived the next day as a birthday gift from my sister, so I figured I might as well put it to good use immediately.
Perfect. That’s pretty much exactly what I had hoped for. That kind of flexibility is what I’m looking to do in my set up.
Hi Tristan
I’m looking at the Renogy Schematic. In the formula for the panel to battery fuse, I’m unsure what is the meaning of “lsc” in that formula. ((# of panels in parallel) x Panel lsc x 1.2) Can you please tell me what this means so i can solve the formula. Thanks for the very informative how-to video.
glennray
Hi Glennray. The “Isc” is the short circuit voltage. The I is capitalized and the SC are in subscript text. Here is where I found that information for my panel: http://www.renogy.com/template/files/Specifications/100-Watt-12-Volt-Monocrystalline-Solar-Panel-Specifications.pdf
Thank you so much for this video! I have committed to copying you, and purchased all of the items you have listed – I am just wondering what you used to connect the two batteries and how you did that.
We are going camping next week and will be gone for a week – was hoping to have it assembled before our trip.
Thanks!
Hi Brandi,
Were you able to complete yours, and what did you power with it? Was it enough for what you wanted to power? I like how compact this is, and Im asking because Im trying to determine if this will suit my needs or if I might need to go bigger.
Thanks!
Tristan,
great video. Build a similar one with 2 batteries and added 12V outlets and separate USB incl. volt meter (both on on/off switch) so I don’t have to power up inverter and when not on solar. The only thing I saw was the charge controller is always drawing power, esp. when you store it away between trips/emergencies/power outages. Thinking about an on/off switch on the positive from the charge controller to the battery. Don’t want to disconnect everything at the battery. Also added a connector for a tickle charger so it is always good to go in a power outage.
Two comments, Tristan. I’m not nit picking – It was just something my Dad taught me when I was young.
1. Always “tin” the ends on all stripped wires (we also used to call that process “sweating”.) Then when you crimp them, you swage the solder into the terminal end. (When you are your age, you can use a firm grip, but as you found out – not always!) When you are in your 70’s , like me, your grip on the crimping pliers is nor so firm.
2. When you put the wire into the ring terminal, make sure you can see the wire poking past the end of the insulation at the ring end and also, ensure that the wire insulation is in the end of terminal insulation (that’s why you do the second crimp.) The inside of that end has “teeth” to hold that part of the coated wire in the hole. That is especially important if the unit moves location from cold to hot and reverse a lot. To make doubly sure, I also use Heat-shrink sleeves as well (stops possible moisture penetration.)
great. how much power? example for running TV. powered speakers, light appliances as needed, (ie evening through night ; next day could start engine to recharge. i still have a thombetta 4 term continuous duty solinoid to utilize. I sold my modified sinewave xantrex HF1800 which was invert/convert and charger so could charge back up battery when driving, now looking for a pure sine one pure sinewave maybe 1000watts advice?
Hi Tristan,
I camp off grid and use solar panels and a solar controller to charge my deep cycle trailer battery. I recently purchased an electric bike with a lithium battery and need an inverter to charge it. I have head “sine wave” and “modified sine wave” which is best for my application? Any other thoughts or concerns?
Tristan, Great video and diy build for solar generator. How has the capacity of thoses MightyMax 35 amp hr batteries been holding up? And have you been only taking the batteries down to 50 percent as to prolong usefully life of the batteries.
Jeff, I don’t use this setup anymore and haven’t for a year, so I can’t really speak to how they’re holding up. Sorry!
Tristian, since you are no longer using this battery system, could you comment on how well it worked for the time you were using it.
So what was the main reason you no longer are using this battery solar set up. What do you use for battery power now for your travels. Thanks
It worked just fine while I was using it. No issues. I’m now using a Jackery Explorer 500, which I like much more. I got it for free in exchange for doing a review, though. But I think it’s worth it. It’s much nicer to have a smaller, lighter unit to easily move around. And the quality is much better than my cobbled together build. If I were to do it all over again, I’d just save up for the Jackery unit.
Hi Tristen, loved your original work. Getting ready to set mine up. Any chance, you could do another video showing how To DIY Your new setup with – Jackery Explorer 500, which You like much more. Thanks. Malir
Kemimoto cup holder is a convenient ATV cup holder with a classy black finish. It’s suitable for most vehicle types, not just ATV, and it holds a different cup and bottle types. The sturdy construction makes it stable and ensures a long lifespan.
This is a sweet setup. I am in the process of putting together a solar portable setup for a ham radio. I just want to know if you have connected anything with a draw on the batteries for a considerable amount of time without having to charge them and how long you were able to discharge them using your electronics before having to recharge? This is a nice economical starter unit. I suppose in the future you could get a bigger battery like a 100AH that would last a much longer time between charges that should still fit in the same box.
Have you described your new/current set up somewhere? I’m researching to set up my own and generally love how you set things up. Apologies if I’ve just missed it!