I decided I wanted to make better use of the shelf space in the back of my Toyota RAV4. I was originally going to build slide-out drawers to put on top of the shelf, but I instead ended up simplifying the concept by just attaching bins to the top of the shelf to create “drawers.” (Click here if you can’t see the video below.)
Ode to an Ancient Jeep: Sleeping and Camping in a 1995 Jeep Cherokee
[Tristan’s Note: I had the pleasure of meeting up with SUV RVing reader and viewer Robert DeNike when I was in California in January. We had a great time chatting about adventures past and future, and we’ve kept in touch since then. He recently sent me a ton of fantastic photos and info about his sleeping/camping setup in his 1995 Jeep Cherokee Country. All of the photos and words below are his, but I will occasionally add my own thoughts, which will be in brackets. Thanks for sharing your adventure rig, Robert!]
****
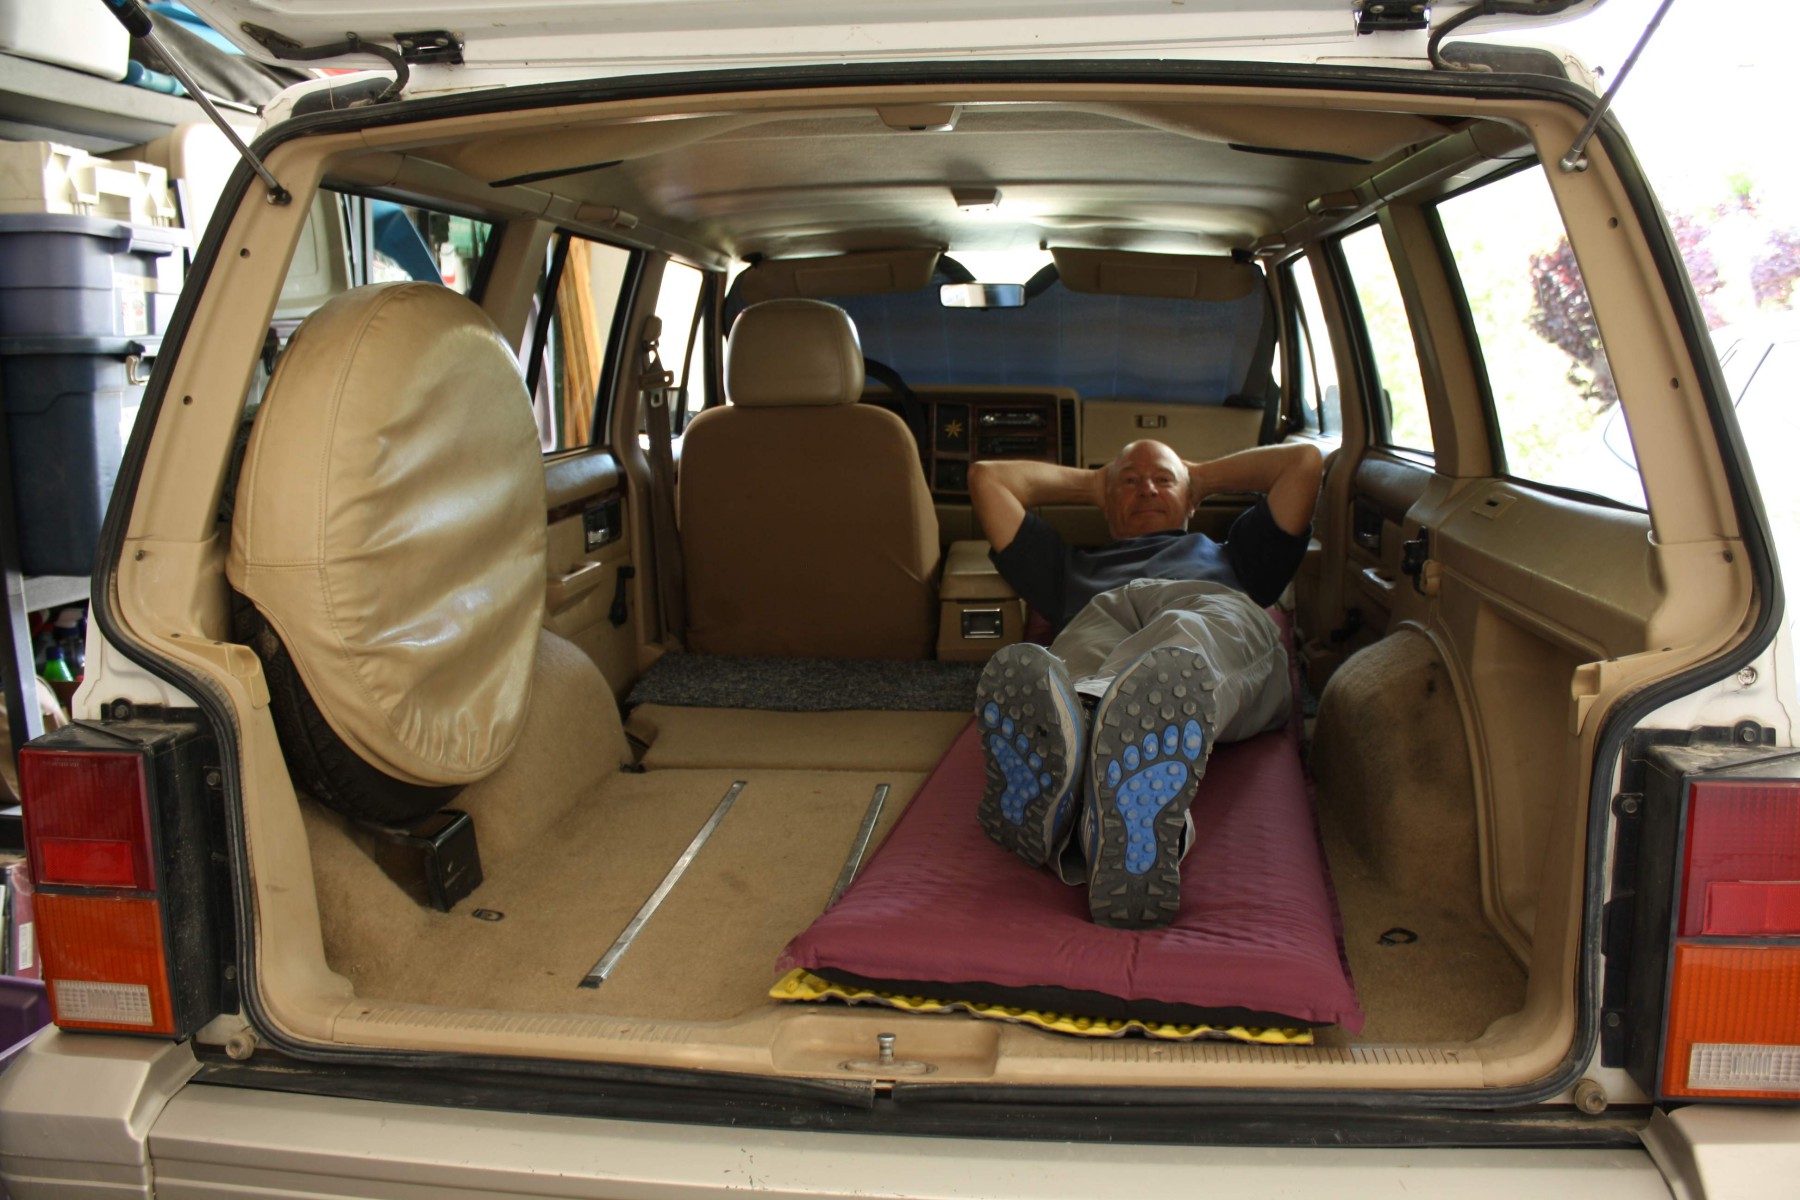
It came off the assembly line in 1995, before some of you were born. But 22 years later it still runs like a Swiss watch, taking me over rutted, boulder-strewn roads far from the maddening crowd.
I’m a backpacker, so the Jeep’s purpose in life is to get me to trailheads at the edges of North America’s great wilderness areas. After 10 days out there, I am thinking fondly of the Jeep and the little luxuries within. It’s always with great joy and relief that I catch sight of it as I emerge from the wilds, waiting there patiently like a loyal dog.
One-Man Show
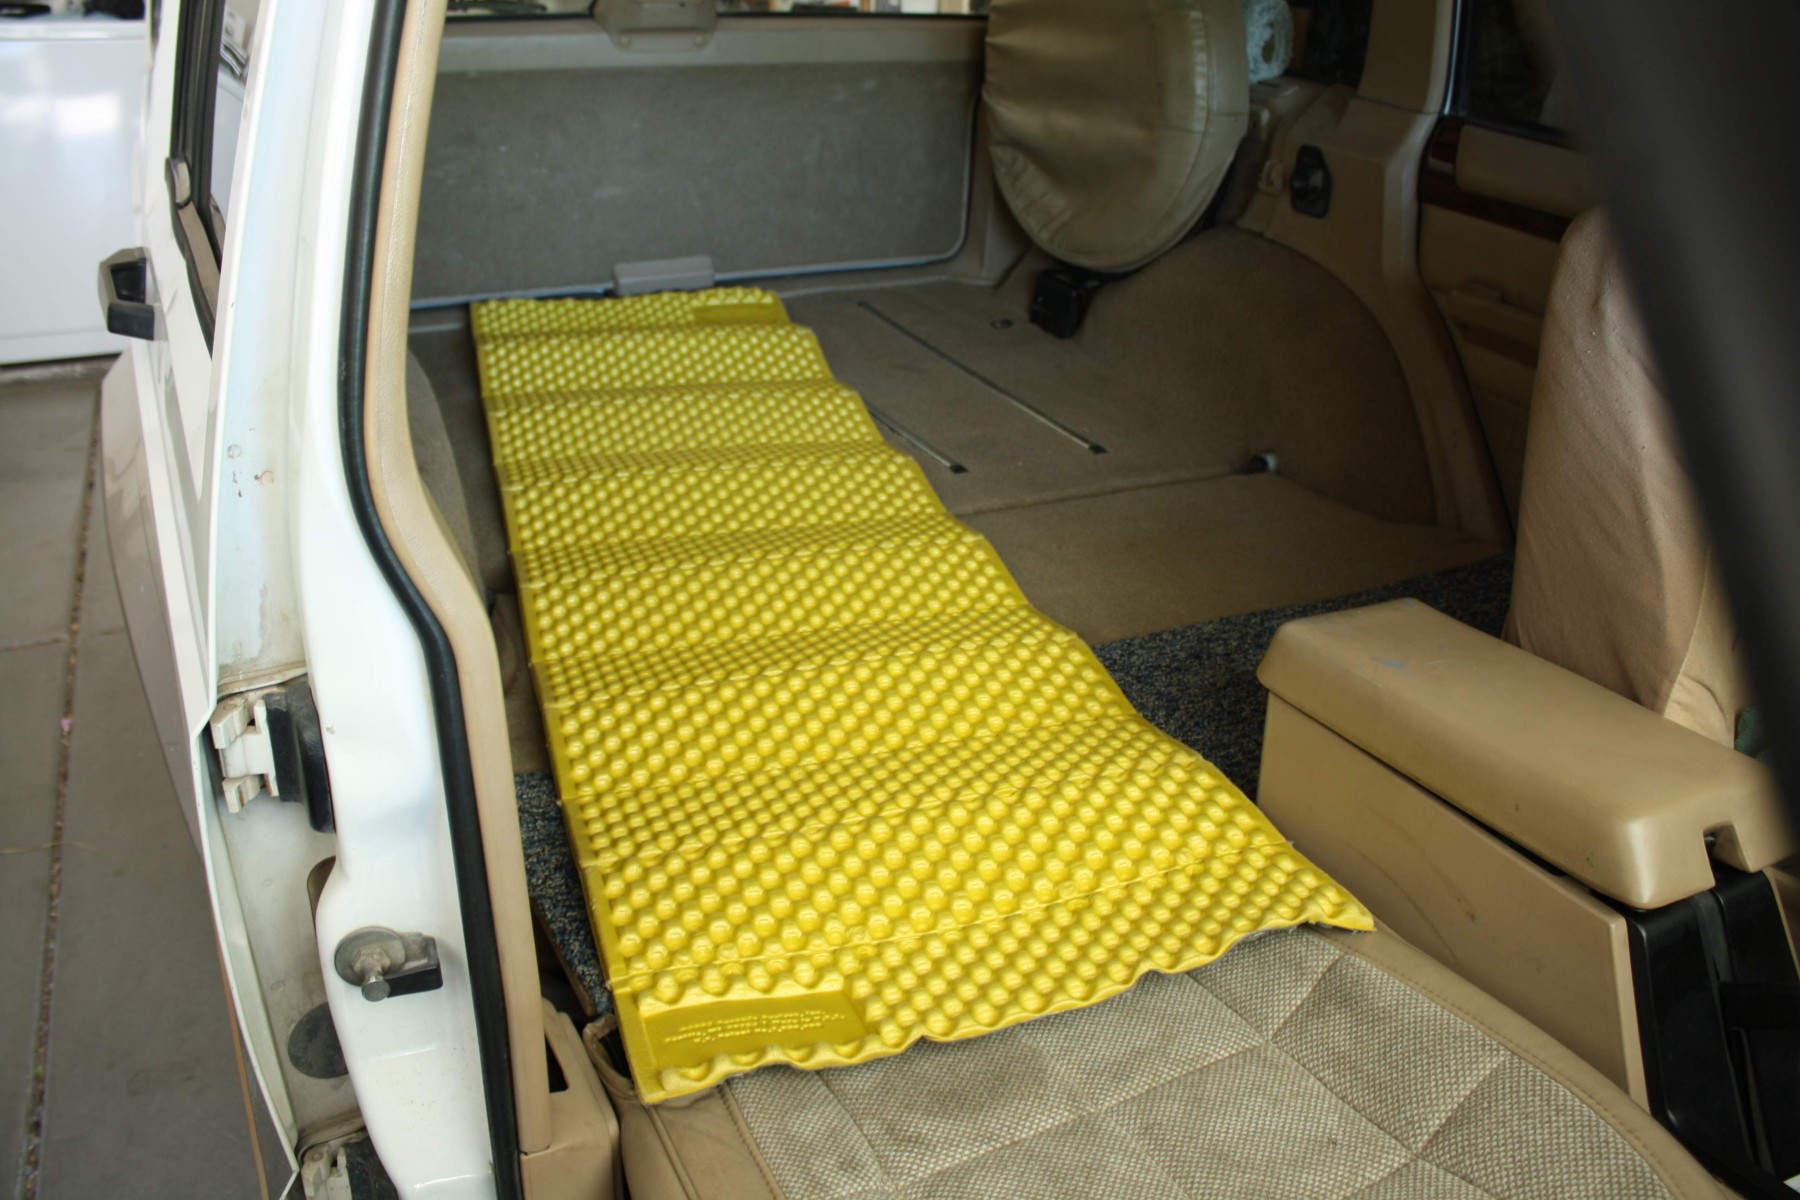
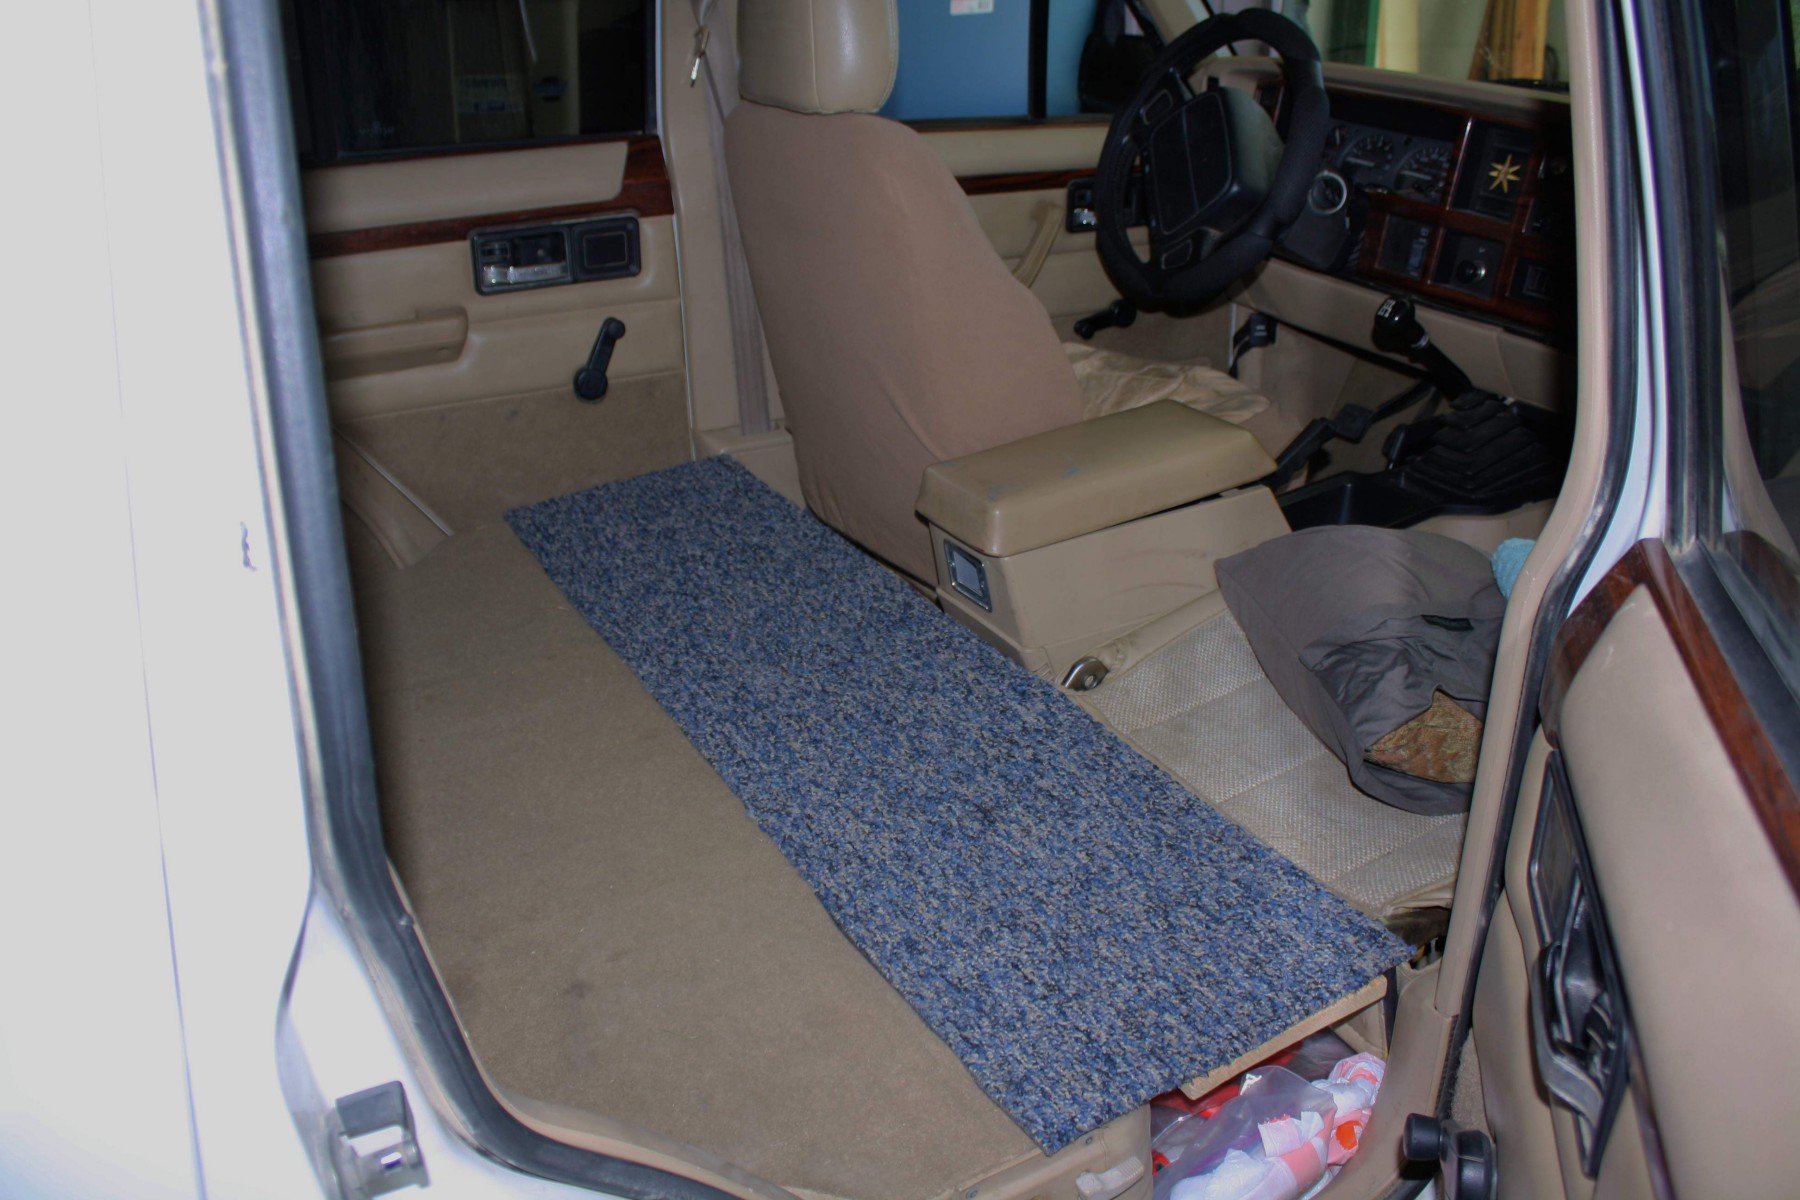
The first modification I made was to remove the rear seat bench. Permanently. The seat back now folds down flat, creating a sizable cargo space. This left the seat belts hanging uselessly in the way, so I unscrewed and cut out all except mine. Finally, I detached the front passenger seat back so I can stretch out fully when lying down, which also opened up the cargo area even more.
The Jeep now accommodates exactly one rider: me. So if your wife or kids want to go camping with you, or even just shopping at the local Costco, forget it. But my wife would rather go to the dentist than go camping. That’s OK; I love her anyway. The point being: these modifications are for the committed solo SUVer only.
Photo Tour
Continue reading Ode to an Ancient Jeep: Sleeping and Camping in a 1995 Jeep Cherokee
How to Hang a Hammock from Your Car, SUV, Van, or Truck
Warmer weather equals hammock weather! In this video I go over several ways to hang a hammock from your SUV, van, truck, or other vehicle. One side has to be attached to a stationary object (a tree, pole, another vehicle, etc.), and the other side attaches to your car. (Click here if you can’t see the video below.)
DIY PVC Rooftop Solar Shower for a Car, Van, SUV, or Truck
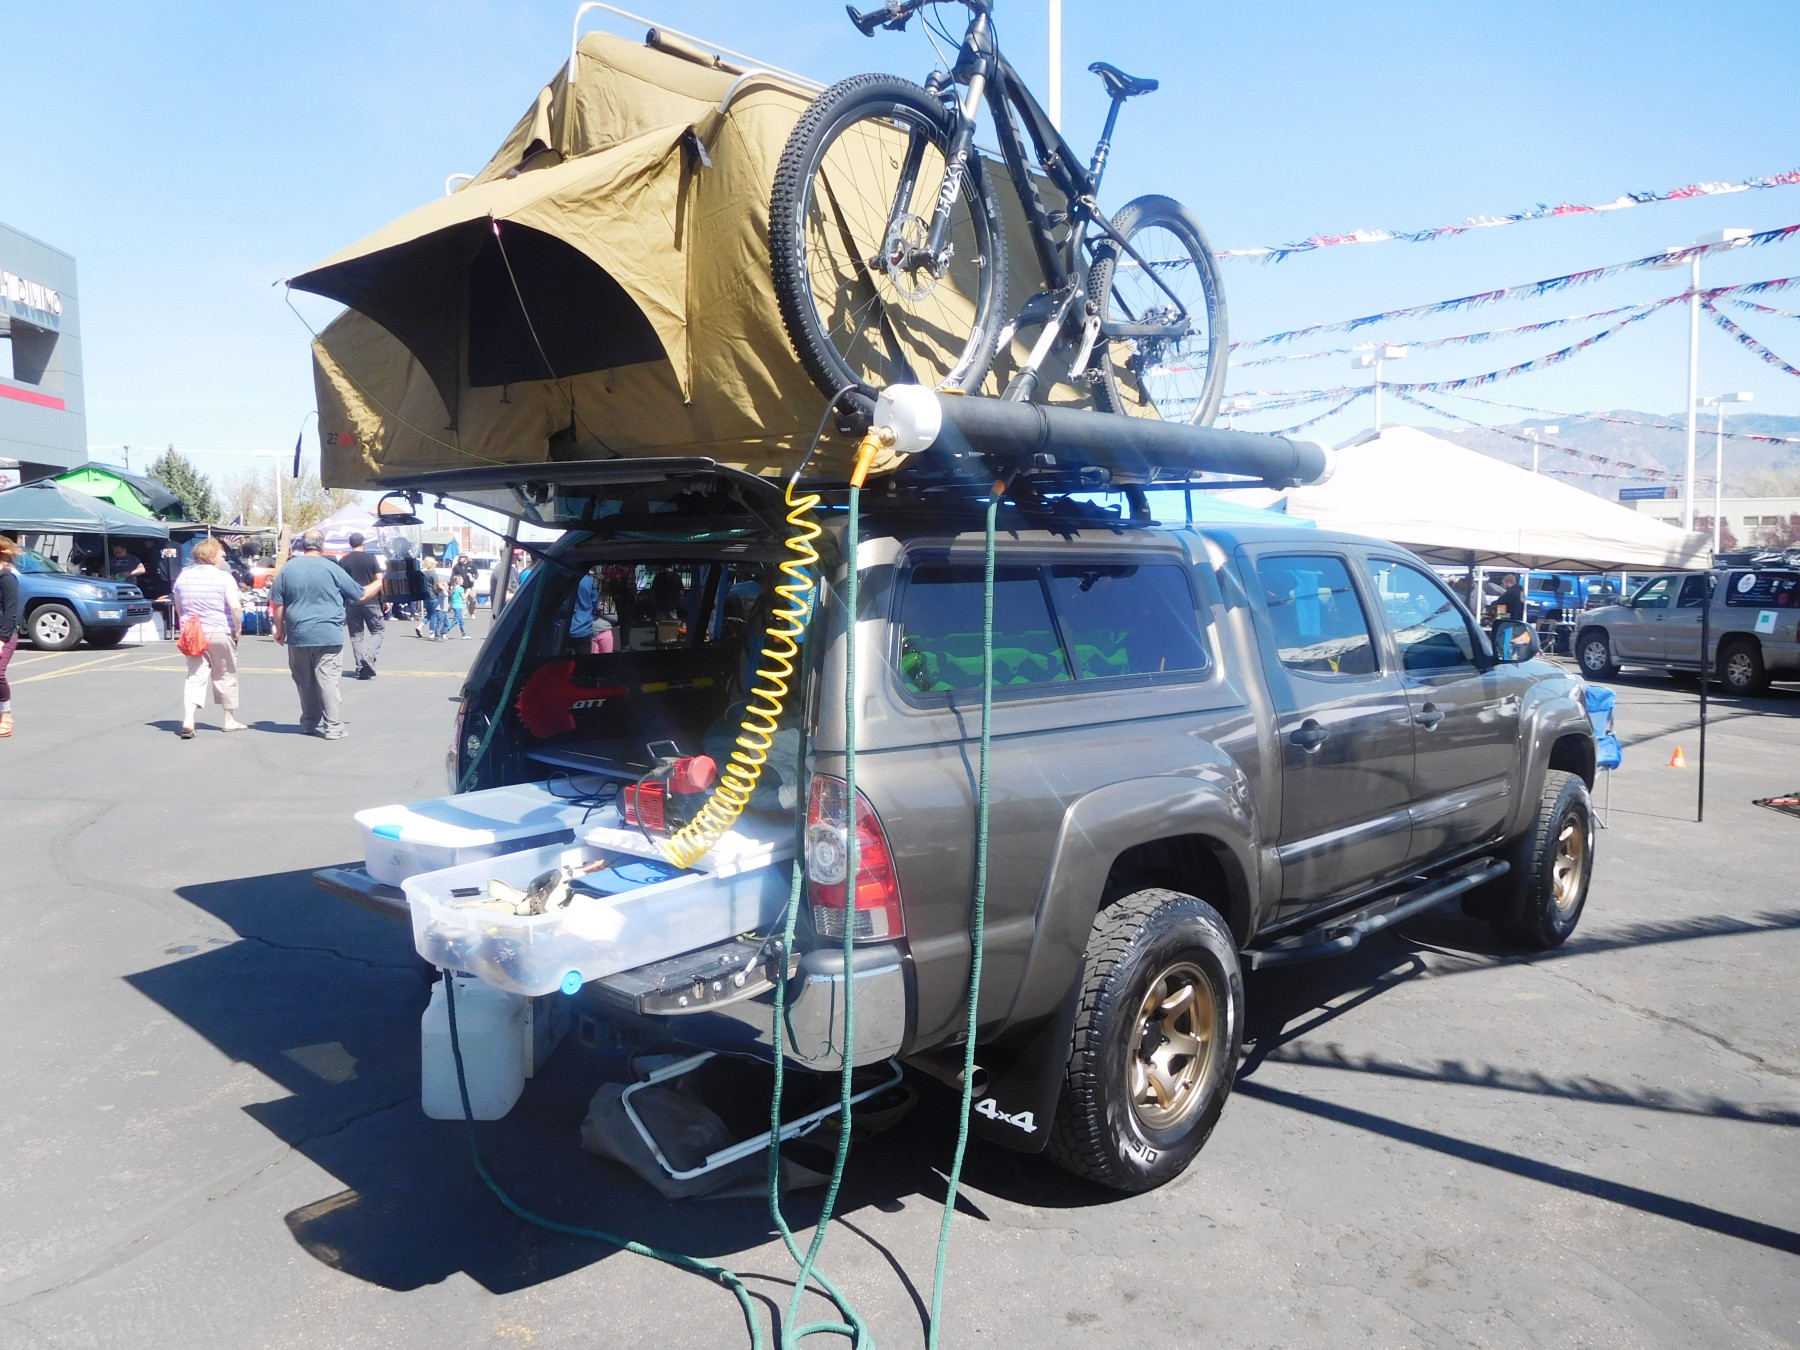
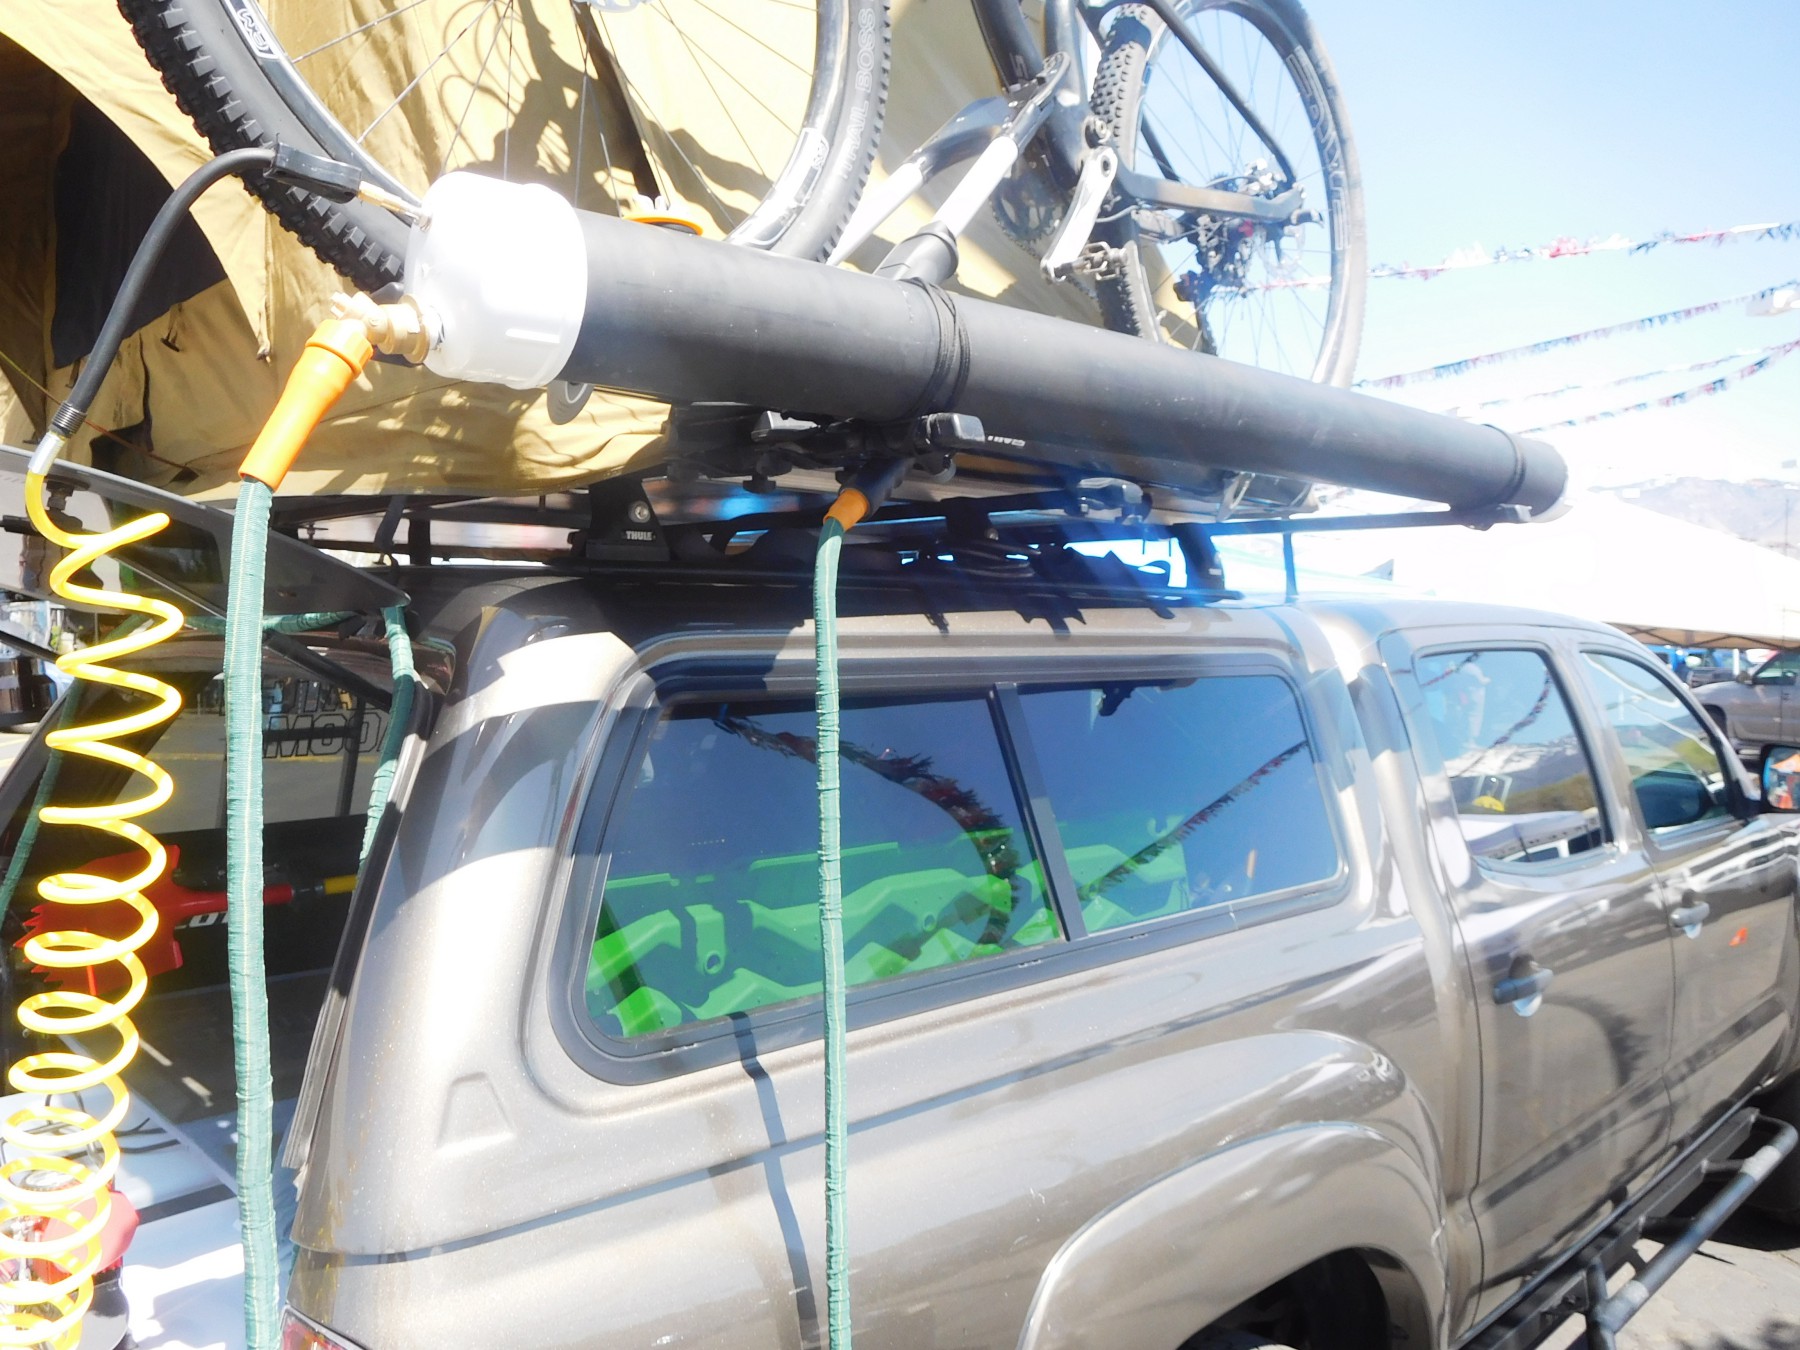
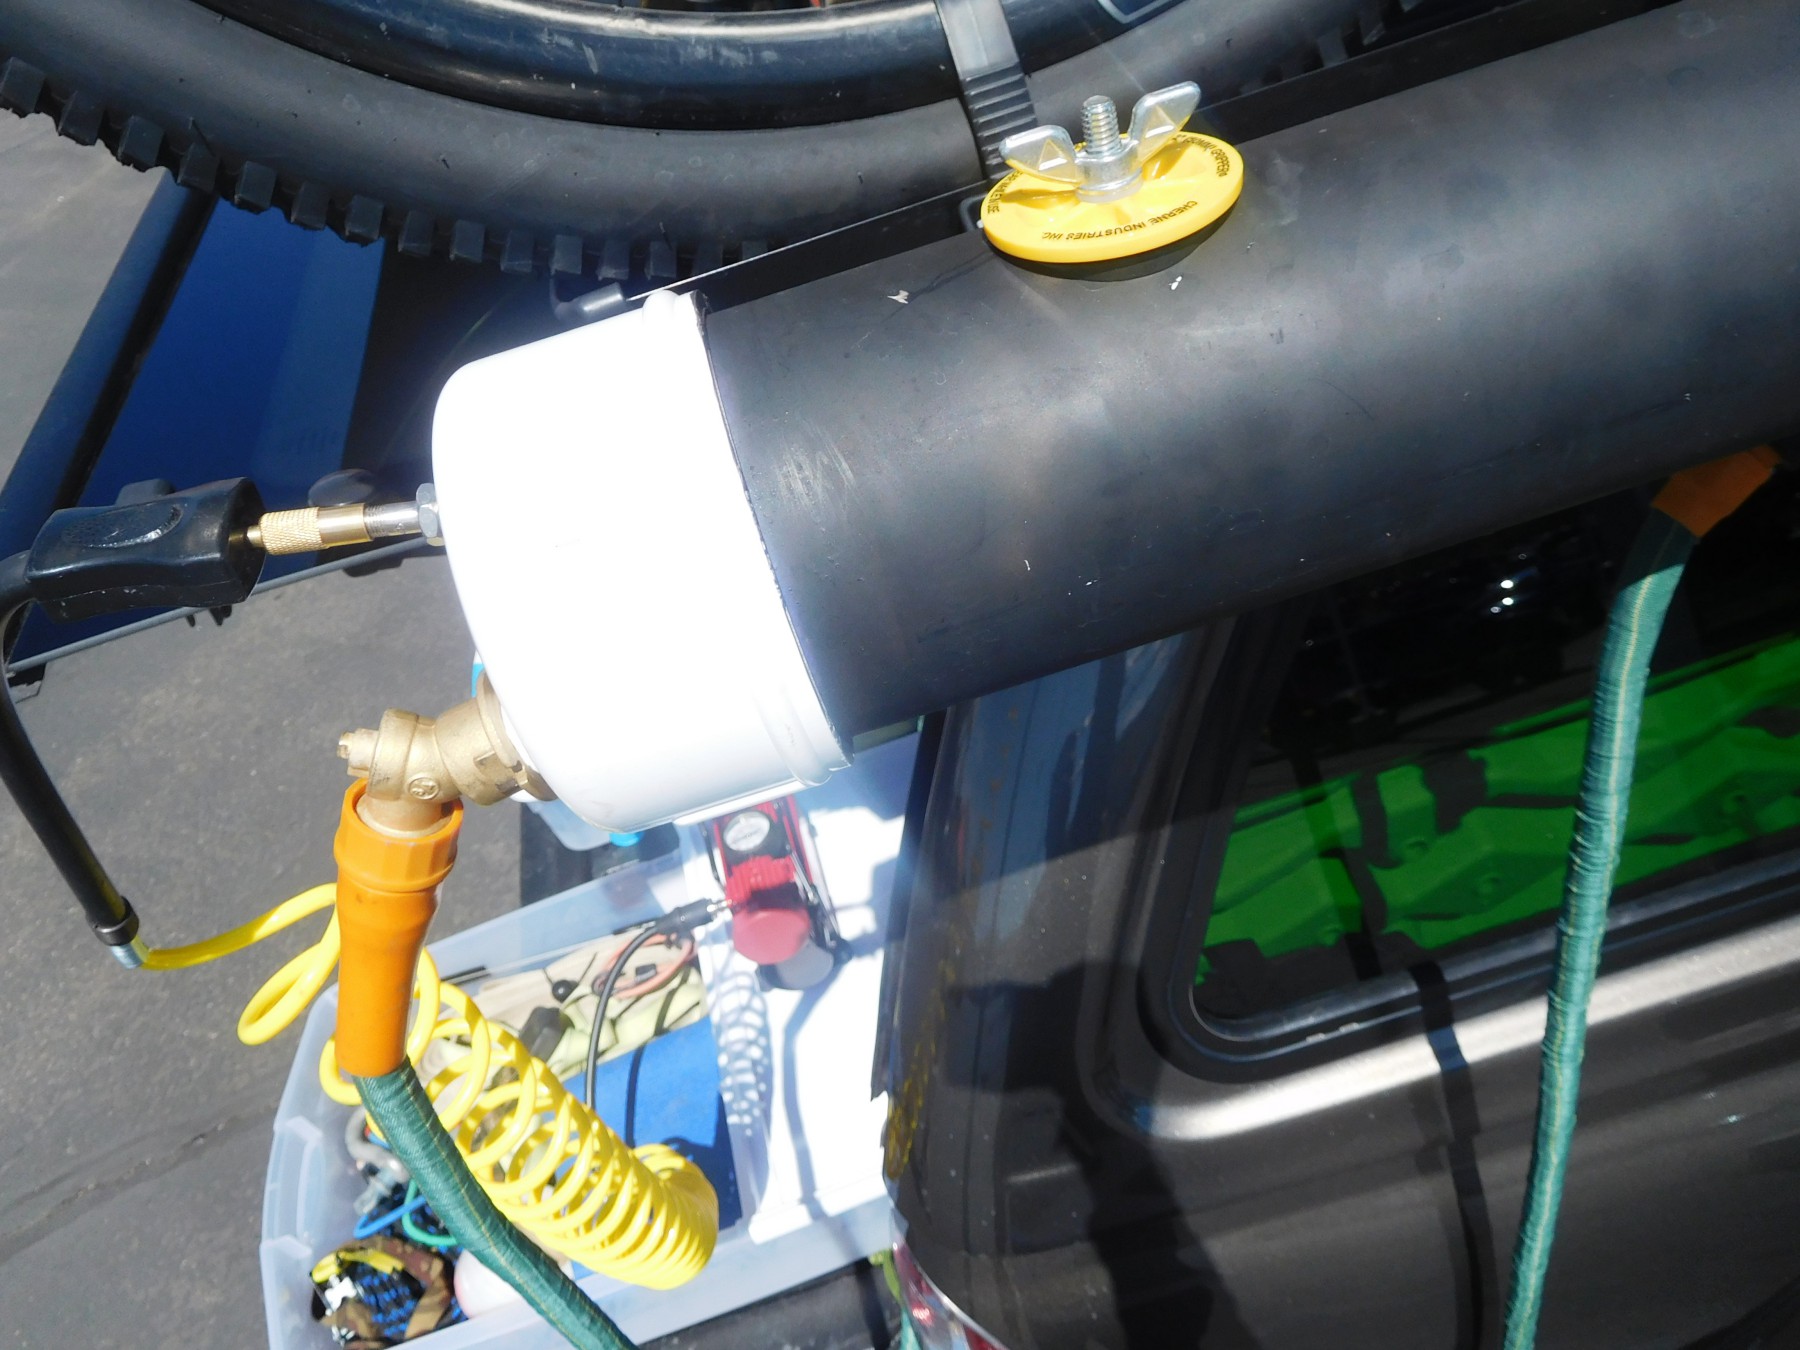
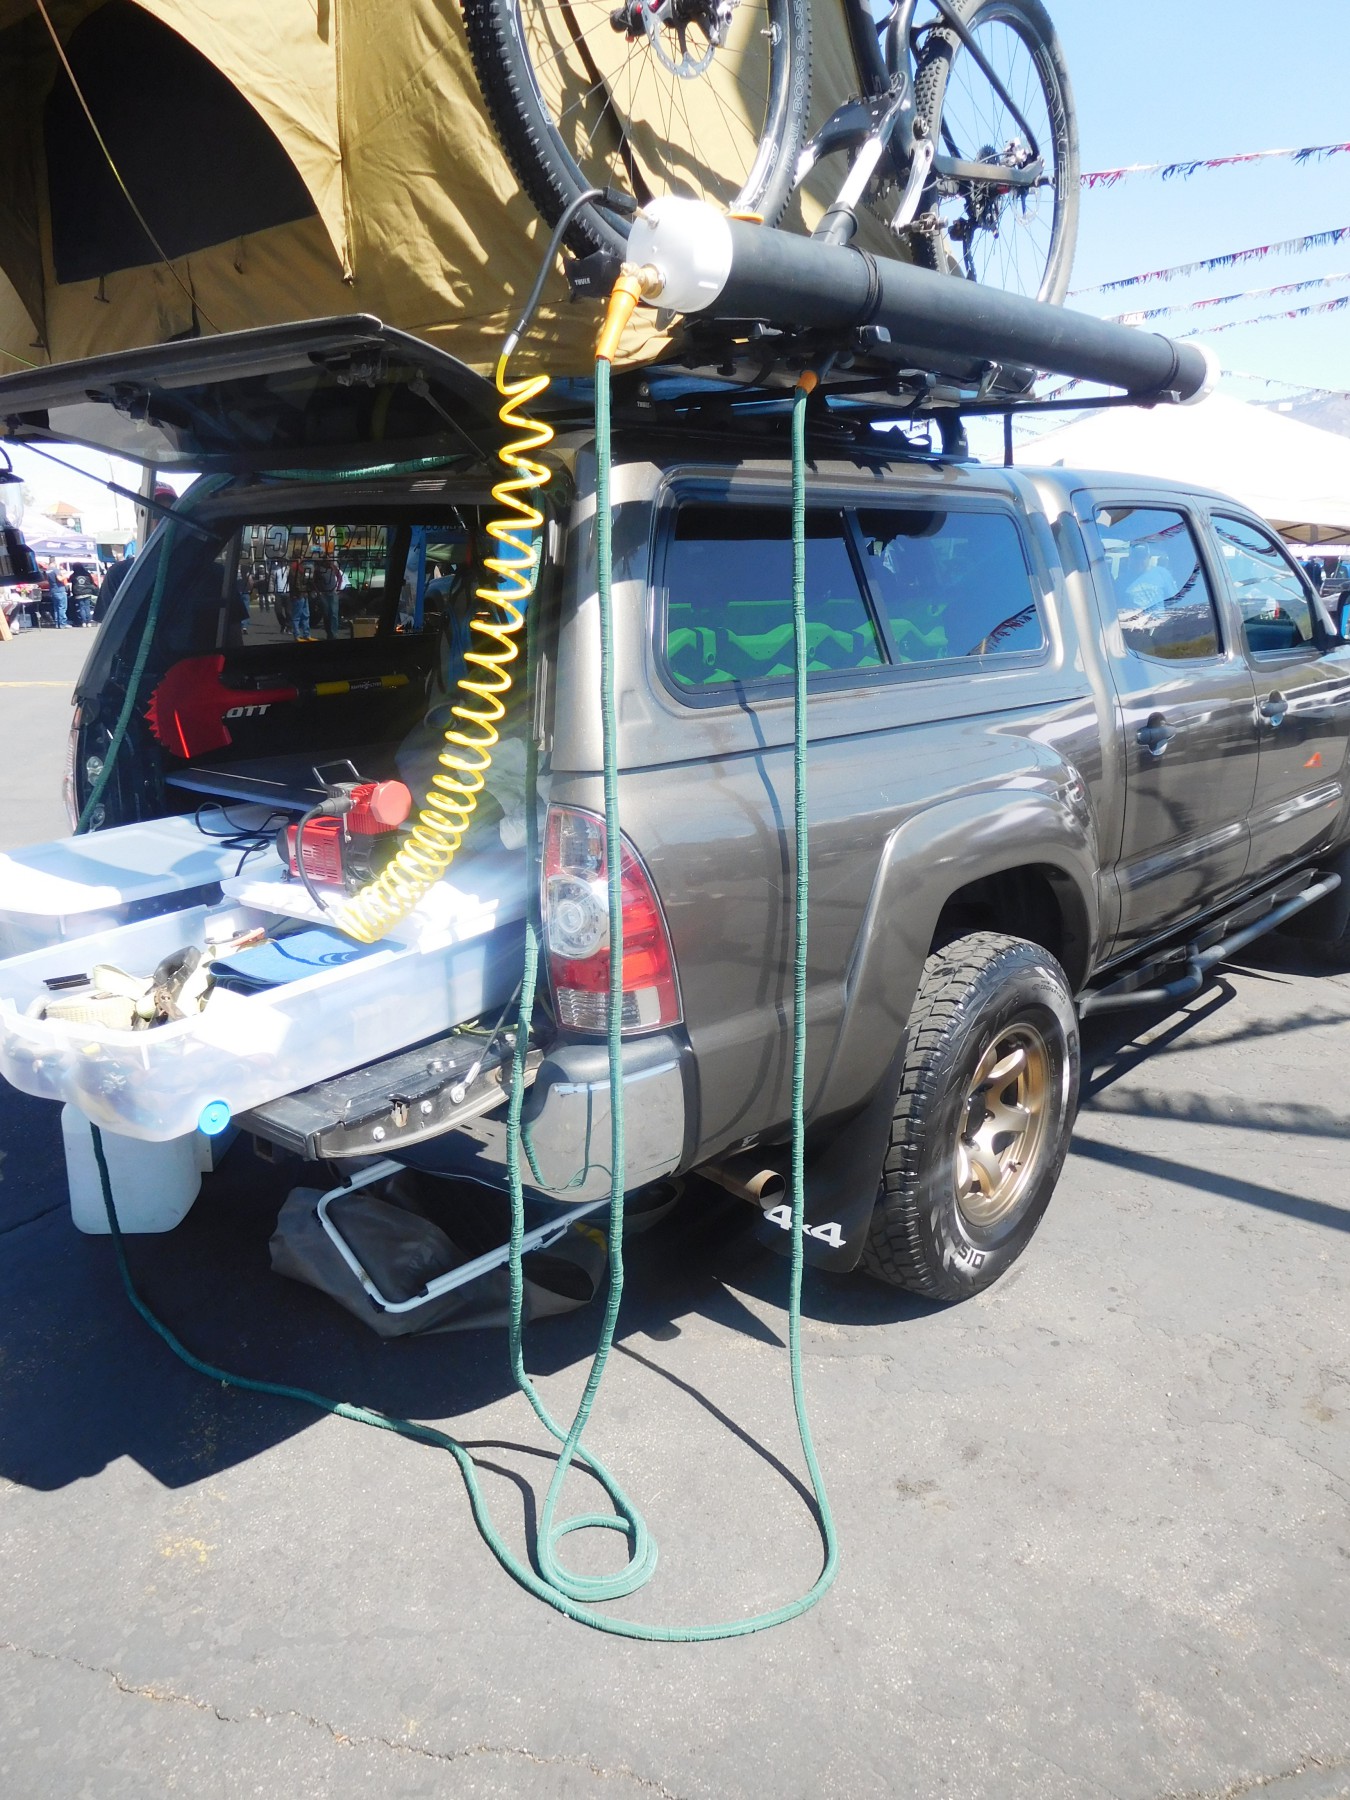
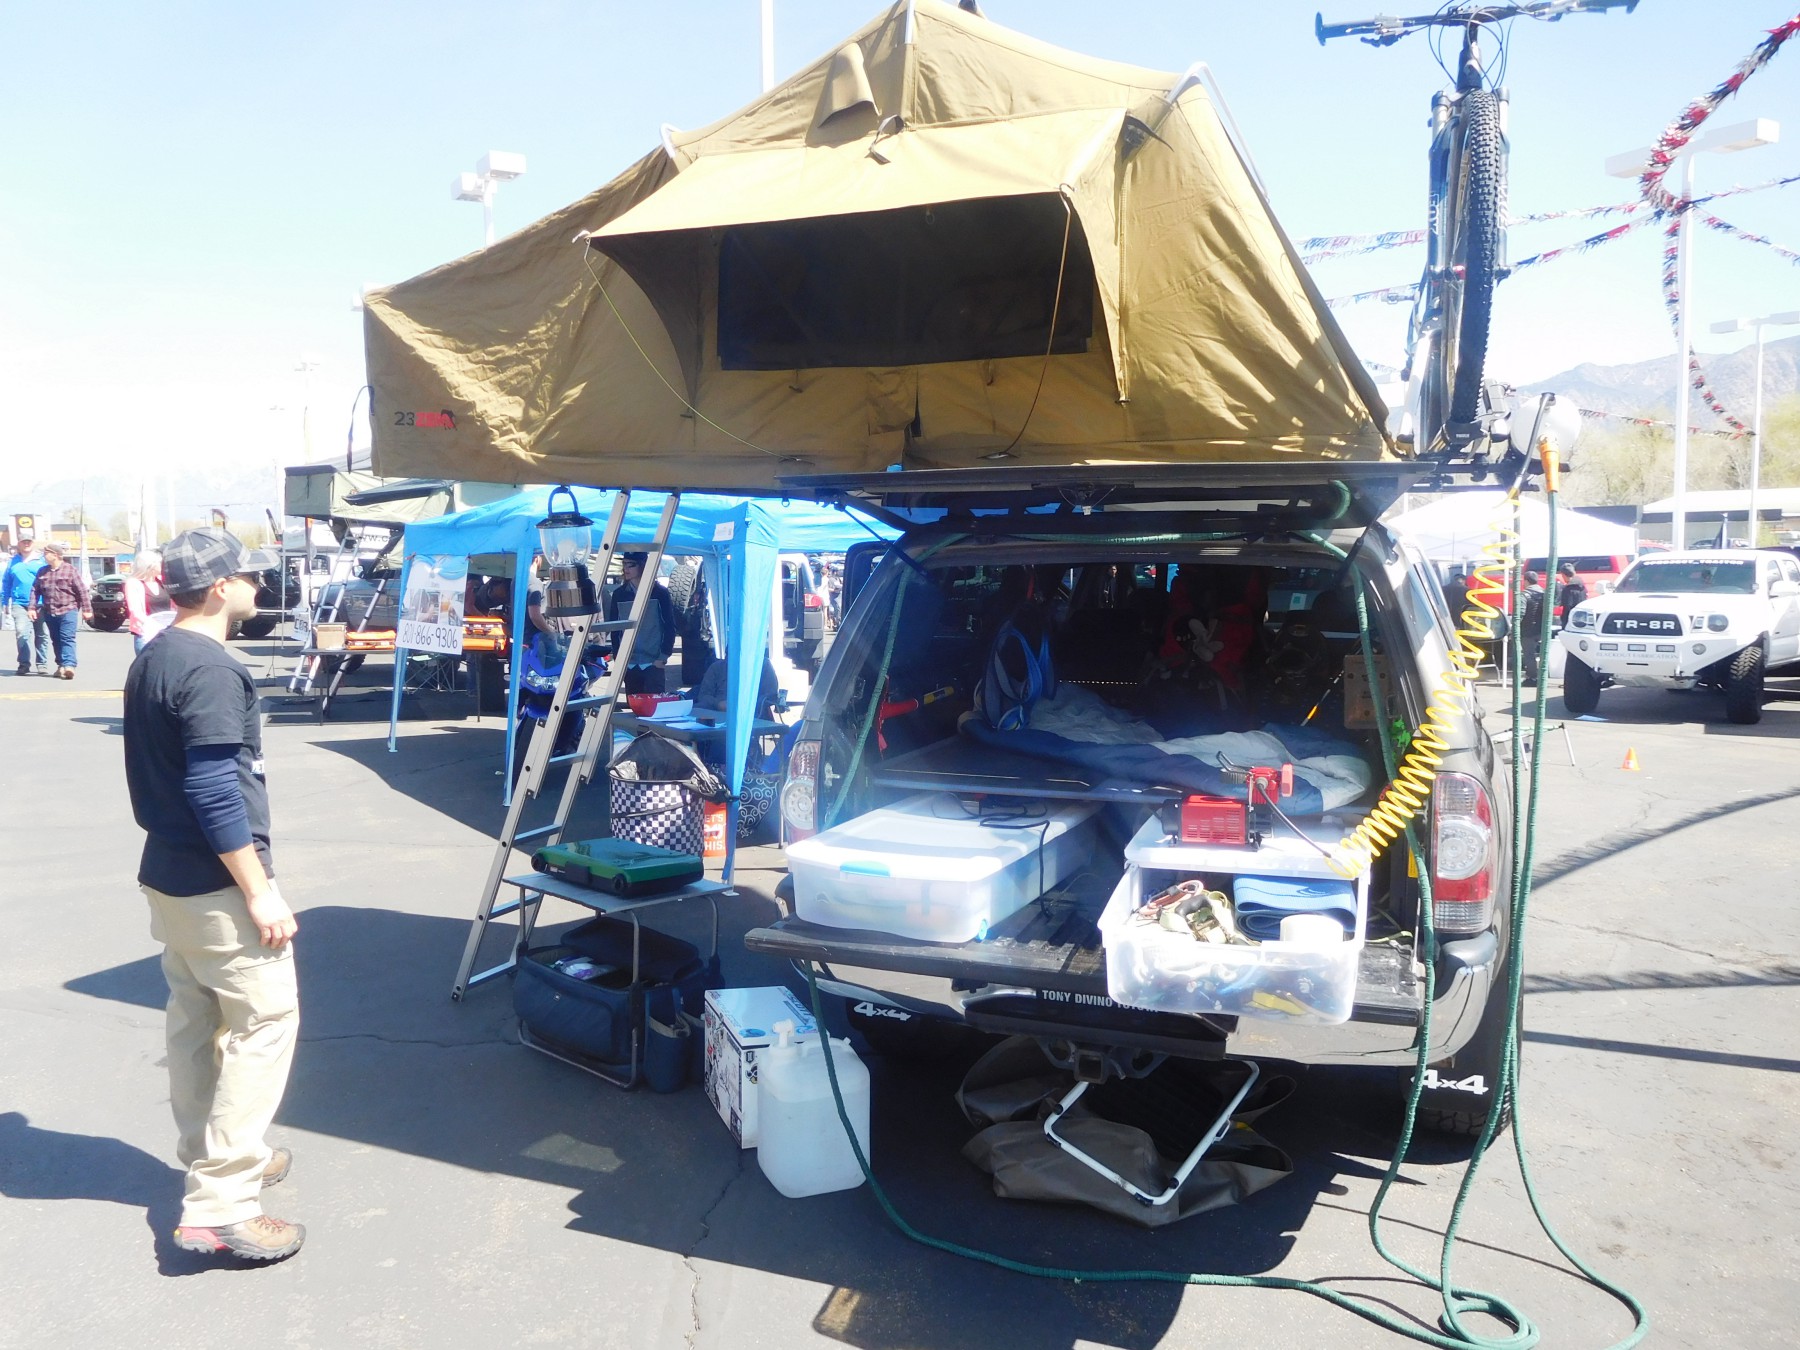
A month or so ago I went to the Utah Toyota Off-Road Expo. It was much smaller than the Salt Lake Off-Road Expo that I went to a week later (and both pale in comparison to Overland Expo West, which is going on right now). Still, there were some great rigs there, mostly 4Runners and Tacomas (no RAV4s, sadly). I noticed on one of the rigs (a Toyota Tacoma with camper shell, roof top tent, bike rack, and more) what looked like a DIY version of the Road Shower, so I went up to talk to the rig’s owner and ask about how he made the shower. Here are some pictures and info:

My Thoughts
Let’s face it, these DIY PVC showers are all kind of ugly. Definitely not as sleek as the Road Shower. But this setup only cost about $50 or $60 versus the Road Shower’s $300. There are lots of videos and other information out there about how to make a PVC shower like this (here are the results for “PVC car shower” on YouTube, and this is probably the best build video I’ve seen), but there are a few things I like about this particular shower. I like that the water fill valve is low-profile and not too much of an eyesore. I’m intrigued by—if still a bit skeptical of—the simple lashing attachment system. And I like the super long hose, though if I were to make a shower like this, it wouldn’t be quite this long.
What are your thoughts?
I don’t know if I’ll ever actually make something like this, but I was excited to see it and figure out the details of how it was made. It works great for him, and I wanted to share some details of the build with you guys.
Note: This blog post contains Amazon affiliate links.
Camping in Paradise! – A Quick SUV Camping/Vandwelling Trip
In this video I head to northern Utah’s Porcupine Reservoir for an overnight camping trip at a fantastic free campsite. I also test out my new inflatable raft, set up my hammock for the first time, and more! (Click here if you can’t see the video below.)
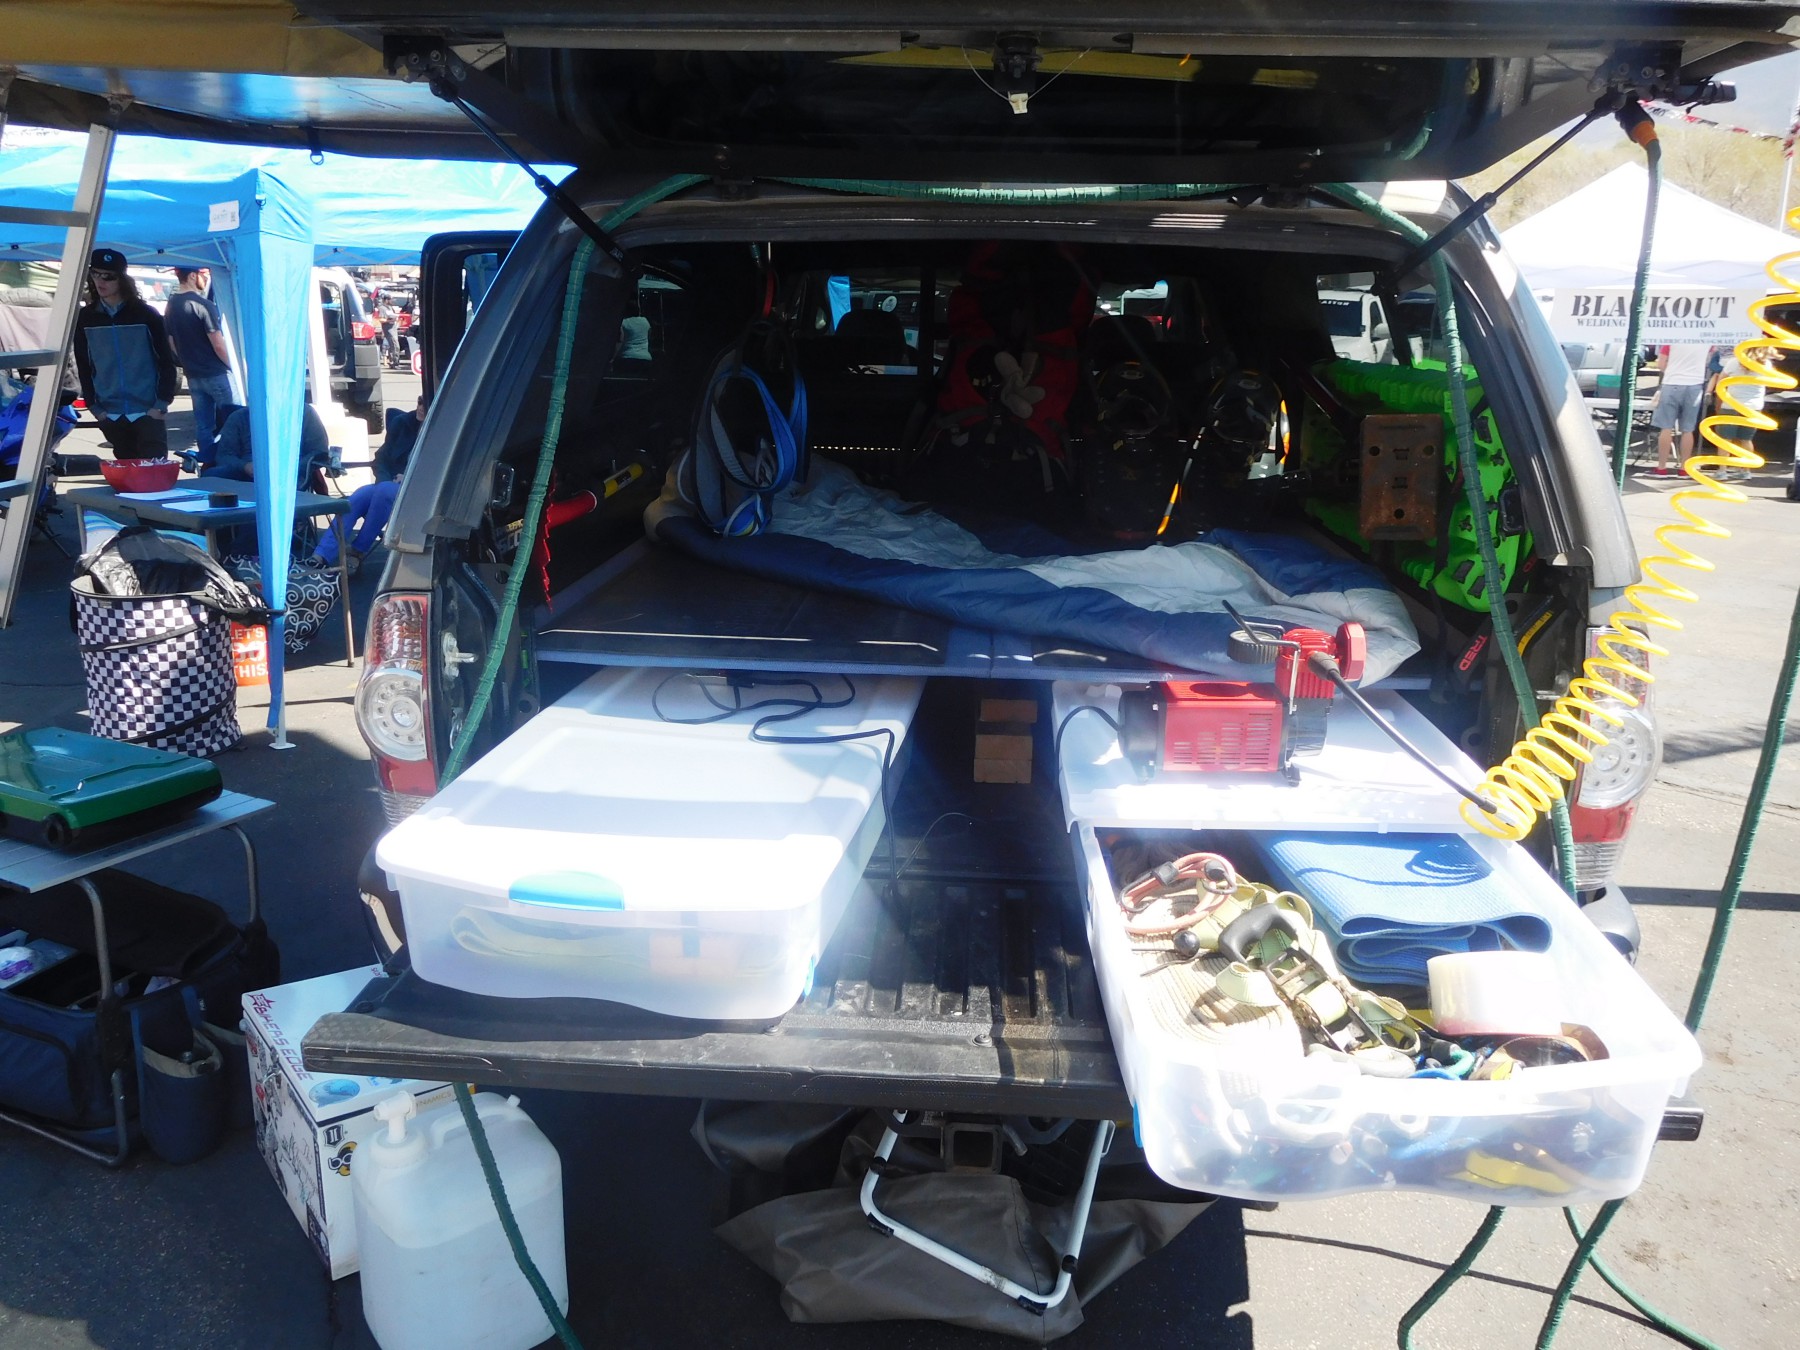
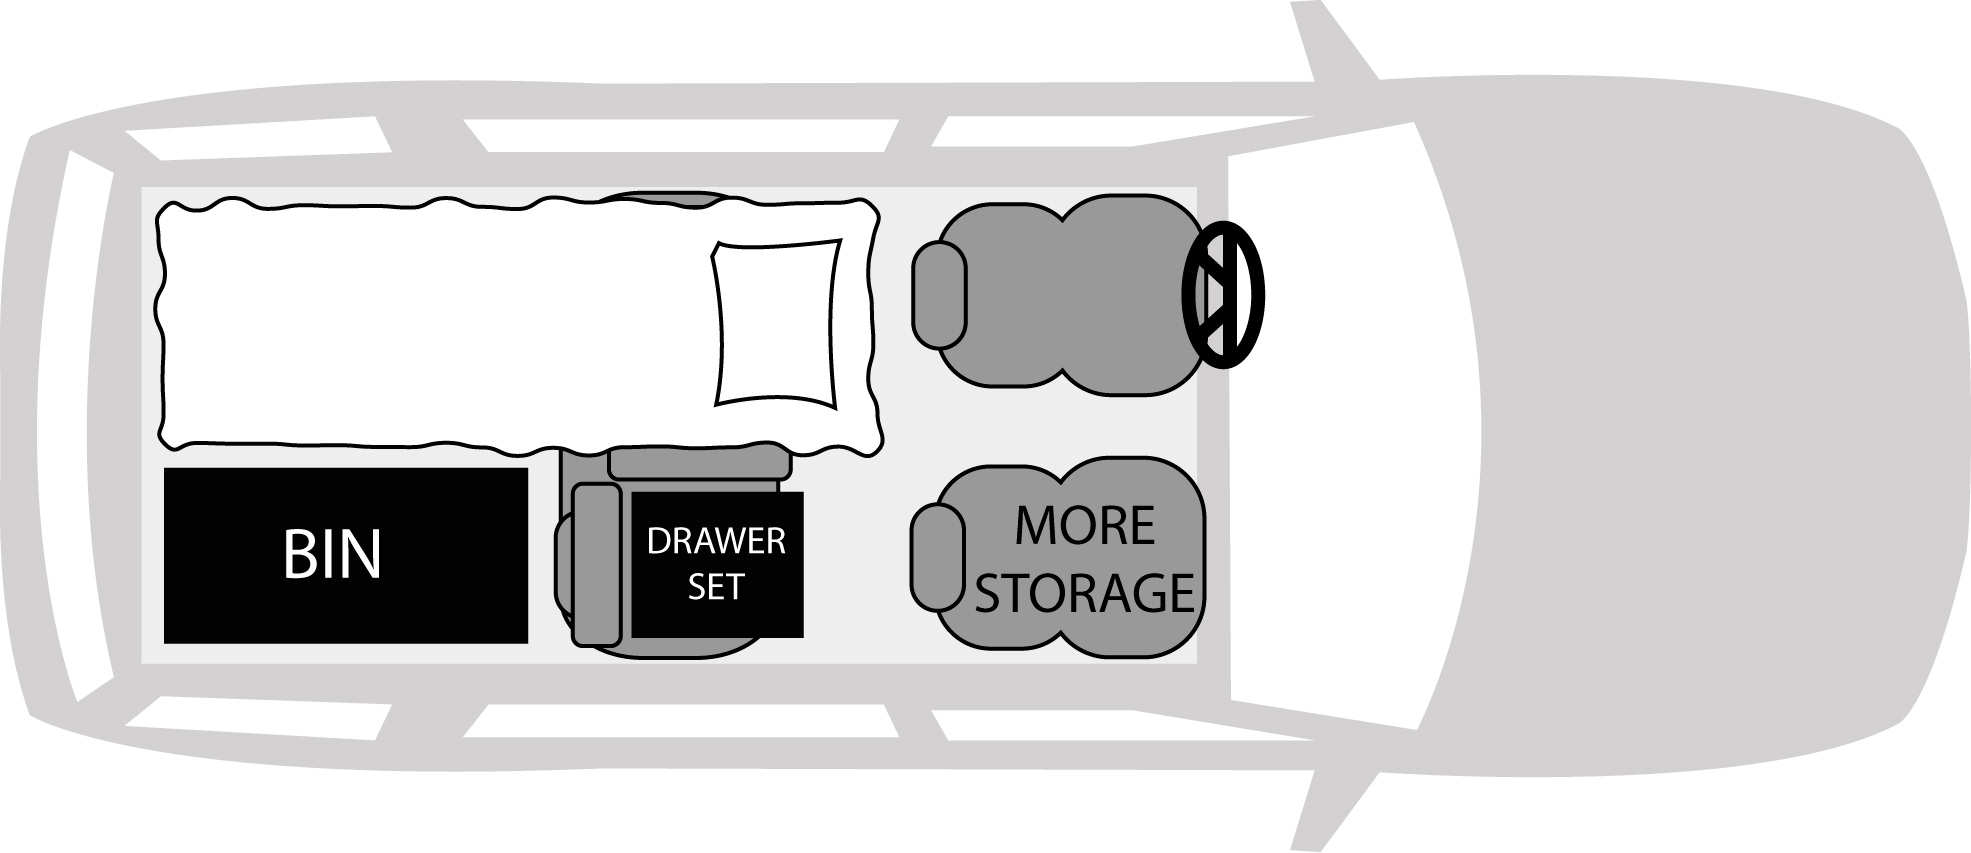
Sleeping and Camping in a 2015 Ford Escape
SUV RVing reader/watcher Ted was kind of enough to send me pictures of his camping setup in a 2015 Ford Escape and give me permission to post them here. Thanks Ted!
In the captions of the images below, you’ll see some of Ted’s comments in quotes and my (Tristan’s) comments not in quotes.
Here’s a rough overhead view of his layout:
Checking Out Roof Top Tents (and More!) for SUV Camping, Vandwelling, etc.
In this video I head to an off-road expo (Salt Lake Off-Road Expo) to see if I can find anything interesting. I do manage to check out a few roof top tents from Freespirit Recreation, Tepui Tents, and Cascadia Vehicle Tents. (Click here if you can’t see the video below.)
Links to some of the things from the video:
- Freespirit Recreation M49 Roof Top Tent
- Freespirit Recreation Extreme Series Canopy (Small)
- Rhino-Rack Base Tent 2500
- Cascadia Vehicle Tents Mt. Denali Extended Stargazer Summit
- Cascadia Tents Standard Pioneer Awning
- Tepui Tents Kukenam XL Ruggedized SKY Roof Top Tent
- BorderLand Trailers
- Trasharoo (Amazon affiliate link)
- RoadShower
- Flycraft Stealth boat
How to Wash Your Clothes By Hand While on the Road or Camping
Last week I published reader Mike’s fantastic set of tips for doing laundry while on the road. Soon after that, I got another great email from Mike that started off with this:
“I realized I did not provide a how-to on laundering items by hand. (Forgot that people might not have a clue as to how to do it.)”
He then proceeded to outline his method of washing clothes by hand. It’s much more systematized—and probably much more effective—than my “throw everything into a bucket of water and knead it for a bit” method. Without further ado, here are Mike’s tips.
What You’ll Need
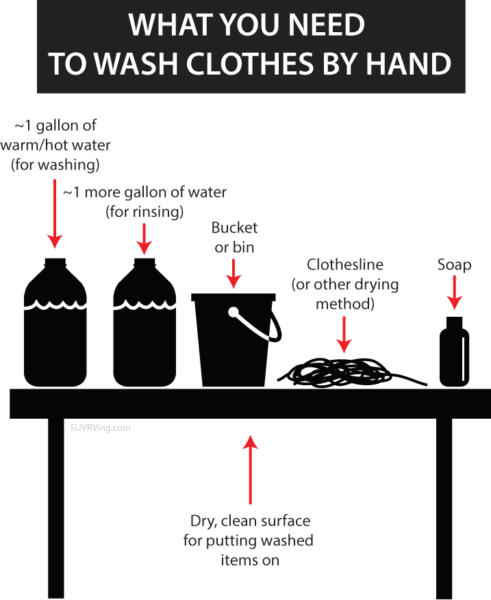
- A gallon or so of warm to hot water (~98 degrees F, skin temperature) for washing the clothes. The exact amount of water you’ll need will depend on how much clothing you have and how dirty the clothing is.
- An additional gallon or so of water for rinsing the clothes. (Warm water is nice but is not necessary.) Again, the exact amount will depend on volume of dirty clothes and how dirty the clothes are.
- One bucket or tub. A collapsible tub like this is great for traveling. (Use the bathroom sink if you’re staying in a hotel room.)
- Clothesline or suitable drying surfaces. A braided clothesline like this is effective and takes up little space.
- Soap (For hand laundry it is best to use a true soap, not a modern detergent. Soap is a little easier on your hands and will leave fabric feeling softer than detergent as residue if any will lubricate fabric fibers rather than stiffen them. Also a gentle soap is easier on your skin if some residue remains in the fabric.)
- Dry, clean surface that you can set your washed items on. [Tristan’s Note: This could be as simple as a clean trash bag on the ground.]
Preparation
Assuming you have only one bucket or tub, you will need to use it for both washing and for rinsing, so you will need to stage your washed items before rinsing. Sort items you wish to launder from cleanest to dirtiest and start washing the cleanest item first. Be prepared to set the washed items aside on a clean surface while still soapy.
Washing Instructions
In a bucket or tub, use about 1 gallon of warm to hot water, adding enough soap to ensure the water feels slippery. Suds are good, but you do not need many. Swish the water around to mix.
One item at a time, work fabric into the soapy mixture. Move it around, squeeze it and so on. Do you best to get the item clean. Usually about 20 seconds to one minute per item is all you need. Gently squeeze out the excess water and set the item aside on a clean dry surface and start washing your next item. If you see the wash water becoming too dirty, you’ll need to either dump it and add new wash water or add some fresh rinse water.
When all your laundry has been washed, it is time to begin rinsing. Dump your wash water and fill your bucket or tub with clean water. Warm water is nice but is not necessary.
Rinsing and Drying
Start rinsing the cleanest items first, the same order as when you were washing the items. This keeps the wash and rinse water the cleanest for the longest amount of time. Again, if you see the water becoming too dirty, add some clean water to the mix or dump it all out and fill the bucket up again with clean water.
Always rinse well. Rinse one item at at time. Squeeze out, but do not wring out, the water from the fabric. After the initial squeeze out, you can wrap the fabric inside a dry bath towel and squeeze or pat dry to absorb more moisture which will help speed drying.
Ease item back into shape and let dry flat, away from direct heat or bright light, or hang the item on your clothesline to dry.
***
Read the rest of Mike’s laundry tips here.
Easy SUV Camper Conversion (RV in a Box!)
I took a break from my usual setup and decided to go on an overnight trip with basically just what I could fit inside a plastic bin. Check out the video below of my “RV in a box” setup for easy SUV camping! (Click here if you can’t see the video.)
Great Tips for Doing Laundry While SUV Camping & Vandwelling
I’ve recently gotten a couple of great emails from a reader named Mike about doing laundry while traveling on the road. My preference is to find a laundromat, but as Mike points out, that is not always possible, and he has tips that I think a lot of people will find useful. With his permission, I’m publishing his emails here (edited and rearranged slightly) for everyone to enjoy and get value from. I’ve also added a few of my own comments. Thanks for the great tips, Mike!
Doing and Drying Laundry
A few years ago I had to travel by car, 33 states in 20 days, staying in motels and hotels. In my case, I was traveling so much, there literally was no time to find and sit in a laundromat which was another reason I chose handwashing of garments in the evening once I was in my hotel room.
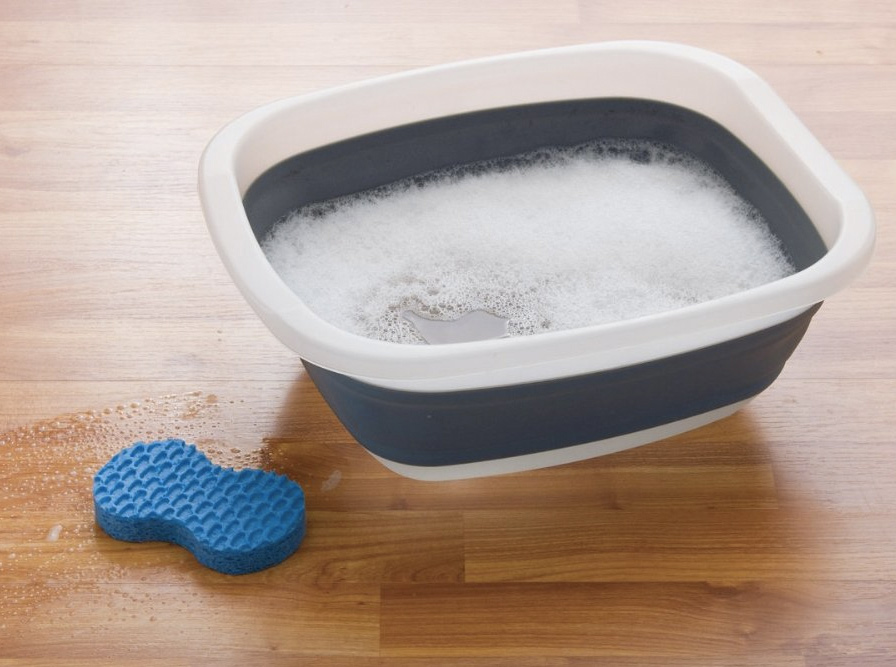
I had 2 sets of clothes and washed items every day or so using a 2 gallon bucket that I carried my laundry equipment in. I think a collapsible tub like this might have been better as a space saver. [Tristan’s Note: A bin like this could, of course, also be used for washing dishes or even muddy shoes.]
Anyway, the best thing ever to help you do hand laundry effectively is a clothesline like this. Light, adaptable, strong, and you do not need clothespins! Can be attached probably a thousand different ways. [Tristan’s Note: Yes, these are great! I’ve used them in the past for my international travels.]
Rinsing is very important when washing any item by hand. Water management would be much harder SUV RVing than in a hotel room for instance, but if only a little bit of soap were used, rinsing would be less rigorous of course.
Natural Soaps
Natural areas often suggest/require something like the following with regard to washing things while on the land. From the National Park Service:
“All soap, including biodegradable soap, should be used and disposed of away from water sources. Carry water 100 feet from the source before washing. This includes washing clothes, dishes, and yourself.”
And following Leave No Trace principles:
“To wash yourself or your dishes, carry water 200 feet away from streams or lakes and use small amounts of biodegradable soap. Scatter strained dishwater.”
I’ve had a small one-person business since 2003 where I import laundry soap from England. It is plain pure soap with no additives and no perfumes and is 100% biodegradable. While Soap Flakes or Liquid Soap Flakes (the products my company imports) can be used for anything including dishes, these soaps are best used as simply soap. As in “wash in soap and water”. Nothing magical, not a miracle cleaner, but very good soap that certainly works well.
I note that both the products above will not harm durable water repellent (DWR) fabrics as the soap is true soap and not detergent.
[Tristan’s Note: I’ve used Dr. Bronner’s for washing clothes and had good results. I like the citrus orange kind.]
Clothing Recommendations
Sounds strange, but silk is super strong and cleans really well with soap and water and dries quickly. Silk undergarments work well when repeated washings are necessary over a period of weeks or a month or so.
All sorts of other special fabrics are great for pants, shirts, socks and so on so as to wash easily and dry quickly while more or less maintaining a good freshly pressed look even when dried on a clothesline.
Here are a few travel clothing sources I have used and recommend:
Years ago I purchased one or two pieces of clothing from all three sources for easy washing and quick drying on the road while maintaining a neat look without ironing and so on.
Easy DIY Travel Shower
A useful cleaning/washing up tip is to take an ice pick—you could also use a deck screw in a pinch—and make 3 to 5 tiny holes in the cap of a throwaway water bottle; you know, those bottles with drinking water in them that you buy by the case. An ice pick makes a faster, easier, and nicer hole than slowly twisting a deck screw, but both will work. Careful use of a knife blade point will work as well. I’ve tried knife blade “slots” poked into a bottle cap, and they will work too, but I find ice pick holes to be the nicest and best for me.
Leave the cap on the bottle and gently press the ice pick through to make some holes in the top of cap.
You can do the same with 1L or 2L (used) plastic soft drink bottles filled with water, and use them for washing hands, even showering. It is so simple.
You can save the various caps you made for quicker future use and use a bottle’s original bottle cap to reseal any unused water remaining in the bottle.
By varying the number, placement and size of the holes you make in the cap, you can control the flow of the water leaving the bottle. Well, that and the amount of pressure you use when squeezing the bottle.
Sort of tip and squeeze and wash your hands or whatever, and with a 2L bottle or two or more 2L bottles, even take a decent shower.
In the past I have purchased those special caps (like this) that fit on plastic Coke bottles, with extra air holes in the cap, however the water comes out awfully fast, too fast for me. If the amount of water used is not an issue, using these special caps feels like you are taking regular shower at home. Great flow.
But just poking holes in a regular plastic bottle cap that comes standard on the bottle, works plenty well for me. Doesn’t use nearly as much water either.
I haven’t seen this bottle cap idea anywhere. Figured it out myself. As simple as it is though, I’m sure others have probably done something like this also. I just think it is really cool. Like you don’t even need pumps or battery powered showers or special anything. Plastic bottles in various sizes are everywhere. Cheap or free and reusable. True, it is not as fancy as those special sink or shower gadgets, but you do not use much water this way either. Plus you can make the kind of water flow the way you want.
[Tristan’s Note: I have done something similar, and it does work well. I used an awl when I did it, but I imagine a very small drill bit would also work. The Mud Dog Travel Shower, SpaTap, and Bottle Blasters are other options if you don’t want to make your own. I haven’t tried any of them, but the Bottle Blasters one looks particularly appealing because it doesn’t have a million holes in it, has two different sides to fit different sizes of bottles, and is cheap ($8.99 for a 3-pack).]
A Simple and Easy DIY Faucet
If you need a small steady flow of water to wash both hands at once, sort of like using a sink at home, you can rest a bottle of bottled water on a rag, stick, rock, table edge or whatever, pointing the bottle’s opening downhill a bit and then slightly loosening the regular cap (no holes in it) let the water dribble or trickle out.
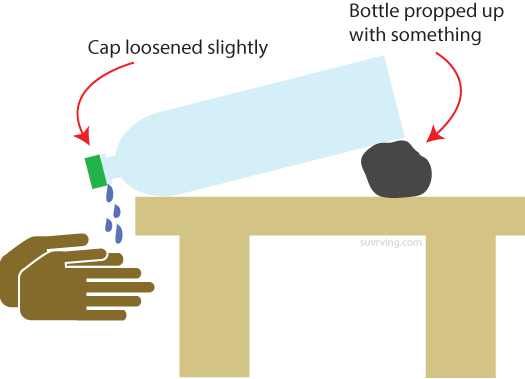
Wash your hands under the dribbling water as if you were washing your hands in a sink. Turn the cap as if you are opening or closing a faucet tap.
Even a small but constant dribbling amount of water can wash your hands quite well and this method uses almost no water in the process.
***
See also Mike’s other tips about how to actually wash and rinse clothes by hand.
[Note: This blog post contains Amazon affiliate links.]